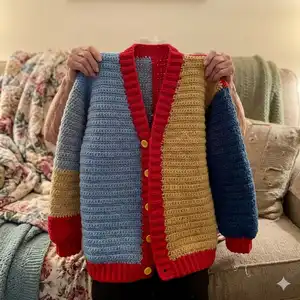
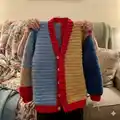
Make a bright, cozy colorblock oversized cardigan with this beginner-friendly written pattern. You will work simple stitches and assemble panels and sleeves to create a customizable, statement cardigan. The design allows for flexible color layouts and easy sizing adjustments so you can make it your own. Follow step-by-step photos and clear instructions to finish a comfy, wearable piece.
Progress Tracker
0% Complete
— Front Panels :
Front Panel 1 :
Using your color of choice: Step 1. Chain 35 (39, 43, 47, 51, 55).
Step 2 :
Skip 2ch then hdc on the 3rd ch from the hook.
Step 3 :
Hdc on each ch until you reach the end of the row. You should have a total of 33 (37, 41, 45, 49, 53) hdcs.
Step 4 :
Ch 2. Flip your work then hdc on the same st. Hdc on each of the next sts until you reach the end of the row.
Step 5 :
Repeat Step 4 until you make a total of 24 (26, 28, 30, 32, 34) rows.
Info :
You will now start working on the upper part of the cardigan. To do the V-shape you will start making the alternating decrease - non-decrease rows.
Step 6 :
Ch 2. Flip your work then hdc on the same st. Hdc on each of the next sts until you reach the last 2 sts. For the last 2 sts, make an hdc2tog (decrease row).
Info :
To make an hdc2tog, yarn over, insert hook into the stitch, yarn over and pull up a loop (3 loops on the hook), yarn over, insert hook into the next stitch, yarn over and pull up a loop (5 loops on the hook), yarn over and pull through all 5 loops on the hook.
Step 7 :
Ch 2. Flip your work then hdc on the same st. Hdc on each of the next sts until you reach the end of the row (non-decrease row).
Step 8 :
Ch 1. Flip your work then make an hdc2tog on the first 2 sts. Hdc on each of the next sts until you reach the end of the row (decrease row).
Step 9 :
Repeat steps 7-8 until you make a total of 18 (20, 22, 24, 26, 28) rows starting from the row where you placed the stitch marker. Include the row with the stitch marker when counting.
Step 10 :
After the last hdc on the last row, ch 1 and fasten off. If you ended the row on the outer side of the panel (the one with a straight edge), leave a tail that is 3x longer than the length of the last row of the front panel. If you ended the row on the inner side of the panel (the one with the V-shape), leave a tail long enough for weaving.
Front Panel 2 :
Using your color of choice: For the lower half of the front panel 2, repeat steps 1-5 of Front Panel 1. You will now start working on the upper part of the cardigan. To do the V-shape you will start making the alternating decrease - non-decrease rows.
Step 6 :
Ch 1. Flip your work then make an hdc2tog on the first 2 sts. Hdc on each of the next sts until you reach the end of the row (decrease row).
Info :
Put a stitch marker on your hdc2tog to remind you which side you are going to do the hdc2tog. The stitch marker will also help you count the rows for the upper part of the cardigan.
— Sleeves :
Cuff Ribbing :
Using your color of choice: Step 1. Chain 10.
Step 2 :
Hdc on the 3rd chain from the hook. Hdc until you reach the end of the row. You should now have a total of 8 hdcs.
Step 3 :
Ch 2. Flip your work. Do a BLOhdc until you reach the end of the row. Make sure you have a total of 8 hdcs. To do a BLOhdc, insert your hdc on the back loop only of each st.
Step 4 :
Repeat step 3 until you make a total of 12 (13, 14, 15, 16, 17) rows or until the length of the cuff ribbing when stretched covers your entire wrist. Make sure you are comfortable. Some materials stretch less so you might want to add a few more rows.
Step 5 :
Now you will attach both ends of the cuff ribbing by doing a sl st on the inner loops only (see images for reference).
Step 6 :
Once you reach the end of the row, make 2sc on the 1st hdc post then 1 sc on the next hdc post.
Step 7 :
Place alternating 2sc then 1 sc on each of the next hdc posts until you reach the end. When you reach the end of the row, sl st on the st before the 1st sc that you created. End of the row.
Info :
Put a stitch marker on the seam to mark the underarm area and to align the sleeve later when attaching to the body panels.
Sleeve Body :
If you are using the same yarn that you used for the cuff: Ch2 then dc on the same st (then go to Step 2). If you are using a color different from the cuff: Step 1. Insert the hook into any st in the row. Sl st. Ch2 then dc on the same st.
Step 2 :
2dc on the next st. Do the alternating 1dc and 2dc on each of the next sts until you reach the end of the row. Sl st on the 1st dc of the row. End of the row.
Step 3 :
Ch2. Dc on the next st then 2 dc on the next st.
Step 4 :
Do the alternating 1dc and 2dc on each of the next sts until you reach the end of the row. If you ended your row with 1dc, add 2dc on the same stitch where you placed the ch2 at the start of the row (see images). Sl st on the 1st dc of the row. If you ended your row with 2dc, add 1dc on the same stitch where you placed the ch2 at the start of the row. Sl st on the 1st dc of the row.
Step 5 :
Ch2. DC on the same st. 1dc on each of the next 2 sts. Then 2dcs on the next st.
Step 6 :
Place 1dc into each of the next 3 sts then 2dcs on the next st. Repeat this step until you reach the end of the row. Sl st on the 1st dc of the row.
Step 7 :
Ch2. DC on the next st then 1 dc on each of the next sts until you reach the end of your row. Add another dc on the same stitch where you placed the ch2 at the start of the row. Sl st on the 1st dc of the row.
Step 8 :
Ch2. Dc on the same st then 1 dc on each of the next sts until you reach the end of the row. Sl st on the 1st dc of the row.
Step 9 :
Repeat steps 7-8 until you reach your desired sleeve length.
Step 10 :
After the last dc on the last row, ch 1, cut the yarn leaving a tail with a length that is equal to 4x the length of your front panels. You will use this tail later when you attach the different panels together.
— Back Panel :
Design 1: Horizontal Layers :
NOTE: Identify how you want to layout your colors first, as well as how you want to match it with the front panels and sleeves. To make sure that the rows of the back panel will match with the rows of the front panel, start working from the bottom, all the way up.
Using your color of choice :
Step 1. Chain 76 (84, 92, 100, 108, 116). Hdc on the 3rd chain from the hook. Hdc on each of the next sts until you reach the end of the row.
Step 2 :
Ch 2. Flip your work then hdc on the same st. Hdc on each of the next sts until you reach the end of the row.
Step 3 :
Repeat Step 2 until you reach your desired length for that color. Cut the yarn and fasten off.
Step 4 :
To start with your new color, create a slip knot with your new yarn color, sl st on the st where you ended.
Step 5 :
Ch2. Flip your work then hdc on the same st. Hdc on each of the next sts until you reach the end of the row.
Step 6 :
Repeat Step 5 until you reach your desired length for that color. Ch1, cut the yarn and fasten off.
Design 2: Colorblock Pattern :
For this design, you are basically doing the same steps for Design 1 except you create 2 separate back panels and sew them together.
Using your color of choice :
Step 1. Chain 39 (43, 47, 51, 55, 59). Hdc on the 3rd chain from the hook. Hdc on each of the next sts until you reach the end of the row.
Step 2 :
Ch 2. Flip your work then hdc on the same st. Hdc on each of the next sts until you reach the end of the row.
Step 3 :
Repeat Step 2 until you reach your desired length for that color. Cut the yarn and fasten off.
Step 4 :
To start with your new color, create a slip knot with your new yarn color, sl st on the st where you ended.
Step 5 :
Ch2. Flip your work then hdc on the same st. Hdc on each of the next sts until you reach the end of the row.
Step 6 :
Repeat Step 5 until you reach your desired length for that color. Ch1, cut the yarn and fasten off.
Info :
Once you have created the two halves of your back panel, you have to connect them using the mattress stitch (see Doing the Mattress Stitch section).
— Doing the Mattress Stitch :
Info :
The mattress stitch is like tying your shoelaces, you work from side to side, inserting the laces from the bottom going up. Align the rows that you want to connect. Select the yarn color that you want to use. Work facing the correct side of the panels (correct side = outside).
Step 1 :
Cut a yarn with a length equal to 3x the length of your back panel.
Step 2 :
Using your tapestry needle, insert the yarn through the first stitch on the right panel from the bottom going up. Leave enough end (1-2 inches) for weaving.
Step 3 :
Then Insert the yarn through the first stitch on the left panel from the bottom going up.
Step 4 :
To secure your first stitch, insert the yarn once more through the first stitch on the right panel from the bottom going up. Then to the first stitch on the left from the bottom going up. You can make a single knot to make sure that the ends are secured.
Info :
From this point forward, work on the outermost post of each row (for rows where the outermost stitch is the ch2, work on the ch2). When inserting the needle, remember to always get at least 2 loops from the outermost post to make sure that the connection will be sturdy and secure.
Step 5 :
Insert the needle to the outermost post of the opposite panel, from the bottom going up, do the same to the other panel. Do this until you reach the post on the last row. Make sure that the rows match while you are stitching them together.
Step 6 :
To end the mattress stitch, you will basically do the same steps as when you started. Insert the yarn through the first stitch on the right from the bottom going up. Insert the yarn through the first stitch on the left from the bottom going up. Repeat again from * to secure your last stitch. Make a single knot then fasten off.
— Attaching the Panels and Sleeves :
Attaching the front and back panels together :
You will start by attaching the top portion of the front panel to the top portion of the back panel through the mattress stitch. Make sure that the rows match. Work facing the correct side of the panels (correct side means the side that should be facing outside).
Step 1 :
Start sewing from the outer edge going to the middle part of the cardigan by doing steps 1-3 under the "Doing the Mattress Stitch" section (page 16).
Step 2 :
For the next stitches, continue stitching from side to side, inserting from the bottom going up, until you reach the last stitch in your front panel.
Step 3 :
Make a single knot then fasten off. Do the same for the other side. You have now created the shoulder part of your cardigan.
Attaching the sleeve to the body :
For this part, you will use mattress stitch to attach the sleeves to the front and back panel then down to attach the sides of the cardigan. Work facing the correct side (correct side means the side that should be facing outside). Note: if you are more comfortable using sc or any other stitch when connecting panels together, you may also use those.
Step 1 :
Fold your sleeves in such a way that the seam will be positioned at the bottom (underarm area).
Step 2 :
Using your stitch markers, mark the topmost portion of the sleeves, then mark the rows in your front and back panel where you want to attach the sleeves. Make sure that the position in the front is similar to the position in the back panel. e.g. If you put the stitch marker on the 20th row of the front panel, make sure to also put the stitch marker on the 20th row of the back panel.
Step 3 :
Attach the sleeves to the front panel first by doing the mattress stitch. You will work from the underarm area all the way up to the shoulders. Since you left a long tail for the sleeves, you will start the mattress stitch by inserting the needle to the outermost post of your marked row in the front panel. Continue doing the mattress stitch all the way up. Take note of the topmost stitch of the sleeve where you placed the stitch marker. This stitch should be connected to the topmost portion of the cardigan.
Info :
Tip: When attaching the sleeve, 1 post in the panel is not necessarily equal to 1 stitch in the sleeve. Sometimes you have to make 2 mattress stitches in a single post in the front panel to match the stitches in the sleeves.
This colorblock oversized cardigan pattern gives you the freedom to create bold, wearable art with simple stitches and clear construction. Personalize the color layout, try horizontal stripes or asymmetric colorblocks, and make it truly yours. Whether you're gifting it or keeping it, this cardigan brings joy and a cozy, handmade touch to any outfit. 🧶✨