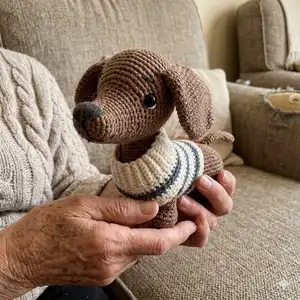
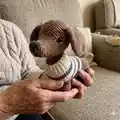
Make an adorable Yumi the Dachshund amigurumi with this clear, photo-assisted crochet pattern. You will create a small, lovable dachshund complete with floppy ears, a stitched nose, and an optional striped sweater. The pattern includes full round-by-round instructions, assembly tips, and finishing details so you can confidently crochet your own handmade companion.
Progress Tracker
0% Complete
— Head :
Info :
All details are crocheted in continuous spirals, without joining the rounds. You can use a stitch marker to keep track of your rounds. Start with color A
Round 01 :
6 sc into the center of magic adjustable ring, pull tail to close the ring (6)
Round 03 :
(sc, inc) 6x (18)
Round 04 :
(2sc, inc) 6x (24)
Round 05-07 :
(3) sc in each st around (24)
Round 08 :
4sc, (dec, sc) 2x, dec, 12sc (21)
Round 09 :
14sc, (inc, 2sc) 2x, inc (24)
Round 10-11 :
(2) sc in each st around (24)
Round 12 :
(7sc, inc) 3x (27)
Round 13-14 :
(2) sc in each st around (27)
Round 15 :
(8sc, inc) 3x (30)
Round 16 :
sc in each st around (image 1.1) (30)
Round 17 :
4sc, (inc, sc) 4x, inc, 17sc (35)
Round 18 :
5sc, (inc, 2sc) 4x, inc, 17sc (40)
Info :
In next rnd we should mark points for eyes:
Round 19 :
4sc, with a contrast thread mark here a point for the first eye (image 1.2), 19sc, mark here a point for the second eye, 17sc (40)
Round 20 :
(inc, 3sc, inc, 7sc) 2x, inc, 3sc, inc, 11sc (46)
Round 21 :
sc in each st around (46)
Round 22 :
sc, (inc, 4sc, inc, 8sc) 2x, inc, 4sc, inc, 11sc (image 1.3) (52)
Round 23-29 :
(7) sc in each st around (52)
Info :
If you use safety eyes, it is the best moment to place them. Place them in points we marked earlier in rnd 19. (image 1.4)
Round 30 :
(11sc, dec) 4x (48)
Round 31 :
3sc, (dec, 6sc) 5x, dec, 3sc (42)
Round 32 :
(5sc, dec) 6x (36)
Info :
Start stuffing the head with filling material. And continue stuffing it during crocheting.
Round 33 :
2sc, (dec, 4sc) 5x, dec, 2sc (30)
Round 34 :
(3sc, dec) 6x (24)
Round 35 :
sc, (dec, 2sc) 5x, dec, sc (18)
Round 36 :
(sc, dec) 6x (12)
Info :
Fasten off, leaving a long tail. Using tapestry needle, weave the yarn tail through the front loop of each remaining stitch and pull tight to close. Weave in the yarn end. (image 1.5)
— EARS (make 2) :
Round 01 :
ch10, sc in 2ndch from hook and remaining 7sc, inc in the last st, turn and continue on the other side of a chain 8sc, inc in the last st (image 2.1) (20)
Round 02-03 :
(2) sc in each st around (20)
Round 04 :
(9sc, inc) 2x (22)
Round 05 :
(10sc, inc) 2x (24)
Round 06 :
(11sc, inc) 2x (26)
Round 07 :
(12sc, inc) 2x (28)
Round 08-13 :
(6) sc in each st around (28)
Round 14 :
(12sc, dec) 2x (26)
Round 15 :
(11sc, dec) 2x (24)
Round 16 :
(10sc, dec) 2x (22)
Round 17 :
(9sc, dec) 2x (20)
Round 18 :
(8sc, dec) 2x (18)
Round 19 :
(7sc, dec) 2x (16)
Round 20 :
Crochet 3sc, then flatten an ear and line up stitches, 8sc through both sides to the end (image 2.2) (8)
Info :
Fasten off, cut the yarn, leaving a long tail for sewing. (image 2.3)
Info :
Sew ears to the both sides of a head between 22 and 31 rnds of a head. The distance between ears - 15sc along the 23rd rnd of a head. The distance between ear and eye - 3sc up from the eye. (image 2.4, 2.5, 2.6)
Info :
Take a piece of color A yarn and tapestry needle, insert needle from under the head (level of 25th rnd) (image 2.7) and bring it out right next to the eye, and insert it back on the opposite side of an eye (image 2.8, 2.9), then bring it back down under the head, one stitch from the entry. Repeat with the second eye, inserting the needle in the same points from the bottom (image 2.10). Then properly pull all yarn ends and, keeping yarn tension, tie a knot of all yarn ends, hide an ends. (image 2.11, 2.12)
Info :
Take a piece of black yarn and embroider the nose between 1 and 7 rnds of a head's top part. The size of a nose - 5sc in height, 3sc - the bottom side, 7sc - the top side. (image 2.13, 2.14) Embroider the line from the bottom of a nose to the 3 rnd of the head's bottom part. Then embroider a smile to the both sides from the line between 3 and 8 rnds of a head. (image 2.15, 2.16)
Info :
With the black yarn embroider the eyebrows, placing them between 20 and 22 rnds over eyes (make 2 loops of yarn). The length of the eyebrow - 1sc, the height - 2sc. (image 2.17)
Info :
With the white yarn embroider the lines under the eyes (image 2.17).
— LEGS (make 4) :
Round 01 :
ch5, sc in 2ndch from hook and remaining 2sc, 3sc in the last st, turn and continue on the other side of a chain 3sc, 3sc in the last st (image 3.1) (12)
Round 02 :
(3sc, 3inc) 2x (18)
Round 03 :
This rnd work with back loops only (image 3.2) sc in each st around (18)
Round 04 :
sc in each st around (18)
Round 05 :
sc, 6dec, 5sc (12)
Round 06 :
sc in each st around (12)
Round 07 :
2sc, 3inc, 7sc (15)
Info :
The next rnd will be different for each leg.
For a back right leg (Round 08) :
3sc, (inc, sc) 2x, inc, 7sc. Make slst. Fasten off, cut the yarn. Attach a pink marker on the 3rd st from the last slst. (image 3.3)
For a back left leg (Round 08) :
3sc, (inc, sc) 2x, inc. Make slst. Fasten off, cut the yarn. Attach a green marker on the 3rd st from the last slst.
For a front left leg (Round 08) :
3sc, (inc, sc) 2x, inc, sc. Make slst. Fasten off, cut the yarn. Attach a yellow marker on the 3rd st from the last slst.
For a front right leg (Round 08) :
3sc, (inc, sc) 2x, inc, 7sc. Make slst. Fasten off, cut the yarn. Attach a blue marker on the 3rd st from the last slst. (image 3.4)
— Body :
Info :
We start crocheting body from tummy. Use color A
Round 01 :
ch23, sc in 2ndch from hook and remaining 20sc, 3sc in the last st, turn and continue on the other side of a chain 21sc, 3sc in the last st (48)
Round 02 :
(21sc, 3inc) 2x (54)
Round 03 :
Make 3sc in next stitches, now it is the start point of a rnd. (image 4.1) Now we should join tummy to legs. But firstly crochet 16sc in a tummy, then put together the tummy and the back right leg (start from the pink marker): 4sc through both details (leg and tummy) (image 4.2), 3sc only in a tummy (image 4.3). Next we are adding the back left leg (start from green marker): 4sc through both details, 16sc only in a tummy. Now we take the front left leg and join it to the tummy (start from yellow marker): 4sc through both details, 3sc only in a tummy (image 4.4). And finally join the front right leg (start from blue marker): 4sc through both details. So, we closed the circle and got back to the start of a rnd. Mark it and take off all the other markers from legs.
Round 04 :
Continue crocheting by outer circle (image 4.5): inc, 14sc, inc in a tummy, 14sc in the first leg, 3sc in a tummy, 14sc in the second leg, inc, 14sc, inc in a tummy, 14sc in the third leg, 3sc in a tummy, 14sc in the last leg. (98)
Round 05-10 :
(6) sc in each st around (98)
Info :
Stuff legs with filling material.
Round 11 :
18sc, dec, 5sc, dec, (3sc, dec)3x, 5sc, dec, 25sc, dec, 13sc, dec, 7sc (90)
Round 12 :
sc in each st around (90)
Round 13 :
20sc, (dec, 2sc) 2x, dec, sc, (dec, 2sc) 2x, dec, 28sc, dec, 9sc, dec, 8sc (82)
Round 14 :
sc in each st around (82)
Round 15 :
18sc, dec, 3sc, dec, 5sc, dec, 3sc, dec, 27sc, dec, 5sc, dec, 9sc (76)
Round 16 :
14sc, (dec, 2sc) 2x, dec, 3sc, (dec, 2sc) 2x, dec, 18sc, dec, 13sc, dec, 4sc (68)
Round 17 :
17sc, (dec, sc) 3x, dec, 40sc (64)
Round 18 :
17sc, 4dec, 39sc (60)
Info :
Slightly stuff the body with filling material (image 4.6)
Round 19 :
2sc (image 4.7), skip 34 st (image 4.8), 24sc (26)
Round 20 :
sc in each st around (26)
Round 21 :
2dec, 6sc and turn (image 4.9), then crochet in opposite direction (image 4.10) 4sc, 6hdc, 4sc and turn, 24sc in the main direction of rounds (image 4.11), slst (image 4.12) (24)
Info :
Fasten off, cut the yarn, leaving a long tail for sewing. Stuff the body with filling material. (image 4.13)
Info :
With the piece of color A yarn sew the gap on the back. We skipped 34 stitches, so we should count 17 skipped stitches and this will be a start point of sewing (image 4.14). Sew together every two stitches, which are opposite to each other. (image 4.15, 4.16)
Info :
Tightly stuff the body with stuffing material. If the body is a little twisted, just twist it by the hands in opposite direction, straightening it. (image 4.17, 4.18)
— Tail :
Round 01 :
6 sc into the center of magic adjustable ring, pull tail to close the ring (6)
Round 02 :
(sc, inc) 3x (9)
Round 03-17 :
(15) sc in each st around (9)
Info :
Fasten off, cut the yarn, leaving a long tail for sewing. Do not stuff it. (image 5.1)
— Assembling :
Info :
Sew the tail to the back side of a body between 15 and 17 rnds, centering it regarding to the back legs. (image 6.1, 6.2)
Info :
Sew the head to the body. Mark points for sewing from the bottom side of a head: point A - 20th rnd, point C - 28th rnd, B and D points - 23rd rnd and leave 6sc distance between them (image 6.3). Pin the head to the neck at the marked points. (image 6.4)
Info :
Sew the head to the neck, add some stuffing material, if needed. (image 6.5, 6.6)
— Sweater :
Info :
It starts from an elastic band, which is crocheted horisontally. It is made in back and forth rows. The turning ch1 at the end of each row does not count as a st. Start with color B
Round 01 :
ch8, sc in 2ndch from hook and remaining 6sc, ch1 and turn (7)
Round 02-42 :
(41) 7sc through back loop only (image 6.1), ch1 and turn (6)
Info :
Line up two ends of a band and join them together with slst. (image 6.2, 6.3) Turn it inside out and continue crocheting in a circle (image 6.4, 6.5):
Round 01 :
ch1, sc in each row of a band (image 6.6), slst in the 1st ch of a rnd (42)
Round 02 :
ch1, sc in each st around, slst in the 1st ch of a rnd (42)
Round 03 :
ch1, sc in each st around, slst in the 1st ch of a rnd (42) (Change to color C)
Round 04 :
ch1, (6sc, inc) 6x, slst in the 1st ch of a rnd (48)
Round 05 :
ch1, sc in each st around, slst in the 1st ch of a rnd (48) (Change to color B)
Round 06 :
ch1, (7sc, inc) 6x, slst in the 1st ch of a rnd (54)
Round 07 :
ch1, sc in each st around, slst in the 1st ch of a rnd (54)
Round 08 :
ch1, 14sc, ch7 (image 6.7), skip next 10 stitches (image 6.8), 6dc, ch7, skip next 10 stitches (image 6.9), 14sc, slst in the 1st ch of a rnd (48) (Change to color C)
Round 09 :
ch1, 14sc, 7sc along the chain, 6dc, 7sc along the chain, 14sc, slst in the 1st ch of a rnd (48)
Round 10-12 :
(3) ch1, sc in each st around, slst in the 1st ch of a rnd (48) (Change to color B)
Round 13 :
ch1, (3sc, inc) 2x, 7sc, dec, 3sc, dec, 4sc, dec, 3sc, dec, 7sc, (inc, 3sc) 2x, slst in the 1st ch of a rnd (48) (Change to color C)
Round 14 :
ch1, sc in each st around, slst in the 1st ch of a rnd (48)
Round 15 :
ch2, 48dc through back loop only, slst in the 2nd ch of a rnd (48)
Info :
Fasten off, cut the yarn, weave in end. (image 6.10) Put the sweater on the dog.
This sweet Yumi the Dachshund pattern walks you through every round to create a lovable handmade companion. 🐶
Follow the clear rounds, photos, and assembly notes to shape the head, ears, legs, body, and tail with confidence. ✨
Make a cozy striped sweater to personalize your dachshund and gift it to someone special. 🧶