🧢 Beautiful ✨ Detailed πŸ’ Adorable

Bobby The Pencil Amigurumi Pattern

Bobby The Pencil Amigurumi Pattern
4.5β˜… Rating
5-7 Hours Time Needed
2.4K Made This
βœ‚οΈ

Intermediate Level

Ideal for those with basic crochet experience, featuring slightly more advanced stitches and techniques to expand your skills.

⏱️

Weekend Treat

Takes 5-7 hours, making it an enjoyable project to finish over a couple of days.

🧸

Cute Companion

An adorable friend to cherish, handcrafted with love to bring comfort and joy for years to come.

About This Bobby The Pencil Amigurumi Pattern

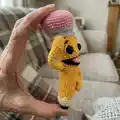
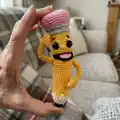
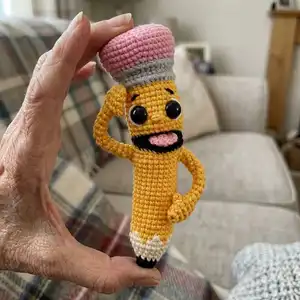
This pattern creates Bobby the Pencil, a playful amigurumi character with a smile, tongue, expressive eyes and posable arms. It uses cotton/semi-cotton yarn and small hooks to create tidy stitches and crisp color changes. The design includes step-by-step rounds for every part plus clear assembly and finishing notes to help you complete a polished toy.

Bobby The Pencil Amigurumi Pattern crochet pattern - detailed view of completed project

You will crochet the inner mouth, tongue, body, topper and two arms, then attach eyes and sew the details. The final toy measures about 15 cm tall when made with the recommended materials.

Why You'll Love This Bobby The Pencil Amigurumi Pattern

I absolutely love this pattern because it turns a simple pencil idea into a personality-filled tiny friend. I enjoy the color-change details around the tip and topper β€” they make the piece really pop. The pattern includes little finishing touches (like the tongue and embroidered whites in the eyes) that bring Bobby to life. I also love that the arms are wired so you can pose him, which adds playful interaction to the finished toy. Making Bobby is satisfying and quick enough to finish in a weekend, but detailed enough to feel like a real project.

Bobby The Pencil Amigurumi Pattern step 1 - construction progress Bobby The Pencil Amigurumi Pattern step 2 - assembly progress Bobby The Pencil Amigurumi Pattern step 3 - details and accessories Bobby The Pencil Amigurumi Pattern step 4 - final assembly and finishing

Switch Things Up

I love how easy it is to customize Bobby by changing colors β€” try pastel shades for a soft look or neon colors for a modern twist.

I often make a mini version by using finer yarn and a smaller hook to create a keychain-friendly pal.

I sometimes swap the plastic eyes for embroidered eyes for a softer, child-safe option.

I like to add tiny accessories like a crocheted bow tie, glasses, or a mini scarf to give Bobby character.

If you want a posable body, add thin flexible wire inside the body as well as in the arms, then wrap it securely to avoid poking.

Change the mouth expression by moving the mouth placement up or down, or make a small smile instead of the open mouth for a different personality.

Try using variegated yarn for the body to give Bobby a textured, colorful streaked look without changing colors manually.

I sometimes embroider freckles or stitches on the topper to create a worn pencil look β€” it adds a lot of charm.

For durability, I reinforce arm attachment points with an extra row of sewing stitches and hide the ends inside the body.

I always experiment with different eye sizes; a slightly larger eye makes Bobby look more whimsical, while smaller eyes look tidier.

Common Mistakes & How to Fix Them

βœ— Skipping stitch markers during rounds with increases and decreases causes lost stitch counts; use a marker at the start of each round and move it every round to maintain correct counts. βœ— Trying to overstuff early distorts shaping and makes sewing parts difficult; stuff gradually as you go, checking shape and firmness frequently to maintain smooth curves. βœ— Changing colors without securing and hiding ends properly can create loose loops; carry the yarn neatly or weave and secure the color changes as shown to keep the surface tidy. βœ— Not checking hook size against your tension will produce the wrong size and loose stitches; test gauge and adjust to 1.75-2 mm hook as recommended for crisp amigurumi stitches. βœ— Forgetting to leave long tail ends for sewing results in awkward finishing; always leave long ends after small parts (mouth, tongue, arms) so you can sew them securely without adding new tails.

Bobby The Pencil Amigurumi Pattern

Make a charming Bobby the Pencil amigurumi you can cuddle or gift. This playful pencil character features color changes, a cute mouth and tongue detail, and posable wire arms for extra personality. The pattern guides you step-by-step through crocheting each small part and assembling the toy so your finished Bobby stands about 15 cm tall. Perfect for adding fun handmade character to your collection or gifting to someone special.

Intermediate 5-7 Hours

Materials Needed for Bobby The Pencil Amigurumi Pattern

β€” Main Fabric

  • 01
    Cotton / semi-cotton yarn YarnArt Jeans or Alize Cotton Gold (~160 m / 50 g) - less than a ball of each color:
  • 02
    Yellow - less than 50 g (main body color)
  • 03
    Black - less than 50 g (tip, mouth inner)
  • 04
    Ivory - less than 50 g (pencil tip detail)
  • 05
    Gray - less than 50 g (top metal band)
  • 06
    Pink - less than 50 g (eraser top)
  • 07
    White - small amount for eye whites and tip details

β€” Tools Required

  • 01
    Crochet hook size 1.75 mm (recommended)
  • 02
    Crochet hook size 2.0 mm (optional for looser tension)
  • 03
    A pair of plastic eyes ~10 mm (2 pieces)
  • 04
    Aluminum/copper wire 1-1.5 mm for the arms
  • 05
    Band-aid or tape to wrap wire ends
  • 06
    Yarn sewing needles
  • 07
    Stitch markers
  • 08
    Pins with large head
  • 09
    Scissors
  • 10
    Fiber filling (polyester stuffing)
  • 11
    Small snips or thread cutter

Progress Tracker

0% Complete

β€” Inner Part Of The Mouth :

Round 1 :

6 SC in MR;

Round 2 :

6 INC (12);

Round 3 :

(SC, INC)*6 (18);

Round 4 :

(2 SC, INC)*6 (24);

Round 5 :

(3 SC, INC)*6 (30);

Info :

fix the thread and leave a long ending for sewing.

β€” Tongue :

Round 1 :

6 SC in MR;

Round 2 :

6 INC (12);

Round 3 :

3 SC, CH, turn the detail (3);

Round 4 :

3 SC in the other direction;

Info :

fix the thread and leave a long ending for sewing, withdraw the initial thread from the MR to the last row.

β€” Body :

Info :

*start with black yarn, 1,75 mm hook. *stuff in process.

Round 1 :

3 SC IN MR;

Round 2 :

3 INC (6);

Round 3 :

(SC, INC)*3 (9);

Round 4 :

(2 SC, INC)*3 (12);

Info :

*change the color to ivory

Round 5 :

(3 SC, INC)*3 (15);

Round 6 :

(4 SC, INC)*3 (18);

Round 7 :

(5 SC, INC)*3 (21);

Round 8 :

(6 SC, INC)*3 (24);

Info :

*in Round 9 begin to change the thread color in turn

Round 9 :

(3 SC, change the color to yellow, SC, change the color to ivory)*6 (24);

Round 10 :

2 SC, (change the color to yellow, 3 SC, change the color to ivory, SC)*5, change the color to yellow, 2 SC (24);

Info :

* further, there are repeated rounds; if you want a longer pencil, just work extra repeated rounds

Round 11 - 24 :

14 rounds 24 SC;

Round 25 :

5 SC, INC, 12 SC, INC, 5 SC (26);

Round 26 :

6 SC, INC, 12 SC, INC, 6 SC (28);

Round 27 :

7 SC, INC, 12 SC, INC, 7 SC (30);

Round 28 :

7 SC, 16 SS back loops only, 7 SC (30);

Round 29 :

6 SC, chain 18, skip 18 St, 6 SC (12);

Round 30 :

6 SC, 18 SC on the chain, 6 SC (30);

Info :

*further, there are repeated rounds (Rounds 31-38); after you would crochet 3 rounds, fix the mouth inner part - sew it, as shown in the photo: on the top - hooking up black front loops and yellow loops of the chain, from below hooking up black and yellow front loops; fix with a stitch the middle part of the mouth and the body from the other side, so that the fiber filling does not push the black part out;

Round 31 - 38 :

7 rounds 30 SC;

Round 39 :

(4 SC, INC)*6 (36);

Info :

*insert plastic eyes 4 rounds higher than mouth upper line at the distance of 6 SC;

Info :

*change the color to gray

Round 40 :

36 SC front loops only;

Round 41 :

36 BPSC;

Round 42 - 43 :

2 rounds 36 SC;

Round 44 :

36 BPSC;

Info :

*change the color to pink

Round 45 :

(5 SC, INC)*6 (42);

Round 46 :

(6 SC, INC)*6 (48);

Round 47 - 49 :

3 rounds 48 SC;

Round 50 :

(6 SC, DEC)*6 back loops only (42);

Round 51 :

(5 SC, DEC)*6 (36);

Round 52 :

(4 SC, DEC)*6 (30);

Round 53 :

(3 SC, DEC)*6 (24);

Round 54 :

12 DEC (12);

Round 55 :

6 DEC (6);

Info :

tighten the hole, fix the thread and hide the ending inside; embroider the white of the eye on the sides, eyebrows and nose; sew the tongue.

β€” Arms :

Info :

*yellow yarn, 1,75 mm hook. *don't stuff.

Round 1 :

3 SC IN MR;

Round 2 :

3 INC (6);

Round 3 :

(SC, INC)*3 (9);

Round 4 :

9 SC;

Round 5 :

chain 3, (start in the 2nd chain from the hook) 2 SC on the chain, 9 SC (9+2 on thumb);

Round 6 :

9 SC;

Round 7 :

(SC, DEC)*3 (6);

Round 8 - 17 :

10 rounds 6 SC;

Info :

fix the thread and leave a long ending for sewing;

β€” Assembly :

Info :

insert wire into the body, trim the ends, bend and isolate the tips with a band-aid, so that the length of the wire on each side is equal to the length of the arms;

Info :

put the arms on the wire and sew them;

Info :

sew the inner mouth to the body hooking upper loops and front loops as described so the filling does not push the black part out;

Info :

embroider whites of the eyes on the sides, eyebrows and nose; finish by weaving ends and hiding threads.

Assembly Instructions

  • Sew the inner mouth piece into the opening at the front of the body: align the black mouth circle inside the opening, then sew through the front loops and hook loops as instructed so the black mouth sits flush and stuffing will not push it out.
  • Insert a piece of 1-1.5 mm wire through the body horizontally, trim to match arm length, bend the ends and wrap each tip with a band-aid to isolate sharp ends and prevent damage to yarn.
  • Slide each arm onto its wire end so the arm sits naturally at the side, then sew the arm to the body through the top edge to secure it firmly in position.
  • Attach the plastic eyes four rounds above the upper line of the mouth, spaced 6 single crochet stitches apart; secure and add embroidered white around each eye for the eye highlight.
  • Sew the tongue into the black mouth area using the long tail left earlier; place and tack it so it sits centered on the lower inner mouth.
  • Embroider small eyebrows and a nose with black yarn as shown in photos and weave in all ends, tighten any remaining holes and hide tails inside the body.

Important Notes

  • πŸ’‘Choose your hook size according to your crocheting density and tension; the pattern author crochets in a mixed capture way with medium densityβ€”adjust if your gauge differs.
  • πŸ’‘Use stitch markers to track the beginning of rounds and especially during increases and decreases to avoid counting mistakes.
  • πŸ’‘Stuff gradually and check shape often; overstuffing can distort features and under-stuffing makes the toy floppy.
  • πŸ’‘Wrap the wire tips with a band-aid or tape before inserting to prevent the wire from cutting through the yarn and to keep the arms secure.
  • πŸ’‘Pin parts before sewing to ensure correct placement and symmetry; leave long tails on small parts for easy, secure sewing.

This little Bobby the Pencil is perfect for gifting or keeping on your desk as a silly companion. Make one in bright colors and give it personality with eyebrow and tongue placement. Have fun customizing and sharing your tiny handmade friend! 🧢✨

You ask,

we answer.

FAQs

What size will the finished piece be?

The finished amigurumi measures approximately 15 cm (5.9 inches) tall when using the recommended yarn and hook size.

Can I use different yarn weights for this pattern?

Yes, you can use different yarn weights, but this will affect the final size and stitch density; choose an appropriate hook size and expect a change in finished height.

Do I need prior crochet experience for this pattern?

This pattern is rated intermediate, so basic knowledge of single crochet, increases, decreases and working in the round is recommended.

How long does this project typically take to complete?

Most crocheters complete this project in 5-7 hours, though time may vary depending on experience and how many assembly details you add.