🧢 Beautiful ✨ Detailed πŸ’ Adorable

Baby Cradle Pattern

Baby Cradle Pattern
4.3β˜… Rating
5-7 Hours Time Needed
1.1K Made This
βœ‚οΈ

Intermediate Level

Ideal for those with basic crochet experience, featuring slightly more advanced stitches and techniques to expand your skills.

⏱️

Weekend Treat

Takes 5-7 hours, making it an enjoyable project to finish over a couple of days.

🏑

Cozy Accent

A warm touch for your space that transforms ordinary corners into inviting nooks filled with handmade charm.

About This Baby Cradle Pattern

This pattern teaches you how to crochet a charming baby cradle with a coordinating mattress, rainbow pillow and a blanket star. You will work in the round and in flat rows, changing colors to create the two-tone cradle. Clear stitch counts and step-by-step rounds are provided so you can follow along easily.

Baby Cradle Pattern crochet pattern - detailed view of completed project

The finished cradle measures approximately 22x13cm and stands about 8cm tall. The pattern uses HiMALAYA Dolphin Baby yarn and a small hook for tight, neat stitches.

Why You'll Love This Baby Cradle Pattern

I absolutely love this pattern because it combines simple shaping with pretty color blocking that really shows off soft plush yarn. I enjoy how the two-color body and light blue sunshade come together for a professional finish. The little rainbow pillow and blanket star are joyful details that make the set playful and gift-ready. I also appreciate that each component is quick to make and stacks together for a satisfying small project.

Baby Cradle Pattern step 1 - construction progress Baby Cradle Pattern step 2 - assembly progress Baby Cradle Pattern step 3 - details and accessories Baby Cradle Pattern step 4 - final assembly and finishing

Switch Things Up

I love customizing this cradle by swapping colors to match a nursery or a holiday theme; try greys and mustard for a modern look or pastels for a classic baby palette.

I often change yarn weight and hooks to create different sizes; a bulkier yarn with a larger hook makes a chunky, toy-friendly cradle.

I also experiment with edging: a simple crab stitch border or a contrasting slip stitch round gives a neat, finished edge that pops.

For a portable version, make the cradle smaller by reducing starting chain length and following the same increase logic for the base.

I sometimes embroider tiny motifs on the sunshade or add crocheted flowers for a feminine touch that makes each piece unique.

If you want handles, crochet an extra chain strap and attach it securely through several rounds so it can be used for gentle carrying in pretend play.

I enjoy making a matching blanket with similar color bands to tie the set together; use the blanket star as a decorative accent or a small blanket corner.

To make the pillow firmer, add a piece of stiff felt inside before closing; this helps it keep shape if it will be handled a lot.

I also suggest trying ombre or gradient yarns for the pillow rounds to get a subtle color shift without cutting yarn after every two rounds.

Finally, I recommend personalizing with initials using surface crochet or small felt appliques to turn the set into a special gift.

Common Mistakes & How to Fix Them

βœ— Skipping stitch counts during the initial increases can make the base misshapen; always count stitches at the end of each round to verify the correct number. βœ— Not changing color cleanly leaves visible joins and loose ends; switch colors by fastening off and weaving tails into the wrong side immediately after each section. βœ— Crocheting too loosely for the mattress or pillow will make stuffing show through; use a slightly tighter tension and smaller hook for these pieces. βœ— Forgetting to work into back loops only when instructed will alter height and shape; mark that round with a stitch marker and work carefully into the back loops only. βœ— Failing to stuff the pillow gradually leads to lumps and uneven shape; stuff a little at a time while you close the seam for a smooth finish.

Baby Cradle Pattern

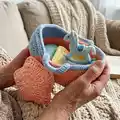
Create a sweet handmade baby cradle complete with a mattress, rainbow pillow and a blanket star. This pattern guides you through color changes and shaping to make a neat little cradle perfect for display or pretend play. You will enjoy the clean stitches and the combination of texture and color. Finished size is approximately 22x13cm with an 8cm height.

Intermediate 5-7 Hours

Materials Needed for Baby Cradle Pattern

β€” Main Fabric

  • 01
    HiMALAYA Dolphin Baby yarn, gauge 120m/100g (main yarn brand)
  • 02
    Pink yarn - color code 346 - 1 ball (cradle upper part)
  • 03
    Light blue yarn - color code 347 - 1 ball (cradle lower part and sunshade)
  • 04
    Yellow yarn - color code 313 - small amount (blanket star)
  • 05
    Various small amounts of different yarn colors for the rainbow pillow (assorted colors)

β€” Tools Required

  • 01
    Crochet hook size 2.75mm (or 3mm)
  • 02
    Scissors
  • 03
    Stitch markers
  • 04
    Polyester stuffing (for the rainbow pillow)
  • 05
    Yarn needle for weaving in ends

Progress Tracker

0% Complete

β€” A baby cradle :

Info :

Work in a continuous spiral along the chain. Lower part is light blue, upper part is pink, and the sunshade is light blue again.

Round 1 :

Make ch19, start working from the 2nd stitch from hook: increase, 16sc, 4sc into one stitch, 16sc, increase=40sc.

Round 2 :

2 increases, 16sc, 4 increases, 16sc, 2 increases=48sc.

Round 3 :

(1sc, increase)-2 times, 16sc, (1sc, increase)-4 times, 16sc, (1sc, increase)-2 times=56sc.

Round 4 :

(2sc, increase)-2 times, 16sc, (2sc, increase)-4 times, 16sc, (2sc, increase)-2 times=64sc.

Round 5 :

(3sc, increase)-2 times, 16sc, (3sc, increase)-4 times, 16sc, (3sc, increase)-2 times=72sc.

Round 6 :

(4sc, increase)-2 times, 16sc, (4sc, increase)-4 times, 16sc, (4sc, increase)-2 times=80sc.

Round 7 :

(5sc, increase)-2 times, 16sc, (5sc, increase)-4 times, 16sc, (5sc, increase)-2 times=88sc.

Round 8 :

(6sc, increase)-2 times, 16sc, (6sc, increase)-4 times, 16sc, (6sc, increase)-2 times=96sc.

Round 9 :

(7sc, increase)-2 times, 16sc, (7sc, increase)-4 times, 16sc, (7sc, increase)-2 times=104sc.

Round 10 :

(8sc, increase)-2 times, 16sc, (8sc, increase)-4 times, 16sc, (8sc, increase)-2 times=112sc.

Info :

Change yarn color.

Round 11 :

112sc into back loops only=112sc.

Rounds 12-22 :

112sc (11 rounds)=112sc.

Info :

Cut and fasten off the yarn.

β€” Sunshade :

Info :

Change yarn color.

Round 23 :

Step 13 stitches to the right from last stitch, attach the yarn and crochet 34sc=34sc.

Info :

Continue working in flat rows.

Round 24 :

without any chain stitches! Skip 1 stitch, crochet 33sc from next stitch, 2sc grabbing basic part of the cradle=35sc.

Info :

Continue working the same way, without any chain stitches, starting from the 2nd stitch and finishing each round make 2sc grabbing basic part of the cradle.

Round 25 :

skip 1 stitch, 34sc, 2sc grabbing basic part=36sc.

Round 26 :

skip 1 stitch, 35sc, 2sc grabbing basic part =37sc.

Round 27 :

skip 1 stitch, 36sc, 2sc grabbing basic part =38sc.

Round 28 :

skip 1 stitch, 37sc, 2sc grabbing basic part =39sc.

Round 29 :

skip 1 stitch, 38sc, 2sc grabbing basic part =40sc.

Round 30 :

skip 1 stitch, 39sc, 2sc grabbing basic part =41sc.

Round 31 :

skip 1 stitch, 40sc, 2sc grabbing basic part =42sc.

β€” Now crochet in the round along the basic part :

Round 32 :

Make ch18, skip 10 stitches, 40sc, make ch18 again, skip 10 stitches, 2sc=78sc (I do not count stitches of the sunshade).

Round 33 :

42sl st, along ch18 crochet 22sc (do not grab stitches, work around the chain), 40sl st, around ch18 crochet 22sc, 2sl st=128sc.

Info :

Cut and fasten off the yarn. Draw remained yarn tails through the gaps between stitches from wrong side to hide.

Info :

Crochet slip stitches into front loops of the 10th round.

Info :

Cut and fasten off the yarn. Draw remained yarn tails through the gaps between stitches from wrong side to hide.

β€” Mattress :

Info :

Work in light blue yarn color.

Info :

Repeat first 10 rounds of the cradle.

Info :

Now crochet slip stitches in the round.

Info :

Cut and fasten off the yarn.

Info :

Draw remained yarn tails through the gaps between stitches from the opposite side to hide.

β€” Rainbow pillow :

Info :

Work in a continuous spiral. Work in different yarn colors, changing yarn after each two rounds.

Round 1 :

Make ch8, start working from the 2nd stitch from hook: increase, 5sc, 4sc into one stitch, 5sc, increase=18sc.

Round 2 :

2 increases, 5sc, 4 increases, 5sc, 2 increases=26sc.

Round 3 :

(1sc, increase)-2 times, 5sc, (1sc, increase)-4 times, 5sc, (1sc, increase)-2 times=34sc.

Round 4 :

(2sc, increase)-2 times, 5sc, (2sc, increase)-4 times, 5sc, (2sc, increase)-2 times=42sc.

Round 5 :

(3sc, increase)-2 times, 5sc, (3sc, increase)-4 times, 5sc, (3sc, increase)-2 times=50sc.

Round 6 :

(4sc, increase)-2 times, 5sc, (4sc, increase)-4 times, 5sc, (4sc, increase)-2 times=58sc.

Round 7 :

(5sc, increase)-2 times, 5sc, (5sc, increase)-4 times, 5sc, (5sc, increase)-2 times=66sc.

Round 8 :

(6sc, increase)-2 times, 5sc, (6sc, increase)-4 times, 5sc, (6sc, increase)-2 times=74sc.

Round 9 :

(7sc, increase)-2 times, 5sc, (7sc, increase)-4 times, 5sc, (7sc, increase)-2 times=82sc.

Round 10 :

Crochet 21sc right to the middle of the pillow, fold the work in half and crochet 41sc through the stitches of both sides. Stuff the pillow as you go.

β€” Blanket star :

Info :

Work in the round, making chain stitches and crochet sl st at the end of each round.

Round 1 :

Make ch6 and connect the ring, ch3, 15dc into ch6, sl st=15dc.

Round 2 :

ch3, 15 increases dc, sl st=30dc.

Round 3 :

ch3, (1dc, increase dc)-15 times, sl st=45dc.

Round 4 :

ch3, (3dc, 1 treble crochet, 5 treble crochet into one stitch, 1 treble crochet, 3dc)-5 times=65dc.

Info :

Crochet slip stitches in the round.

Info :

Cut and fasten off the yarn. Draw remained yarn tails through the gaps between stitches from the opposite side to hide.

Info :

Congrats! You have just finished the pattern!

Assembly Instructions

  • Place the mattress inside the cradle so it sits flat on the base and align edges; if necessary secure with a few hidden whipstitches through the base to prevent shifting.
  • Stuff the rainbow pillow as you crochet the final edge and sew the opening closed, then position it at the head of the cradle and tack it in place with a few stitches so it does not move.
  • Arrange the blanket star or small blanket inside the cradle as desired; you can sew one corner to the mattress to keep it in position for display or play.
  • Weave all remaining yarn tails through gaps between stitches on the wrong side to hide them and trim close to the fabric for a neat finish.
  • If you made handles or a sunshade, position them symmetrically on each side and secure by stitching through several rounds for strength before weaving in ends.

Important Notes

  • πŸ’‘Use stitch markers to mark the beginning of rounds and every increase section so you can count easily and avoid miscounts.
  • πŸ’‘Stuff the pillow gradually as you stitch the closing rounds to get an even, smooth shape and avoid lumps from overstuffing.
  • πŸ’‘When changing yarn colors, fasten off and weave in the end on the wrong side immediately to keep the edges tidy and prevent loose tails.

This baby cradle pattern combines soft, plush yarn with simple shaping to create a lovely tiny cradle and matching accessories. It makes a thoughtful handmade gift or a charming display piece for your nursery. Enjoy the color changes and the quick, satisfying finishes as you assemble the set. 🧢✨

You ask,

we answer.

FAQs

What size will the finished piece be?

The finished cradle measures approximately 22x13cm with an 8cm height when using the recommended yarn and hook size.

Can I use different yarn weights for this pattern?

Yes, you can use different yarn weights but this will change the final size; adjust your hook accordingly and make a gauge test to match proportions.

Do I need stuffing for the projects?

You will need polyester stuffing for the rainbow pillow; the mattress and cradle are worked flat and do not require stuffing.

How long does this project typically take to complete?

Most crafters complete the full set in about 5-7 hours, though time varies by experience and how many pieces you make.