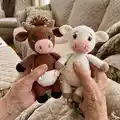
🧢 Beautiful ✨ Detailed πŸ’ Adorable

Baby cow and Baby bull Amigurumi Pattern

Baby cow and Baby bull Amigurumi Pattern
4.0β˜… Rating
5-7 Hours Time Needed
3.8K Made This
βœ‚οΈ

Intermediate Level

Ideal for those with basic crochet experience, featuring slightly more advanced stitches and techniques to expand your skills.

⏱️

Weekend Treat

Takes 5-7 hours, making it an enjoyable project to finish over a couple of days.

🧸

Cute Companion

An adorable friend to cherish, handcrafted with love to bring comfort and joy for years to come.

About This Baby cow and Baby bull Amigurumi Pattern

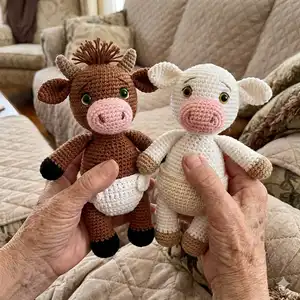
This pattern guides you to crochet two charming companions: a baby cow and a baby bull, about 24 cm tall. It uses plush velvet-style yarn for a soft, tactile finish and includes detailed rounds for every part. The instructions cover arms, legs, tail, head, muzzle, ears and assembly with photos to help placement.

Baby cow and Baby bull Amigurumi Pattern crochet pattern - detailed view of completed project

You will learn simple amigurumi shaping and color changes to craft the body and contrasting muzzle and nappy. The pattern includes needle-sculpting tips and finishing details for a polished look.

Why You'll Love This Baby cow and Baby bull Amigurumi Pattern

I absolutely love this pattern because it transforms simple plush yarn into two endearing characters with a lot of personality. I designed the shapes to be friendly and easy to assemble while still giving lots of scope for customization. The step-by-step rounds and photos make the process satisfying from start to finish. I enjoy the tactile result β€” the plush yarn makes each toy feel like a small hug.

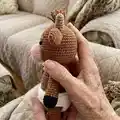
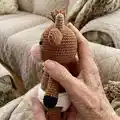
Baby cow and Baby bull Amigurumi Pattern step 1 - construction progress Baby cow and Baby bull Amigurumi Pattern step 2 - assembly progress Baby cow and Baby bull Amigurumi Pattern step 3 - details and accessories Baby cow and Baby bull Amigurumi Pattern step 4 - final assembly and finishing

Switch Things Up

I love how versatile this pattern is for customization; you can change colors to make different breeds or fantasy versions of the cow and bull.

I sometimes use pastel shades for a softer nursery look or bold color blocks for an eye-catching toy.

Want a larger or smaller doll? Simply select a bulkier or finer yarn and adjust your hook size; bulky yarn with a larger hook makes a chunkier cuddly toy, and thinner yarn yields a mini version.

I often swap the 16 mm safety eyes for smaller or larger sizes to subtly change the toy's expression and personality.

Try embroidering spots, hearts, or initials to personalize each toy for gifts β€” embroidery on the body or muzzle looks lovely.

For a posed look, insert thin wire inside the limbs for posability, or keep them soft and floppy for baby-safe toys.

Swap the tail tassel style: use longer cotton strips for a dramatic tail or shorter for a tidy finish.

Add tiny accessories like a crocheted scarf, bell, or diaper to create a character set with different outfits.

I also like mixing yarn textures β€” plush body with cotton horns or felt details for long-lasting contrast and durability.

If you want baby-friendly versions, skip safety eyes and embroider the eyes instead to make the toy suitable for very young children.

Play with mouth and eyebrow placement to create different expressions, from curious to sleepy to surprised.

Finally, experiment with stuffing amounts: a firmer fill gives a sturdier toy, while softer stuffing gives a more squishy, cuddle-ready companion.

Common Mistakes & How to Fix Them

βœ— Skipping counting stitches during increases and decreases leads to uneven shaping; count your stitches every round and use a marker at the start of each round. βœ— Forgetting to change yarn color exactly where specified creates visible color gaps; switch yarns on the correct stitch and tuck tails neatly to hide joins. βœ— Under-stuffing limbs produces floppy arms and legs; stuff firmly but evenly and add stuffing gradually while shaping. βœ— Placing safety eyes too high or low can ruin the expression; follow the placement instructions and set eyes in the 8th row within the range of 5 sc for best results.

Baby cow and Baby bull Amigurumi Pattern

Make your own cuddly Baby Cow and Baby Bull with this detailed crochet pattern. You will find clear step-by-step rounds, photos, and assembly tips so you can create a 24 cm (9.4 in) plush friend. The pattern uses plush yarn and simple amigurumi shaping to give adorable results. Great as a gift or a cozy handmade companion.

Intermediate 5-7 Hours

Materials Needed for Baby cow and Baby bull Amigurumi Pattern

β€” Main Fabric

  • 01
    1 skein brown plush yarn (examples: Yarnart Dolce, Himalaya Dolphin Baby, Bernat Baby Velvet - 100g/120m per skein) for legs, arms, body and head (used Yarnart Dolce nr.765)
  • 02
    1 skein white plush yarn for cow's body and bull's nappy (used Himalaya Dolphin baby nr.80301)
  • 03
    A little pink plush yarn for muzzle and ears (used Himalaya Dolphin baby nr.80303)
  • 04
    A little peach plush yarn for cow's nappy (used Himalaya Dolphin baby nr.80333)
  • 05
    A little dark brown plush yarn for bull's arms and legs (used Yarnart Dolce nr.775)
  • 06
    A little cotton brown yarn for horns (used Alize Cotton Gold)

β€” Tools Required

  • 01
    4 mm crochet hook for toys
  • 02
    2.25 mm crochet hook for horns and fine cotton work
  • 03
    Safety eyes 16 mm (2 pieces per toy)
  • 04
    Eyelashes (for baby cow if desired)
  • 05
    Soft polyester stuffing
  • 06
    Thin long needle and a needle with a large eyelet
  • 07
    Stitch marker
  • 08
    Yarn cutter or sharp scissors
  • 09
    Pins for assembly (optional)

Progress Tracker

0% Complete

β€” Arm*2 :

Info :

Use 4mm crochet hook, dark brown and main brown colors yarn with dark brown color yarn

Round 1 :

2 ch. 6 Sc in the 2nd ch from the hook.

Round 2 :

6 inc (12)

Round 3 :

12 sc through back loop only

Round 4 :

(4 sc, 1 dec)*2 (10)

Info :

Change yarn to main color (brown)

Round 5-9 :

10 sc (5 rounds)

Round 10 :

(3 sc, 1 dec)*2 (8)

Info :

Stuff the arm. 4 sc through both sides across. Leave a little tail.

β€” Leg*2 :

Info :

Use 4mm crochet hook, dark brown and main brown colors yarn

Round 1 :

2 ch. 6 Sc in the 2nd ch from the hook.

Round 2 :

6 inc (12)

Round 3 :

(1 sc, 1 inc)*6 (18)

Round 4 :

18 sc through back loop only

Round 5 :

18 sc

Round 6 :

(1 sc, 1 dec)*6 (12)

Info :

Change yarn to main color (brown)

Round 7-11 :

12 sc (5 rounds)

Round 12 :

(4 sc, 1 dec)*2 (10)

Round 13 :

10 sc

Info :

Stuff the leg. 5 sc through both sides across. Leave a little tail.

β€” Tail :

Info :

Use 4mm crochet hook, main brown color yarn and brown cotton yarn

Round 1 :

2 ch. 6 Sc in the 2nd ch from the hook.

Round 2-7 :

6 sc (6 rounds)

Info :

Do not stuff. 3 sc through both sides across. Leave a long tail

Info :

Cut the cotton yarn into strips about 10cm long.

Infos :

Fold in half, using thinner crochet hook thread through the loop of the tail and thread it again into the thread loop. Well pull. Look pictures. At the end, using scissors make the ends straight.

β€” Body :

Info :

Use 4mm crochet hook, white color and main brown colors yarn

Round 1 :

2 ch. 6 Sc in the 2nd ch from the hook.

Round 2 :

6 inc (12)

Round 3 :

(1 sc, 1 inc)*6 (18)

Round 4 :

(2 sc, 1 inc)*6 (24)

Round 5 :

(3 sc, 1 inc)*6 (30)

Round 6 :

(4 sc, 1 inc)*6 (36)

Round 7 :

5 sc with first leg, 12 sc, 5 sc with second leg, 14 sc (36)

Round 8 :

27 sc, 3 sc with the tail, 6 sc (36)

Round 9-10 :

36 sc (2 rounds)

Info :

Change yarn to main color (brown)

Round 11 :

36 sc through back loop only

Round 12 :

6 sc, 6 dec, 18 sc (30)

Round 13 :

(3 sc, 1 dec)*6 (24)

Round 14-15 :

24 sc (2 rounds)

Round 16 :

1 sc, 4 sc with first arm, 7 sc, 4 sc with second arm, 8 sc (24)

Round 17 :

(2 sc, 1 dec)*6 (18)

Round 18 :

(4 sc, 1 dec)*3 (15)

Info :

Fasten off. Good stuff the body.

Info :

With white color yarn 11rnd: 36 sc through front loop

β€” Head :

Info :

Use 4mm crochet hook and main brown color yarn

Round 1 :

2 ch. 6 Sc in the 2nd ch from the hook.

Round 2 :

6 inc (12)

Round 3 :

(1 sc, 1 inc)*6 (18)

Round 4 :

(2 sc, 1 inc)*6 (24)

Round 5 :

(3 sc, 1 inc)*6 (30)

Round 6-8 :

30 sc (3 rounds)

Round 9 :

(4 sc, 1 inc)*6 (36)

Round 10 :

(5 sc, 1 inc)*6 (42)

Round 11-12 :

42 sc (2 rounds)

Round 13 :

(5 sc, 1 dec)*6 (36)

Round 14 :

(4 sc, 1 dec)*6 (30)

Round 15 :

(1 sc, 1 dec)*10 (20)

Round 16 :

(3 sc, 1 dec)*6 (16)

Info :

Set safety eyes in the 8th row in the range of 5sc. Good stuff the head.

β€” Muzzle :

Info :

Use 4mm crochet hook and rose color yarn. Crochet around the chain! We make oval

Round 1 :

8 ch. 1 sc in the 2nd ch from the hook, 1 sc, 1 sc, 1 sc, 1 sc, 1 sc, 3 sc to the last loop, 5 sc and 1 inc on other side of the chain (16)

Round 2 :

1 inc, 5 sc, 3 inc, 5 sc, 2 inc (22)

Round 3 :

1 sc, 1 inc, 5 sc, (1 sc, 1 inc)*3, 5 sc, (1 sc, 1 inc)*2 (28)

Round 4-5 :

28 sc (2 rounds)

Round 6 :

1 sc, 1 dec, 5 sc, (1 sc, 1 dec)*3, 5 sc, (1 sc, 1 dec)*2 (22)

Info :

Fasten off.

β€” Ear*2 :

Info :

Use 4mm crochet hook, main brown and pink colors yarn. One ear made from 2 layers of circle pieces.

With pink yarn - Round 1 :

2 ch. 6 Sc in the 2nd ch from the hook.

With pink yarn - Round 2 :

6 inc (12)

With pink yarn - Round 3 :

(1 sc, 1 inc)*6 (18)

With pink yarn - Round 4 :

(2 sc, 1 inc)*6 (24)

With pink yarn - Info :

Fasten off.

With main brown yarn - Round 1 :

2 ch. 6 Sc in the 2nd ch from the hook.

With main brown yarn - Round 2 :

6 inc (12)

With main brown yarn - Round 3 :

(1 sc, 1 inc)*6 (18)

With main brown yarn - Round 4 :

(2 sc, 1 inc)*6 (24)

Info :

Don't fasten and don't cut yarn.

Info :

Stake both pink and brown pieces together with wrong-side on each other, continue to crochet the next round with brown color.

Round 5 :

24 sc on both circle pieces (24)

Info :

Fold the ear and make 4s c through both layers together to give it a scooped appearance.

Info :

Sew ears to the head between 5 and 6 rows.

β€” Assembly & Finishing :

Item Name (Head to Body) :

Sew the head to the body. Put more stuffing around the head and neck area as you are sewing together!!!

Item Name (Muzzle) :

Sew muzzle to the head, using a little stuffing.

Item Name (Ears) :

Sew ears to the head between 5 and 6 rows.

Info :

Needle Sculpting. This will give natural look to the face. Insert the needle in the center of neck. Stitch out to right inner eye corner. I make a sewing stitch 2-3 loops long and pull the needle out to the center of the neck. Apply a little bit of tension on the thread, not much. The more you pull, the more the eye will sink back into the head. Repeat the same for the second eye.

Assembly Instructions

  • Sew the head to the body and add extra stuffing around the neck as you join to create a smooth transition and secure attachment.
  • Sew the muzzle to the head using a little stuffing to keep the oval shape, centering it under the eyes so it sits evenly.
  • Attach the ears to the head between rounds 5 and 6; fold and shape each ear by making 4 sc through both layers for a scooped appearance before sewing.
  • Position and sew the arms to the body at the stitches indicated in round 16 of the body, securing firmly and hiding tails inside the body.
  • Attach legs to the body when assembling round 7 of the body: join the legs with 5 sc, 12 sc, 5 sc and continue crocheting as instructed to secure them into the body.

Important Notes

  • πŸ’‘Set safety eyes in the 8th row and check spacing: use the range of 5 sc as referenced to get the correct facial expression.
  • πŸ’‘Use stitch markers to keep track of the start of each round and to mark changes like where to attach arms and legs.
  • πŸ’‘Stuff firmly but not overly tight so the plush maintains its soft appearance while holding shape and details.
  • πŸ’‘Change yarn colors on the correct stitch and weave in ends as you go to keep joins neat and reduce finishing work.

This Baby Cow and Baby Bull pattern creates two lovable, plush companions perfect for gifting or collecting. You will enjoy the soft texture of plush yarn and the cute shaping of muzzle, ears, and tassel tail. Make one for yourself and one to share β€” they are irresistible little friends. 🧢🧸

You ask,

we answer.

FAQs

What size will the finished piece be?

The finished amigurumi measures approximately 24 cm (9.4 inches) tall when using the recommended plush yarn and a 4 mm hook.

Can I use different yarn weights for this pattern?

Yes, you can use different yarn weights, but this will affect the final size and texture; choose an appropriate hook for your yarn and expect size variations.

Do I need prior crochet experience for this pattern?

This pattern is rated intermediate, so basic crochet skills and experience with amigurumi shaping (increases, decreases, color changes) are recommended.

How long does this project typically take to complete?

Most crocheters complete one toy in about 5-7 hours, though actual time varies by experience, customization, and how many finishing details you add.