🧢 Beautiful ✨ Detailed πŸ’ Adorable

Moonlit Bralette Pattern

Moonlit Bralette Pattern
4.3β˜… Rating
2-4 Hours Time Needed
3.7K Made This
βœ‚οΈ

Beginner Friendly Level

Perfect for those just starting their crochet journey, with clear instructions and simple techniques

⏱️

Bite-Sized Project

Finishes in 2-4 hoursβ€”perfect for an afternoon of creative relaxation.

πŸ‘•

Casual Chic

Relaxed style with a modern twist, perfect for everyday wear while maintaining that handcrafted uniqueness.

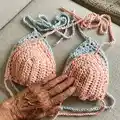
About This Moonlit Bralette Pattern

This pattern creates a simple, adjustable bralette with two shaped cups, a decorative border and long straps for tying. Youll work with Paintbox Cotton DK yarn held double to give structure and drape. The construction is straightforward, using HDC shaping and simple borders to form the cups.

Moonlit Bralette Pattern crochet pattern - detailed view of completed project

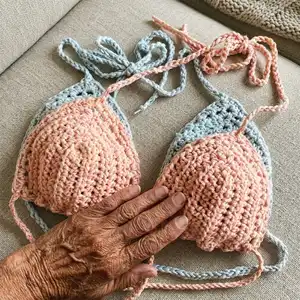
Includes full instructions for both cups, border details and strap lengths. Sized with small, medium and large options and easy notes to customize fit.

Why You'll Love This Moonlit Bralette Pattern

I absolutely love this pattern because it turns simple stitches into a wearable, stylish bralette that feels handmade and special. I enjoy how the HDC shaping creates soft, rounded cups without complicated increases. Holding two strands together gives the fabric nice body while staying breathable for summer wear. I also love that the straps are fully adjustable so you can tie the bralette to the fit you prefer.

Moonlit Bralette Pattern step 1 - construction progress Moonlit Bralette Pattern step 2 - assembly progress Moonlit Bralette Pattern step 3 - details and accessories Moonlit Bralette Pattern step 4 - final assembly and finishing

Switch Things Up

I love how easy it is to customize this bralette; you can change colors to make bold or subtle versions and it instantly alters the vibe.

I often swap Paintbox Cotton for a cotton blend or bamboo yarn held double for a softer drape and a slightly different feel next to skin.

Want a sportier look? Use a smaller hook and tighter tension for firmer fabric and reduce CH counts to fit snugly.

For a more relaxed, beachy bralette, pick a thicker DK or light worsted yarn and increase CH counts slightly to keep proportions.

I like adding small lining cups or bra pads inside for extra coverage and support; simply stitch them in place after assembly.

Try adding decorative edging like picots or shell stitches instead of the simple border for a feminine touch.

I sometimes shorten shoulder straps and add adjustable sliders for more control over fit and comfort.

To create a halter style, make longer straps and tie behind the neck rather than using the shoulder straps as directed.

I encourage experimenting with strap placement by moving the top attachment one or two stitches closer or farther apart to change cup coverage.

Make a matching set by crocheting a small trim for shorts or a skirt; the same stitch pattern works nicely as a trim motif.

I also enjoy embroidering tiny motifs on the cups after finishing to personalize each bralette uniquely.

Finally, try making minis for doll clothing by using thinner yarn and appropriate hook adjustmentsβ€”this pattern scales well with change of materials.

Common Mistakes & How to Fix Them

βœ— Skipping the instruction to hold two strands together will change the fabric density and size; be sure to hold two strands of Paintbox Cotton DK throughout as instructed. βœ— Not placing the final HDC in the very last chain of the previous row will make the cup bottom curve; always place a HDC in the very last CH to keep the cup straight at the bottom. βœ— Cutting the yarn too early after shaping the cup can leave you unable to continue the border smoothly; do not cut yarn after repeating Row 3 until instructed to cut and tie off.
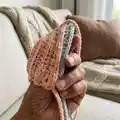
 βœ— Weaving the bottom strap inconsistently will make the strap look uneven and sit poorly; weave the bottom strap in and out of the bottom loops evenly and adjust tension for a tidy finish. βœ— Using a different hook size without adjusting yarn handling can alter fit and gauge; if you change hook size, make a test cup and adjust stitch counts or strap length to match your desired size.

Moonlit Bralette Pattern

Make a delicate, handmade bralette with this easy-to-follow Moonlit Bralette pattern. Youll create two shaped cups, a pretty border and simple straps using DK cotton held double. This pattern is perfect for a relaxed summer top or layered look and is great for makers who enjoy quick wearable projects.

Beginner Friendly 2-4 Hours

Materials Needed for Moonlit Bralette Pattern

β€” Main Fabric

  • 01
    Paintbox Cotton DK yarn (DK/light worsted) - hold two strands together
  • 02
    Approximately 2 balls Paintbox Cotton DK yarn total (use colors as desired)
  • 03
    Use two strands held together throughout the project to achieve recommended fabric and drape

β€” Tools Required

  • 01
    Crochet hook size 4.0mm
  • 02
    Scissors
  • 03
    Tapestry needle

Progress Tracker

0% Complete

β€” Materials :

Infos :

Materials list. 1. 2 balls of paintbox cotton DK yarn. 2. 1 4mm hook 3. Scissors 4. Tapestry needle For this pattern, we will be holding two strands of yarn together.

β€” Cups :

Info :

Cups. Make 2.

Round 1 :

To begin, CH 14(16,18) S,M,L. HDC in 3rd CH from hook and in every CH after.

Round 2 :

CH2, turn. In same CH work HDC and in each CH until you get to the CH3 space at the top of this row. In this CH3 space, work 3 HDC. Continue HDC in every stitch after. Be sure to place a HDC in the very very last CH of the previous row to keep your cup straight at the bottom.

Round 3 :

CH2, turn. HDC in every stitch until you get to the top where we previously placed 3 HDC. Work HDC, HDC,CH1,HDC in middle stitch of the three, HDC in the next CH. HDC as usual down the row to the bottom.

Round 4 :

Repeat Row 3. 3(5,7) more times. DO NOT CUT YARN.

Info :

Let's create a cute border now:)

Round 5 :

CH4,turn. Skip one CH, work HDC. CH1,skip 1, HDC in next CH until you reach the top where we turn. In the top middle CH, work HDC, CH2, HDC in same stitch. CH1, continue border as usual to very bottom.

Round 6 :

CH2,turn. Work HDC in each CH1 space and at the top of each HDC. So one HDC in every CH1 space and every HDC. Until you get to the top where the cup turns. In top CH space, work 2 HDC,CH1, 2HDC. Continue the border like normal down the other side. (Each CH1 space and each HDC.

Info :

Now we need to create a border of spaces along the bottom of the cup to weave in our straps we will make.

Round 7 :

CH2, immediately work HDC in the side of the very last HDC of previous border row. Along the bottom, as consistently as you can, work HDC,CH1, skip a space, HDC. Ending with a HDC in side of previous row's first HDC. Cut and tie off! Make one more cup.

β€” Straps :

Shoulder straps (P1) :

For the shoulder straps, attach yarn at top of each cup. CH80.

Bottom strap (P2) :

For bottom strap, CH 150-200. Weave the strap in and out of your bottom loops. You can choose to have the bow tie in the front or in the back :)

β€” Finishing :

Info :

Cut and tie off ends after weaving straps and secure all ends with tapestry needle. Make sure both cups are identical and straps are even before trimming ends.

Info :

All done!

Assembly Instructions

  • Make two cups following the cup instructions, finish border and cut/tie off as directed, then repeat to make the second cup ensuring both match in size.
  • Attach shoulder straps by securing yarn at the top of each cup and chain 80 for each strap; weave or knot straps to create comfortable positioning over shoulders.
  • Weave the bottom strap (CH150-200) in and out of the bottom loops created along the cup base, adjust tension so the cups sit evenly and tie a bow at the front or back.
  • Trim and weave in all loose ends using a tapestry needle, checking strap symmetry and cup placement before final trimming to ensure a neat finish.

Important Notes

  • πŸ’‘Hold two strands of Paintbox Cotton DK yarn together for the whole pattern to achieve the intended fabric and size.
  • πŸ’‘Do not cut yarn after repeating Row 3 on the first cup; complete the border and only cut and tie off when instructed.
  • πŸ’‘Place a HDC in the very last chain of the previous row to keep the bottom of the cup straight and even.

This Moonlit Bralette pattern is a quick and stylish make that transforms simple stitches into a wearable favorite. Perfect for warm days or layering under jackets, it offers a cozy handmade touch you can wear with pride. Make a pair in contrasting colors or match them for a classic look. 🧢✨

You ask,

we answer.

FAQs

What size will the finished piece be?

The finished bralette size varies with yarn tension and strap placement; follow CH counts 14(16,18) for S,M,L and adjust strap length for a custom fit.

Can I use different yarn weights for this pattern?

You can use different yarn weights, but this will affect the final size and drape; if switching yarn weight, make a test cup and adjust chain counts and hook size accordingly.

Do I need prior crochet experience for this pattern?

This pattern is beginner friendly and uses basic stitches (HDC and CH), so basic crochet knowledge is recommended for best results.

How long does this project typically take to complete?

Most crocheters finish this bralette in about 2-4 hours, depending on experience and the time spent customizing straps and fit.