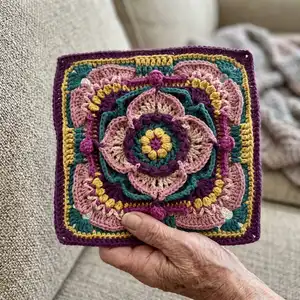
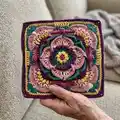
Make a richly textured, floral-inspired crochet square with clear step-by-step rounds and photo guidance. This pattern uses worsted-weight yarns and layered stitches to create a dimensional motif you can mix-and-match in colorways. Perfect for advanced crocheters who love detail and creative colorwork, the square works beautifully into blankets, cushions, or as a focal motif for projects.
Progress Tracker
0% Complete
— Brood of Angels Square :
Info :
Hook/Finished and Blocked Size: 4.5 mm, 11"; 5.00 mm, 12". Crochet Terms: US terminology throughout. Skill Level: Advanced.
Infos :
Yarn and Colors Used: I Love This Cotton (Worsted Weight), 100% cotton; Yarn Bee ~ Tweed Indeed (Worsted Weight), 46% acetate, 46% cotton, 6% viscose, 2% polyester; Yarn Bee ~ Must Be Merino (Worsted Weight), 50% merino wool, 25% acrylic, 25% nylon. Colorway listings shown in pattern.
Info :
Additional Items Needed: Stitch markers and yarn darning needle.
Round 1 :
In double magic circle, ch 3 (counts as first hdc and ch 1 of rnd); [hdc, ch 1] 7 times; cut yarn, invisible join; Counts: 8 hdc, 8 ch-1 sp (16 total)
Round 2 :
If you have difficulty working Option 1, please use Option 2. Option 1: Turn to back AND starting in any ch-1 sp, *puff in ch-1 sp; ch 2, sk NEXT hdc; repeat from * around; cut yarn, invisible join. Counts: 8 puff, 8 ch-2 sp (24 total). Option 2: Starting in any ch-1 sp, *puff in ch-1 sp; ch 2, sk NEXT hdc; repeat from * around; cut yarn, invisible join. Counts: 8 puff, 8 ch-2 sp (24 total) ~ Rnd 2 Right-Handed and Left-Handed Videos
Round 3 :
I recommend watching the video for this rnd before starting. Option 1: Turn to front AND starting in any ch-2 sp, Option 2: Starting in any ch-2 sp. Both options, continue: Note: the 1st dc of the dc2tog is always worked behind the previous dc2tog and st between dc2tog is skipped. • dc2tog, working in ch-2 sp before and after puff, ch 1; • [dc2tog, working in previously skipped puff and NEXT puff, ch 1; dc2tog, working in previously worked ch-2 sp and NEXT ch-2 sp, ch 1] 7 times; • dc2tog, working in previously skipped puff and from the front in NEXT puff, ch 1; cut yarn, invisible join. Counts: 16 dc2tog, 16 ch-1 sp (32 total) ~ Rnd 3 Right-Handed and Left-Handed Videos
Round 4 :
I recommend watching the video before starting this rnd. Starting in any ch-1 sp, *HPS in ch-1 sp, ch 1; sk NEXT dc2tog; repeat from * around; cut yarn, invisible join. Counts: 16 HPS, 16 ch-1 sp (32 total) ~ Rnd 4 Right-Handed and Left-Handed Videos
Round 5 :
Working behind rnd 4 and in rnd 3 dc2tog only, start in any dc2tog, *working in BL and 3LP as one, hdc in dc2tog, ch 2; repeat from * around; cut yarn, invisible join. Counts: 16 BLhdc, 16 ch-2 sp (48 total) ~ Rnd 5 Right-Handed and Left-Handed Videos
Round 6 :
Starting in any BLhdc, *sc in BLhdc; ch 2, sk NEXT ch-2 sp; repeat from * around; cut yarn, invisible join. Counts: 16 sc, 16 ch-2 sp (48 total) ~ Rnd 6 Right-Handed and Left-Handed Videos
Round 7 :
Starting in any ch-2 sp, *[tr, ch 1] 5 times in ch-2 sp-place st marker in 4th ch-1 sp; sk NEXT sc, ([tr, ch 1] 5 times) in NEXT ch-2 sp; sk NEXT sc, place st marker in ch-2 sp of rnd 5 directly below, sk NEXT ch-2 sp; sc in NEXT sc; ch 1, sk NEXT ch-2 sp and sc; repeat from * around; cut yarn, invisible join. Counts: 4 sc, 40 tr, 44 ch-1 sp (88 total) ~ Rnd 7 Right-Handed and Left-Handed Videos
Round 8 :
Starting in ch-1 marked sp of rnd 7-remove marker, * (2 hdc) in ch-1 sp; sk NEXT tr, (dc, ch 2, dc) in NEXT ch-1 sp-place st marker in ch-2 sp; sk NEXT tr [(2 hdc) in NEXT ch-1 sp, sk NEXT tr] 2 times; [(2 dc) in NEXT ch-1 sp, sk NEXT tr] 2 times; ch 1, sk NEXT ch-1 sp; sc in NEXT ch-1 sp directly below AND between 2 HPS of rnd 4- there will be 4 HPS between scs, ch 1; working behind rnd 7, sc in NEXT ch-2 marked sp of rnd 5-do not remove marker; ch 1, sk NEXT (sc, ch-1 sp); [sk NEXT tr, (2 dc) in NEXT ch-1 sp] 2 times; sk NEXT tr, (2 hdc) in NEXT ch-1 sp, sk NEXT tr; repeat from * around; cut yarn, invisible join. Counts: 8 sc, 32 hdc, 40 dc, 12 ch-1 sp, 4 ch-2 sp (100 total/25 per side) ~ Rnd 8 Right-Handed and Left-Handed Videos
Round 9 :
I recommend watching the video before starting this rnd. Working from the back of rnd 7 only, start in tr immediately before any (dc, ch 2, dc) marked st of rnd 8-do not remove marker, *[working in rnd 7 tr, hdc in BL and 3LP of tr as one, hdc in tr, ch 1; sk all sts to NEXT tr] 5 times-place st marker in 5th ch-1 sp; sk all sts to marked st of rnd 5; working in marked st of rnd 5, dc to the left of sc (right, if left-handed) in rnd 8-remove marker; ch 1, sk NEXT (sc, ch 1, tr); [BLhdc in 3LP of NEXT tr, ch 1, sk all sts to NEXT tr] 3 times; repeat from * around; cut yarn, invisible join. Counts: 32 BLhdc, 4 dc, 36 ch-1 sp (72 total) ~ Rnd 9 Right-Handed and Left-Handed Videos
Round 10 :
Starting in ch-1 marked sp of rnd 9, *dtr in ch-1 marked sp of rnd 9-remove marker, ch 1; X-st using the NEXT Unworked ch-1 sp and previously worked ch-1 sp - for the exact placement of the X-st I recommend looking at rnd 10 picture or watching the video; ch 1, dtr in previously worked ch-1 sp; sk NEXT hdc, (2 tr) in ch-1 sp; [sk NEXT hdc, (2 dc) in ch-1 sp] 2 times; ch 1, sk NEXT (hdc, ch-1 sp, hdc); [(2 dc) in ch-1 sp, sk NEXT hdc] 2 times; (2 tr) in NEXT ch-1 sp, sk NEXT hdc; repeat from * around; cut yarn, invisible join. Counts: 32 dc, 16 tr, 8 dtr, 12 ch-1 sp, 4 X-st (72 total) ~ Rnd 10 Right-Handed and Left-Handed Videos
Round 11 :
Use Option 4 if you find working Option 3 is too difficult or you prefer the look of Option 4. Option 3: Starting in ch-2 sp of any X-st, *(4 tr) in ch-2 sp of X-st; ch 1, sk NEXT (dtr, ch-1 sp); BPdc around NEXT dtr and tr; BPhdc around NEXT tr and 4 dc; mod X-st in ch-2 marked sp of rnd 8-remove marker; sk NEXT ch-1 sp, BPhdc around NEXT 4 dc and tr; BPdc around NEXT tr and dtr; ch 1, sk NEXT ch-1 sp and dtr; tr in NEXT ch-2 sp of X-st; repeat from * around; cut yarn, invisible join. Counts: 40 BPhdc, 8 dc, 16 BPdc, 20 tr, 8 ch-1 sps, 4 ch-2 sps (100 total) ~ Rnd 11 Right-Handed and Left-Handed Videos. Option 4: Starting in ch-2 sp of any X-st, *(4 tr) in ch-2 sp of X-st; ch 1, sk NEXT (dtr, ch-1 sp); BPdc around 2 sts; BPhdc around 5 sts; (dc, ch 2, dc) in ch-2 sp marked st of rnd 8-remove marker; sk ch-1 sp, BPhdc around NEXT 5 sts; BPdc around NEXT 2 sts; ch 1, sk NEXT (ch-1 sp, dtr); tr in NEXT ch-2 sp of X-st; repeat from * around; cut yarn, invisible join. Counts: 40 BPhdc, 8 dc, 16 BPdc, 20 tr, 8 ch-1 sps, 4 ch-2 sps (100 total)
Round 12 :
Starting in 2nd BPdc after any group of 5 tr, *dc in 6 sts; ch 1, sk NEXT mod X-st OR NEXT (dc, ch 2, dc); dc in NEXT 7 sts; ch 1, sk NEXT ch-1 sp; [3dc-cluster in NEXT tr, ch 1] 5 times; sk NEXT ch-1 sp, dc in NEXT BPdc; repeat from * around; cut yarn, invisible join. Counts: 56 dc, 20 3dc-cluster, 28 ch-1 sp (104 total) ~ Rnd 12 Right-Handed and Left-Handed Videos
Round 13 :
In this rnd use the same option used in rnd 11. Option 3: Starting around 2nd dc of any side, *FPhdc around 6 sts, ch 1; (5 dc) in NEXT ch-2 sp of rnd 11 mod X-st; ch 1, sk NEXT ch-1 sp; FPhdc around NEXT 7 sts; ch 1, sk NEXT ch-1 sp; Option 4: Starting around 2nd dc of any side, *FPhdc around 6 sts, ch 1; (5 dc) in NEXT ch-2 sp of rnd 11; ch 1, sk NEXT ch-1 sp; FPhdc around NEXT 7 sts; ch 1, sk NEXT ch-1 sp; Both options, continue: [FPdc around NEXT 3dc-cluster, ch 2, sk NEXT ch-1 sp] 4 times; FPdc around NEXT 3dc-cluster; ch 1, sk NEXT ch-1 sp; FPhdc around NEXT st; repeat from * around; cut yarn, invisible join. Counts: 56 FPhdc, 20 dc, 20 FPdc, 16 ch-1 sp, 16 ch-2 sp (144 total) ~ Rnd 13 Right-Handed and Left-Handed Videos
Round 14 :
Work in rnd 12 only and start in ch-1 sp between 1st and 2nd 3dc-cluster of any side. In the 1st, 2nd, 3rd and 5th bullet points below, fold ch-2 sp of rnd 13 to the back, working dc2tog in rnd 12 ch-1 sps and in front of rnd 13 FPdc: *work dc2tog in ch-1 sp AND NEXT ch-1 sp, ch 2; [work dc2tog in previously worked ch-1 sp and NEXT UNworked ch-1 sp, ch 2] 2 times; work dc2tog in previously worked ch-1 sp and NEXT UNworked ch-1 sp; ch 1, sk NEXT 2 dc; working behind rnd 13, hdc in NEXT 2 sts; dc in NEXT 3 sts-place st marker in 2nd dc; ch 1, sk NEXT ch-1 sp; dc in NEXT 3 sts; hdc in NEXT 2 dc; ch 1, sk NEXT 2 dc; work dc2tog in NEXT rnd 12 ch-1 sp and NEXT ch-1 sp; ch 2; repeat from * around; cut yarn, invisible join. Counts: 16 hdc, 24 dc, 20 dc2tog, 12 ch-1 sp, 16 ch-2 sp (104 total) ~ Rnd 14 Right-Handed and Left-Handed Videos
Round 15 :
Starting in 2nd marked dc of rnd 14, *sc in 2 dc-move marker to place it around 1st worked dc of rnd 14, sk NEXT ch-1 sp; working under both ch-1 sps before and after (5 dc) of rnd 13, FPdc around NEXT group of 5 dc, sk NEXT ch-1 sp; sc in NEXT 3 dc; ch 1, sk NEXT 2 hdc of rnd 14; In the NEXT 4 bullet points, fold ch-2 of rnd 14 to the back, insert hook from front-to-back and pull ch-2 of rnd 13 to the front: (4 tr) in NEXT Unworked ch-1 sp of rnd 13; sk ALL sts across to NEXT ch-2 sp of rnd 13; [(4 tr) in NEXT Unworked ch-2 sp of rnd 13; sk ALL sts across to NEXT ch-2 sp of rnd 13] 2 times, ch 2 as a corner; (4 tr) in NEXT Unworked ch-2 sp of rnd 13; sk ALL sts across to NEXT ch-2 sp of rnd 13; (4 tr) in NEXT Unworked ch-1 sp of rnd 13; ch 1, sk NEXT 2 hdc of rnd 14; sc in NEXT dc; repeat from * around; cut yarn, invisible join. Counts: 24 sc, 4 FPdc, 96 tr, 8 ch-1 sp, 4 ch-2 corner sp (132 total/33 per side) ~ Rnd 15 Right-Handed and Left-Handed Videos
Round 16 :
Starting in any ch-2 corner sp, *(3 tr, ch 2, 4 tr) in ch-2 corner sp; ch 1, sk NEXT 4 tr; working in 3LP, dc in NEXT 8 tr; ch 1, sk ch-1 sp; start around marked dc of rnd 14, and work FPtr around 1st, 2nd and 3rd dc-remove marker; FPdc around NEXT FPdc of rnd 15, FPtr around 4th, 5th and 6th dc of rnd 14; ch 1, sk ALL sts to NEXT tr of rnd 15; working in 3LP, dc in NEXT 8 tr; ch 1, sk NEXT 4 tr; tr in NEXT ch-2 corner sp; repeat from * around; cut yarn, invisible join. Counts: 64 dc, 4 FPdc, 32 tr, 24 FPtr, 16 ch-1 sp, 4 ch-2 corner sp (140 total/35 per side) ~ Rnd 16 Right-Handed and Left-Handed Videos
Round 17 :
Starting in any ch-2 corner sp, *(sc, ch 2, sc) in ch-2 corner sp; sc in NEXT 3 tr; hdc in NEXT tr and ch-1 sp; sc in NEXT 7 dc; hdc in NEXT dc; sk NEXT ch-1 sp; FPtr around NEXT 7 sts; sk NEXT ch-1 sp, hdc in NEXT dc; sc in NEXT 7 dc; hdc in NEXT ch-1 sp and tr; sc in NEXT 3 tr; repeat from * around; cut yarn, invisible join. Counts: 88 sc, 24 hdc, 28 FPtr, 4 ch-2 corner sp (140 total/35 per side)
Round 18 :
Starting in any ch-2 corner sp, *(2 dc, ch 2, 2 dc) in ch-2 corner sp; working in BL, dc in NEXT 14 sts; working in BL and 3LP as one, dc in NEXT 7 FPtr; working in BL, dc in NEXT 14 sts; repeat from * around; cut yarn, invisible join and weave in ALL yarn ends. Counts: 156 dc, 4 ch-2 corner sp (156 total/39 per side)
This beautiful Brood of Angels Square brings layered floral texture and color to any project, from blankets to cushions. The design pairs advanced stitches and clear photo guidance to make complex techniques approachable. Enjoy experimenting with the two provided colorways or create your own colorful combination to reflect your style. 🧶✨