๐Ÿงถ Beautiful โœจ Detailed ๐Ÿ’ Adorable

Fern Plant Car Pattern

Fern Plant Car Pattern
4.0โ˜… Rating
2-4 Hours Time Needed
4.1K Made This
โœ‚๏ธ

Intermediate Level

Ideal for those with basic crochet experience, featuring slightly more advanced stitches and techniques to expand your skills.

โฑ๏ธ

Bite-Sized Project

Finishes in 2-4 hoursโ€”perfect for an afternoon of creative relaxation.

๐Ÿก

Cozy Accent

A warm touch for your space that transforms ordinary corners into inviting nooks filled with handmade charm.

About This Fern Plant Car Pattern

This pattern creates a small hanging fern-style plant with a crocheted beige pot, five detailed fern leaves, and fiddleheads for fullness. It uses superfine yarn and small hooks to produce delicate texture and realistic fronds. The pieces are sewn into the pot and attached to a pair of hanging cords to create a finished decorative plant.

Fern Plant Car Pattern crochet pattern - detailed view of completed project

Clear step-by-step instructions are provided for the pot, circle base, leaves, fiddleheads, and assembly. Small tools and simple finishing techniques complete the project quickly and neatly.

Why You'll Love This Fern Plant Car Pattern

I absolutely love this pattern because it turns simple stitches into a lifelike hanging fern that feels magical when finished. I enjoy the mix of small detailed work and quick assembly that gives satisfying results in a short time. The leaf shaping is playful and rewarding, letting me experiment with texture and silhouette. Making fiddleheads adds a whimsical touch that always delights recipients. Overall, this pattern balances technique and charm, which makes it one of my go-to mini projects.

Fern Plant Car Pattern step 1 - construction progress Fern Plant Car Pattern step 2 - assembly progress Fern Plant Car Pattern step 3 - details and accessories Fern Plant Car Pattern step 4 - final assembly and finishing

Switch Things Up

I love how this pattern adapts to different stylesโ€”I often change yarn colors to create variegated or vintage-looking ferns.

I like to swap yarn weight and hook size to make a tiny keychain version or a larger, more dramatic hanging plant.

I sometimes embroider veins on the leaves or use a slightly darker yarn to add depth and realism to the fronds.

Try making fewer or more leaves to vary fullness; three leaves gives a minimalist look, while seven produces a lush hanging plant.

I also experiment with metallic or sparkly yarn for a whimsical, decorative version perfect for special occasions.

If I want a sturdier shape, I add a little wire inside the hanging cord or along the stem for subtle posability.

For a faster make, I use a chunkier yarn and larger hookโ€”this creates a bold, statement plant in much less time.

I often create matching sets in different greens to make a cluster of hanging plants for a windowsill or shelf display.

To personalize gifts, I attach a small crocheted tag or bead to the hanging cord with the recipients initial.

I recommend experimenting with leaf placement and trimming tails to vary how the fronds drape over the pot for unique finished looks.

Common Mistakes & How to Fix Them

โœ— Skipping the initial chain counting for the leaf starts will distort the overall leaf length; always make the full 27 chain foundation and recount before proceeding. โœ— Using a larger hook for the leaves will make the fronds floppy and lose detail; switch to the specified 2.0mm hook for crisp, defined leaf edges. โœ— Forgetting to stuff the pot before sewing the circle inside will make assembly awkward and the shape unstable; place the circle and add stuffing as you sew to keep control. โœ— Crocheting the pot with inconsistent tension causes uneven rounds and a misshapen base; maintain steady tension and count stitches after each round to ensure even increases.

Fern Plant Car Pattern

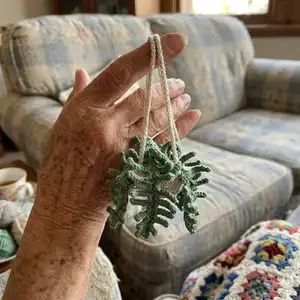
Create a charming hanging fern plant car to decorate your space or give as a handmade gift. This pattern guides you through crocheting a small beige pot, green fern leaves, and fiddleheads to assemble a lovely hanging plant. Youll enjoy working small pieces and learning shaping techniques that bring texture and movement to this mini plant. Perfect for crafting a unique piece of home decor or a sweet present.

Intermediate 2-4 Hours

Materials Needed for Fern Plant Car Pattern

โ€” Main Fabric

  • 01
    Super fine yarn (supper fine) 1.8 oz (50 g)
  • 02
    Color: fern green for leaves and fiddleheads (use portion of the 50 g ball)
  • 03
    Color: tan beige for pots and circle (use portion of the 50 g ball)

โ€” Tools Required

  • 01
    Crochet hook size 3.0mm (for pot and circle)
  • 02
    Crochet hook size 2.0mm (for leaves and fiddleheads)
  • 03
    Stitch marker
  • 04
    Sewing needle
  • 05
    Scissors
  • 06
    Cotton filling (polyester stuffing)
  • 07
    Optional: pins for assembly

Progress Tracker

0% Complete

โ€” Notes :

Info :

Plant car pattern. Any changes for larger/smaller sizes will be indicated at the start of each pattern piece.

โ€” Abbreviations :

Infos :

Row: round. MR : Magic Ring. st(s) : stitch(es). sl st : slip stitch. sk : skip. ch: chain. sc : single crochet. dc : double crochet. inc : increase.

โ€” Material :

Infos :

Weight/yardage: supper fine 1.8 oz (50 g). Color : tan beige, and fern green. hook size : 2.5-3.0 mm. Stitch maker. Sewing needle. Scissors. Cotton filling.

โ€” Pots (beige) :

Info :

*use 3.0mm hook size*

Round 1 :

Row 1 : Magic ring, chain 1, 10SC

Round 2 :

Row 2: chain 1, (1 single crochet, 1 increase) 5 times (15sts)

Round 3 :

Row 3 : chain 1, (2 single crochet, 1 increase) 5 times (20sts)

Round 4 :

Row 4 : chain 1, (3 single crochet, 1 increase) 5 times (25sts)

Round 5 :

Row 5 : chain 1, (4 single crochet, 1 increase) 5 times (30sts)

Round 6 :

Row 6 : chain 1, (5 single crochet, 1 increase) 5 times (35sts)

Round 7-10 :

Row : 7-10 : chain 1, 35 single crochet (35sts)

โ€” Circle (in green) :

Round 1 :

Row 1 : Magic Ring, chain 2, 10 double crochet (10sts)

Round 2 :

Row 2 : chain 2 10 double crochet inc (20sts)

Round 3 :

Row 3 : chain 2 (1 double crochet, 1 increase) 10 times (30sts)

Round 4 :

Row 4 : chain 1 (5 single crochet, 1 increase) 5 times

Info :

Hanging (make 2) : 60-70CH
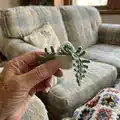
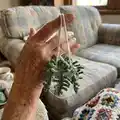
โ€” Leaf (in green) (make 5) :

Info :

*use 2.0mm hook size*

Round 1 :

make a slip knot, 27ch

Round 2 :

hook in 2rd sts, 4 sl st

Round 3 :

1SC, 8ch. hook in 2rd, 7sl st, 1SC

Round 4 :

1sl st, 1SC, 8ch. hook in 2rd, 7sl st, 1SC

Round 5 :

1sl st, 1SC, 8ch. hook in 2rd, 7sl st, 1SC

Round 6 :

1sl st, 1SC, 7ch. hook in 2rd, 6sl st, 1SC

Round 7 :

1sl st, 1SC, 7ch. hook in 2rd, 6sl st, 1SC

Round 8 :

1sl st, 1SC, 6ch. hook in 2rd, 5sl st, 1SC

Round 9 :

1sl st, 1SC, 5ch. hook in 2rd, 4sl st, 1SC

Round 10 :

1sl st, 1SC, 4ch. hook in 2rd, 3sl st, 1SC

Round 11 :

2sl st 1ch 2 sl st

Round 12 :

1SC 4ch. hook in 2rd, 3sl st, 1SC

Round 13 :

1sl st, 1SC, 5ch. hook in 2rd, 4sl st, 1SC

Round 14 :

1sl st, 1SC, 6ch. hook in 2rd, 5sl st, 1SC

Round 15 :

1sl st, 1SC, 7ch. hook in 2rd, 6sl st, 1SC

Round 16 :

1sl st, 1SC, 7ch. hook in 2rd, 6sl st, 1SC

Round 17 :

1sl st, 1SC, 8ch. hook in 2rd, 7sl st, 1SC

Round 18 :

1sl st, 1SC, 8ch. hook in 2rd, 7sl st, 1SC

Round 19 :

4sl st, (do not cut off this tail just yet)

โ€” Fiddlehead :

Info :

*use 2.0mm hook size*

Round 1 :

slip knot, 21ch. hook in 2rd sts

Round 2 :

12SC, 8HDC, (do not cut off this tail just yet)

โ€” Sewing step :

Info :

sew the circle inside pots and dont forget stuffing ^_^

Info :

sew leaf and fiddlehead in midle the pots

Assembly Instructions

  • Sew the circle base inside the pot and add stuffing as you sew to secure shape and volume.
  • Make two hanging cords (60-70 chain each) and attach them evenly around the pot rim to create the hanger.
  • Sew the five leaves and fiddleheads into the middle of the pot, arranging them so the fronds drape naturally.
  • Leave tails on fiddleheads and leaves when crocheting so you can stitch them securely into the pot interior.

Important Notes

  • ๐Ÿ’กUse the specified 2.0mm hook for leaves and fiddleheads and 3.0mm for the pot to achieve the correct proportions and texture.
  • ๐Ÿ’กStuff the pot and circle before finishing sewing to ensure a neat, full shape; avoid overstuffing which can distort the pot.
  • ๐Ÿ’กKeep stitch markers handy to mark rounds and starting points, especially when working small rounds and tight stitches.

This sweet little hanging fern makes a charming addition to any shelf, window, or rearview mirrorโ€”handmade with tiny stitches and lots of love. Perfect as a small gift or a decorative accent for your space, each frond adds delicate movement and texture to the piece. Enjoy crafting this cozy accent and let your creativity grow with every stitch. ๐Ÿงถ๐ŸŒฟ

You ask,

we answer.

FAQs

What size will the finished piece be?

The finished hanging fern measures approximately palm-sized with the pot about 4-5 cm across and leaves extending outward; exact size depends on yarn tension and hook choice.

Can I use different yarn weights for this pattern?

You can experiment with different yarn weights, but using a thicker yarn will enlarge the final piece and change the leaf texture; adjust hook sizes accordingly.

Do I need prior crochet experience for this pattern?

This pattern is rated intermediate and assumes familiarity with single crochet, double crochet, increases, and working into chain spaces.

How long does this project typically take to complete?

Most crafters finish this project in 2-4 hours, depending on experience and how quickly you work through the small detailed pieces.