🧢 Beautiful ✨ Detailed πŸ’ Adorable

Winter Fairytail Crochet Bag Pattern

Winter Fairytail Crochet Bag Pattern
4.8β˜… Rating
5-7 Hours Time Needed
1.1K Made This
βœ‚οΈ

Beginner Friendly Level

Perfect for those just starting their crochet journey, with clear instructions and simple techniques

⏱️

Weekend Treat

Takes 5-7 hours, making it an enjoyable project to finish over a couple of days.

✨

Stylish Touch

An elegant detail to elevate any look, combining traditional techniques with contemporary design sensibilities.

About This Winter Fairytail Crochet Bag Pattern

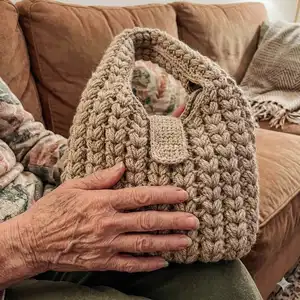
This pattern creates a textured winter handbag using bulky alpaca-blend yarn and a puff-stitch motif for rich texture. Youll crochet a reinforced base, build up the body with repeating "check mark" puff stitches, add a sturdy handle, and finish with a cotton lining and magnetic valve. Step-by-step photos and clear instructions guide you through each stage.

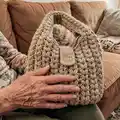
Winter Fairytail Crochet Bag Pattern crochet pattern - detailed view of completed project

Suitable for beginners comfortable with basic crochet stitches and following photo steps. The finished bag measures approximately 13 inches wide by 10 1/4 inches tall with a 20 inch handle.

Why You'll Love This Winter Fairytail Crochet Bag Pattern

I absolutely love this pattern because it combines a simple construction with an impressive textured finish that looks much more complicated than it is. I enjoy how the puff stitch creates a cozy, tactile surface that feels luxurious in alpaca-blend yarn. Sewing in the lining and adding a valve gives the finished bag a professional touch I am proud to gift or sell. The pattern is forgiving for beginners, yet the final result is stylish and durable, which makes me want to make several color variations.

Winter Fairytail Crochet Bag Pattern step 1 - construction progress Winter Fairytail Crochet Bag Pattern step 2 - assembly progress Winter Fairytail Crochet Bag Pattern step 3 - details and accessories Winter Fairytail Crochet Bag Pattern step 4 - final assembly and finishing

Switch Things Up

I love how easy it is to customize this pattern by changing yarn color or texture β€” try a two-tone body with a contrasting handle for a modern look.

If you want a smaller version for a crossbody, use lighter weight yarn and a smaller hook and shorten the handle accordingly.

I often add decorative trims like tassels or a crocheted flower sewn to the flap to personalize each bag I make.

To make the bag more structured, try lining with interfacing or adding a thin piece of cardboard covered in fabric inside the base before attaching the lining.

I sometimes substitute the magnetic valve for a leather strap and button for a more rustic, handmade finish.

For a beachy summer version, choose cotton rope yarn and a neutral palette β€” it changes the bag character entirely.

If you want to make it reversible, create two matching panels and join them with an invisible seam for a clean double-sided finish.

Try different puff stitch heights by adjusting how far you pull up the loop; a slightly taller puff gives a chunkier texture.

I recommend experimenting with handle width β€” a wider handle adds comfort if you carry heavier items.

Don’t be afraid to mix techniques: adding simple surface embroidery or embroidered initials on the lining makes each bag truly unique.

Common Mistakes & How to Fix Them

βœ— Skipping the second-loop start on the base chain will change the stitch count and shape; always begin Row 1 from the 2nd loop from the hook as written. βœ— Not pulling up the puff stitch loop to 27-30 mm will make the texture inconsistent; measure and pull the loop up to the level of the hook for consistent puff height. βœ— Failing to place markers when marking handle placement makes alignment difficult when sewing the lining; count check marks carefully and place markers before making the handle. βœ— Not steam-blocking the base can leave it floppy and uneven; steam the base through a damp cloth on the wrong side to stabilize the shape before assembling the lining.

Winter Fairytail Crochet Bag Pattern

Make a cozy, textured crochet handbag using bulky alpaca-blend yarn and an easy puff-stitch technique. This pattern walks you through creating a sturdy base, crocheting the body and handle, adding a fabric lining, and attaching a magnetic valve for a polished finish. Youll love the tactile puff stitch and the structured shape that makes this bag both stylish and functional. Perfect as a handmade gift or a special treat for yourself.

Beginner Friendly 5-7 Hours

Materials Needed for Winter Fairytail Crochet Bag Pattern

β€” Main Fabric

  • 01
    Wool yarn with alpaca, approx 130 m / 100 g (400 yards / 370 m) - example used: Bugeto Alpaca Wool, 3 skeins
  • 02
    Fabric for the lining: cotton or linen, 12*28 inches (30*70 cm) - cut 2 parts plus seam allowance
  • 03
    Valve (magnetic snap), 6*1 1/4 inches (15*3 cm) or a valve size to match your hardware
  • 04
    Sewing thread to match yarn color

β€” Tools Required

  • 01
    Crochet hook size 5 mm
  • 02
    Scissors
  • 03
    2 stitch markers
  • 04
    Plastic needle with large eyelet
  • 05
    Sewing needle for lining
  • 06
    Pins for assembly
  • 07
    Steam iron and damp cloth for blocking
  • 08
    Yarn needle for finishing and sewing handle

Progress Tracker

0% Complete

β€” Base of the bag :

Info :

Crochet chain with 21 CH.

Round 1 :

1 row. Crochet from the 2nd loop from the hook: 19 SC, 3 SC in 1, turn, 18 SC, 2 SC in 1 (=42), SlSt in the 1st SC, 3 CH.

Round 2 :

2 row. Skip 1 loop with SlSt and next loop. Crochet in the 3rd loop: PC (make 3 yarn over and pull up 3 loops (7 loops on the hook); yarn over and pull through all 7 loops on the hook; chain one to close the puff stitch); Pull up the loop to the level of the hook 27-30 mm long. Crochet CH and one more PC in the same loop. We got a "check mark" with 2 PC with one base and 1 CH between the peaks.

Round 3 :

Skip 2 loops, crochet next "check mark" with 2 PC and 1 CH in the middle. Crochet 4 more "check marks" to the end of the row, skipping 2 loops of the previous row. Then crochet 1 "check mark" in the top of the side part. Turn, crochet 6 "check marks", skipping 2 loops of the previous row. Next 1 more "check mark" in the top of the another side part. The "check marks" should be opposite each other. There should be 14 "check marks" in total (28 PC). Crochet SlSt in the 4th loop of the previous row, 3 CH.

Round 4 :

3 row. Next, crochet the base of the "check marks" in this and each subsequent row in the "check mark" (under CH between the "check marks" of the previous row). First, make an increase in the corner. For this, crochet: PC, CH, PC, CH, PC in the 1st "check mark" of the previous row.

Round 5 :

Next crochet 4 "check marks". Increase in the corner again: PC, CH, PC, CH, PC. Then crochet 1 "check mark". Increase in the corner: PC, CH, PC, CH, PC. Next crochet 4 "check marks". Increase in the corner again: PC, CH, PC, CH, PC. Crochet last 1 "check mark", SlSt, 3 CH.

Round 6 :

4 row. Crochet 18 "check marks" in each "check mark" of the previous row, SlSt, 3 CH.

Round 7 :

5 row. 18 "check marks", SlSt, 3 CH.

Round 8-18 :

5-15 rows. 18 "check marks", SlSt, 3 CH.

Round 19 :

16 row. 18 "check marks", SlSt.

β€” Base trim :

Info :

Crochet this row with SlSt on the back loop only.

Info :

Crochet to the end of the row. Cut the thread, pull out the end. Close the row with the end. Strengthen and hide the end. Steam the base of the bag with an iron through a damp cloth on the wrong side.

β€” Lining :

Info :

For the lining, it is better to take a stiff cotton fabric. For example, cotton or linen. Take a sheet of paper and outline the base. Put the pattern on the fabric. Cut out 2 parts with a seam allowance of 5-7 mm for sewing. If desired, you can cut a pocket.

Info :

First, sew the pocket on one part. Then sew two parts of the lining. Wrap and hem the edge on top. At this stage, you can give it to the atelier.

β€” Handle :

Info :

Fold the base in half, on the sides in the middle, 1 "check mark". Count 2 "check marks" on the right and left of it. Place the markers. There are 5 "check marks" between markers.

Round 1 :

1 row. Insert the hook between "check marks", where the first marker is. Crochet 3 CH with 2 thread.

Round 2 :

Next crochet 5 "check marks". Crochet DC with the base between the "check marks", where the second marker is.

Round 3 :

2 row. Crochet 25 SlSt from the 2nd loop from the hook on the back loop only.

Round 4 :

3 row. 3 CH, PC in the 1st "check mark" of the 1st row, 3 "check marks", PC in the 5th "check mark" of the 1st row, DC in the 1st SlSt of the previous row.

Round 5 :

4 row. Crochet 19 SlSt from the 2nd loop from the hook on the back loop only.

Round 6 :

5 row. 3 CH, 3 "check marks", DC in the 1st SlSt of the previous row.

Round 7 :

6 row. Crochet 15 SlSt from the 2nd loop from the hook on the back loop only.

Round 8 :

7 row. 3 CH, 3 "check marks", DC in the 1st SlSt of the previous row.

Round 9 :

8 row. Crochet 15 SlSt from the 2nd loop from the hook on the back loop only.

Round 10 :

9 row. 3 CH, 3 "check marks", DC in the 1st SlSt of the previous row.

Round 11 :

10 row. Crochet 15 SlSt from the 2nd loop from the hook on the back loop only.

Round 12-25 :

11-24 rows. Crochet repeating 9-10 rows. Cut the thread, pull out the end. Strengthen and hide the end.

Info :

Similarly crochet the 2nd part of the handle. Leave the end for sewing on the second part of the handle 28 inches (70 cm) long. Steam both parts of the handle with an iron through a damp cloth on the wrong side. Fold the parts of the handle with the front sides together, sew with a plastic needle. Insert the needle under two loops of each part. Strengthen and hide the end. Steam the seam with an iron through a damp cloth on the wrong side.

β€” Sew on the valve :

Info :

Top part. Sew the top part of the valve with the sewing needle and thread in the middle of the base part, between "check marks" of the 14th and 15th rows. Strengthen the end on the wrong side.

Info :

Lower part. Fold the valve. Try on where the lower part will be. In my example, in the middle of the 13th row. Sew the lower part of the valve with the sewing needle and thread. Strengthen the end on the wrong side.

β€” Sew in the lining :

Info :

Put the lining inside, straighten it with our hands. The top of the lining is about 2 rows below the edge of the base. The side seams of the lining should match the middle of the side "check marks". Fold the bag in half so that the side seams match. Mark the middle of the lining. Align it with the middle of the base. Do the same on the other side. Pin with a pins.

Info :

Take the sewing thread to match the color of the handbag. Sew in the lining to the handbag with neat, small stitches. Insert the needle behind the edge of the lining. Make a fixing stitches in 3-4 places. If desired, you can steam the seam through a damp cloth.

Assembly Instructions

  • Sew the lining into the bag: pin the lining so that the top is about two rows below the edge, align side seams with the middle of the side check marks, then hand-stitch the lining to the bag with small neat stitches.
  • Attach the valve: sew the top part of the magnetic valve between the check marks of the 14th and 15th rows, then fold and sew the lower part over the middle of the 13th row, reinforcing on the wrong side.
  • Sew handles: fold each handle part with front sides together, sew with a plastic needle under two loops, leave a long tail for final sewing (approx 28 inches/70 cm), then sew handles to the bag securely.
  • Steam and shape: steam the base and handle seams with an iron through a damp cloth on the wrong side to flatten and strengthen the shape before final assembly.
  • Finish and hide ends: weave and strengthen all yarn tails and thread ends, cut excess, and hide ends inside seams to secure the bag for everyday use.

Important Notes

  • πŸ’‘Use stitch markers to mark the center and handle placement so the handle aligns symmetrically; this prevents uneven placement during sewing.
  • πŸ’‘Pull up the puff stitch loops to 27-30 mm to maintain consistent puff height and an even texture across the bag.
  • πŸ’‘Steam the base and handle seams through a damp cloth on the wrong side to stabilize the shape before attaching the lining and hardware.

This Winter Fairytail crochet bag pattern gives you a cozy textured accessory you can be proud of. The bold puff stitches and alpaca-blend yarn make a luxurious, tactile finish that feels handmade and high-quality. Follow the clear photos and step-by-step instructions for a polished, lined handbag with a secure valve and sturdy handles. 🧢✨

You ask,

we answer.

FAQs

What size will the finished piece be?

The finished bag from the specified materials measures approximately 13 inches (33 cm) wide and 10 1/4 inches (26 cm) tall, with a handle length of about 20 inches (50 cm).

Can I use different yarn weights for this pattern?

Yes, but changing yarn weight will affect the final size and texture; if you choose a different weight, adjust hook size accordingly and make a gauge swatch to match the recommended gauge of 12 stitches and 10 rows = 4*4 inches (10*10 cm).

Do I need sewing skills to add the lining?

Basic hand-sewing skills are sufficient; the pattern explains how to cut the lining, pin it, and sew it neatly with small stitches. You can also have a tailor sew the lining if you prefer.

How long does this project typically take to complete?

Most crafters finish this project in 5-7 hours, depending on experience, whether you make the lining by hand or with a machine, and how much time you spend on finishing touches.