🧢 Beautiful ✨ Detailed πŸ’ Adorable

Watermelon Coleus Pattern

Watermelon Coleus Pattern
4.4β˜… Rating
5-7 Hours Time Needed
2.4K Made This
βœ‚οΈ

Intermediate Level

Ideal for those with basic crochet experience, featuring slightly more advanced stitches and techniques to expand your skills.

⏱️

Weekend Treat

Takes 5-7 hours, making it an enjoyable project to finish over a couple of days.

🏑

Cozy Accent

A warm touch for your space that transforms ordinary corners into inviting nooks filled with handmade charm.

About This Watermelon Coleus Pattern

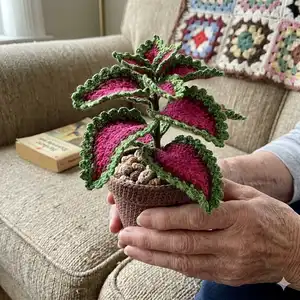
This pattern teaches you how to crochet a realistic Watermelon Coleus plant with wired leaves and layered color detail. It uses DMC Petra no5 thread and includes instructions for wiring, long stitches, and edge scallops. The pattern makes a planted arrangement composed of multiple leaf sizes so you can shape a natural-looking rosette.

Watermelon Coleus Pattern crochet pattern - detailed view of completed project

You will work individual leaves, insert florist wire, and finish them for arranging in a pot. The tutorial includes tips for shaping and placement so the plant looks professional.

Why You'll Love This Watermelon Coleus Pattern

I absolutely love this pattern because it combines delicate crochet stitchwork with a sculptural, botanical finish that feels unique and rewarding. I enjoy the long-stitch sequences β€” they create a beautiful textured petal edge and give each leaf a lifelike shape. Working over florist wire brings the leaves to life and lets you pose the plant any way you like. Making the full arrangement is satisfying, and every time I walk by it I feel proud of the handcrafted detail.

Watermelon Coleus Pattern step 1 - construction progress Watermelon Coleus Pattern step 2 - assembly progress Watermelon Coleus Pattern step 3 - details and accessories Watermelon Coleus Pattern step 4 - final assembly and finishing

Switch Things Up

I love how easy it is to customize the Watermelon Coleus by changing colors; try pastel tones for a soft, delicate houseplant or bold jewel tones for a dramatic statement.

To make a larger plant, simply make more leaves or use thicker yarn with a larger hook to scale up every piece proportionally.

I often add embroidery veins to the leaf center for extra realism β€” a few tiny backstitches in a deeper shade can add great depth.

Want a miniature version for a keychain? Use thinner thread and a smaller hook, and shorten the wire to create a tiny pendant leaf.

Try alternating the scallop edge color to create variegated borders β€” the pattern's color-change points make this simple and effective.

For posability, wrap a second thinner wire inside the main florist wire to make the leaves hold sharper bends without kinking the outer layer.

If you prefer a potted arrangement with stems, group several wired leaves on a wrapped main stem and cover the base with moss for a natural finish.

To create a hanging mobile, suspend several mini leaves from a hoop using fishing line for a whimsical, floating garden effect.

I sometimes mix yarn weights in the same project for texture β€” use a slightly thicker yarn for outer trim to make the scallops pop visually.

Finally, experiment with adding beads or tiny crocheted flowers at the center of leaf clusters to create seasonal or themed arrangements that match your decor.

Common Mistakes & How to Fix Them

βœ— Skipping the skipped chain stitches at the beginning can misplace the tip shaping; always count and work the (3sc) clusters in the last and skipped chains as instructed. βœ— Ignoring the wire insertion step will make leaves floppy and hard to pose; cut approx 20"(50cm) florist wire and crochet the round over it to add structure. βœ— Rushing the long stitch technique causes uneven scallops and pulling; practice the Long hdc/dc/tc on a scrap round and pull the wire round evenly before continuing. βœ— Not changing color at the correct moment will ruin the layered look; follow the 'CHANGE COLOUR' cues and weave in ends neatly between rounds for clean color transitions.

Watermelon Coleus Pattern

Make a realistic, decorative Watermelon Coleus plant with this detailed crochet pattern. You will create layered, wired leaves with vibrant color transitions to recreate the signature watermelon coleus look. The pattern includes step-by-step rounds, long-stitch explanations, and wiring instructions so you can shape each leaf exactly how you want. Perfect for a decorative pot, gift, or display piece to brighten any room.

Intermediate 5-7 Hours

Materials Needed for Watermelon Coleus Pattern

β€” Main Fabric

  • 01
    DMC Petra no5 crochet thread (recommended)
  • 02
    3ply thread (recommended)
  • 03
    Alternative: 4ply or crochet cotton 10 with appropriate hook size
  • 04
    Color 53607 (pink/magenta) - used for inner leaf shades
  • 05
    Color 5550 (deep plum) - used for inner edge or accent
  • 06
    Color 53803 (bright pink) - used for mid leaf sections
  • 07
    Color 5938 (brown/maroon) - used for alternate plant version accents
  • 08
    Color 5907 (light lime green) - used for outer edge/leaf trim
  • 09
    Color 5905 (medium green) - used for outer edge/leaf trim and stems

β€” Tools Required

  • 01
    Crochet hook 1.5mm
  • 02
    Garden wire: 2mm, 3mm or 3.5mm (for stem) optional
  • 03
    Florist wire approx 20"(50cm) per leaf
  • 04
    Green floral tape
  • 05
    Styrofoam block or dry florist sponge (for pot)
  • 06
    Pebbles or soil to cover pot
  • 07
    Wooden garden stakes (optional)
  • 08
    Scissors
  • 09
    Yarn needle for sewing and finishing

Progress Tracker

0% Complete

β€” Pattern Instructions :

Info :

Notes: When you see stitches in brackets, it means that all the ones in the bracket are worked in to one stitch. Example: (sc inc) means: 2sc worked in to one stitch. (3sc) means: 3sc in the same stitch. (3sc) x 2 means: 3sc in each of the next 2 stitches. Alternate (dc inc) and 1dc x 3 means: work 2dc in to the first stitch, then work 1dc in the next, then repeat the last 2 steps 2 more times.

Info :

Following the tutorial and using the recommended yarn, your finished plant will measure approx. 7"(18cm) tall without plant pot and 9"(23cm) in width depending on how you shape the leaves. This plant is made of 12 leaves in total as shown in the image. However you can make it larger by making more leaves or smaller by making less leaves.

β€” Leaf A :

Make :

Make 4

Round 1 :

Ch25 Skip1 2sc 1hdc 1dc (dc inc) x 2 9dc 4hdc 3sc

Round 1 :

(3sc) in the last chain

Round 1 :

3sc 4hdc 9dc (dc inc) x 2 1dc 1hdc 2sc

Round 1 :

(3sc) in the skipped chain from the beginning

Round 2 :

2sc 2hdc 1dc (dc inc) (1dc, 1tc) 1tc (tc inc) repeat the last 2 steps 1 more time 3tc 4dc 4hdc 3sc

Round 2 :

(3sc) center stitch, Going down the other side,

Round 2 :

3sc 4hdc 4dc 3tc (tc inc) 1tc repeat the last 2 steps 1 more time (1tc, 1dc) (dc inc) 1dc 2hdc 3sc slst base chain

β€” Leaf A Wire :

Info :

We will now crochet over the florist wire. Cut a piece of approximately 20"(50cm) and thread it through the stitch on your hook (p1 & 2).

Info :

Crochet this whole next round over the wire (p3).

β€” Leaf A continued :

Round 3 :

ch1 8sc (sc inc) 1sc repeat last 2 steps 2 more times 17sc

Info :

Work all the following stitches in to the center stitch at the tip of the leaf: (p1, 2 & 3) (1hdc, ch4, skip1, 1sc, 1hdc down the chain, 1hdc) Pull the wire round and down equally

Round 3 :

17sc 1sc (sc inc) repeat the last 2 steps 2 more times 8sc slst in 1st stitch on the opposite side CHANGE COLOUR

β€” Leaf A - Long stitch explanation :

Info :

In this round I am using a few unusual stitches that I call the Long hdc, the Long dc and the Long tc. Those stitches are almost worked the same as the normal hdc, dc and tc just with a slight difference. On the following page I am explaining how to work the Long hdc. Once you familiarised yourself with this one then you do exactly the same with the Long dc and Long tc once they come up in the round. Each of those Long stitches comes in a sequence of one normal hdc, dc or tc followed by the Long stitch. For example the hdc sequence will be described as (1hdc, 1Long hdc). The dc sequence (1dc, 1Long dc) and the tc sequence (1tc, 1Long tc). On average there will be a space of approximately 2 stitches on that previous round in between each long stitch (see p1). Sometimes it might be just one depending on the bends in the petal shape. Your finished round will look like in (p2).

Round 4 :

ch1, 4sc, 1hdc Then work the first Long stitch sequence. Work 1hdc, Yarn over as to work another hdc but don’t work it in to the next chain. Instead insert the hook in to the round below (underneath the wire round) and 1 stitch back (p1). So basically below and slightly diagonal from the last stitch you made. Pull the yarn through as you would usually do (p2) and pull the long stitch up (p3). Now pull through to complete the Long hdc the same as you would usually do (p4). So now you have done this sequence: (1hdc, 1Long hdc). In the next chain work 1slip stitch (p5), This chain may be hidden under the Long stitch so just check to make sure the slip stitch is worked in to the correct chain.

Round 4 continued :

You have already completed the stitches above this line on the previous page for the first leaf. Continue to work 1dc (1dc, 1Long dc) Slst. 1dc (1tc, 1Long tc) Slst Repeat 3 more times. 1dc (1dc, 1Long dc) Slst Repeat 1 more time. 1hdc (1hdc, 1Long hdc) Slst Repeat 1 more time.

Round 4 :

2sc (3sc) center stitch

Round 4 :

Work all the following down the other side following the long stitch sequences: 2sc slst 1hdc (1hdc, 1Long hdc) Repeat 1 more time slst 1dc (1dc, 1Long dc) Repeat 1 more time slst 1dc (1tc Long tc) Repeat 3 more times slst (1dc, 1Long dc) 1dc Repeat 1 more time slst (1hdc, 1Long hdc) 1hdc

Round 5 :

ch1 4sc slst (in to the row below) (p1)

Round 5 :

1sc (p2) 1hdc (p3) (hdc inc) (p4) slst (side of slst from the row below) (p1) Repeat 9 more times

Round 5 :

3sc (1sc, ch3, skip1, 1sc, 1sc) Center stitch. Going down the other side, 3sc

Round 5 :

slst (side of slst) (hdc inc) 1hdc 1sc Repeat 9 more times

Round 5 :

slst (row below) 5sc CHANGE COLOR

Round 6 :

ch1 4sc Now work, 1dc next to the slip stitch from the previous round, So basically, push the hook in at the side of the slst we made in the previous round, pull the yarn up and complete the dc (p1). This stitch is repeated all around the petal where the slip stitches from the previous round are.

Round 6 :

Continue to work: 1hdc (p2) (sc dec) (p3) 1hdc (p4) 1dc (side of slst) (p1) Repeat the last 4 steps 9 more times 3hdc 2sc

Round 6 continued :

Work (3sc) in to the unworked skipped chain at the tip of the petal.

Round 6 continued :

Going DOWN the other side 2sc 3hdc 1dc (side of slst)

Round 6 continued :

1hdc (sc dec) 1hdc 1dc (side of slst) Repeat 9 more times

Round 6 continued :

5sc Slst in the 1st chain on the opposite side.

Round 7 :

(ch1, 1sc) 7sc

Round 7 :

(slst, ch2, 1dc, ch1) (1dc, ch2, slst) 2slst Repeat the last 4 steps 10 more times

Round 7 :

(1dc, 1tc, ch1, slst, 1dc) center

Round 7 :

Going down the other side 2slst (slst, ch2, 1dc, ch1) (1dc, ch2, slst) Repeat the last 4 steps 10 more times

Round 7 :

8sc Leave a long tail, Wrap tight around the wire To cover approx. 2"(5cm).

β€” Leaf B :

Make :

Make 2

Round 1 :

Ch20 Skip1 2sc 1hdc 1dc (dc inc) x 2 6dc 3hdc 2sc

Round 1 :

(3sc) last chain

Round 1 :

2sc 3hdc 6dc (dc inc) x 2 1dc 1hdc 2sc

Round 1 :

(3sc) in the skipped chain From the beginning

Round 2 :

2sc 2hdc 1dc (dc inc) x 2 1dc (dc inc) 1dc (dc inc) x 2 1dc 2hdc 3sc

Round 2 :

(3sc) center 3sc 3hdc 3dc (dc inc) 1dc (dc inc) 1dc (dc inc) x 2 1dc 2hdc 3sc slst in to base chain

β€” Leaf B continued / Insert Wire :

Info :

Insert Wire approx. 20"(50cm)

Round 3 :

ch1 5sc Alternate (sc inc) and 1sc x 3 15sc

Round 3 :

(1hdc, ch4, skip1, 1sc,1hdc, 1hdc) center stitch

Round 3 :

15sc 1sc and (sc inc) x 3 5sc Slst in 1st on opposite side. Change Color

Assembly Instructions

  • If using a plant pot, cut styrofoam or dry florist sponge to fit the pot and place it inside; push the stems of your leaves into the foam starting from the centre and arranging the other leaves in a circle around it.
  • Wrap a long tail of yarn tightly around the exposed wire at the base of each leaf to cover approximately 2"(5cm) and finish off before securing into the pot.
  • Use green floral tape to bind multiple wires together to form a stem and to secure leaves into position; you can also use wooden stakes instead of wire for thicker stems.
  • Cover the foam/plastic base with pebbles or soil to conceal the mechanics and provide a natural look once leaves are inserted and arranged.

Important Notes

  • πŸ’‘Follow the bracketed stitch notation carefully because brackets mean multiple stitches are worked into the same stitch.
  • πŸ’‘Always cut and insert the florist wire before crocheting the round over it so you can shape and pose the leaf correctly.
  • πŸ’‘Change color exactly where indicated and weave in ends between rounds to maintain clean edges and color transitions.

Create a striking Watermelon Coleus that brings a splash of color to any shelf or table. Each wired and crocheted leaf mimics the real plant with layered hues and scalloped edges. Arrange them in a pot for a long-lasting handmade display that never needs watering. 🌿🧢

You ask,

we answer.

FAQs

What size will the finished piece be?

The finished plant measures approximately 7"(18cm) tall without a pot and about 9"(23cm) wide using the recommended yarn and 1.5mm hook, depending on how you shape the leaves.

Can I use different yarn weights for this pattern?

Yes, you can, but changing yarn weight will affect the final size and look; use an appropriate hook size for your chosen yarn and be prepared to adjust wire length.

Do I need prior crochet experience for this pattern?

This pattern is rated intermediate, so basic knowledge of US crochet stitches plus experience with increases, decreases and working over wire is recommended.

How long does this project typically take to complete?

Most crocheters finish this project in 5-7 hours, though time may vary depending on experience, number of leaves made, and finishing details.