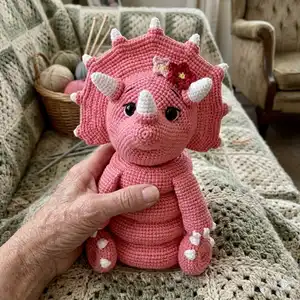
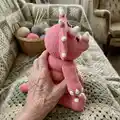
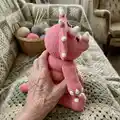
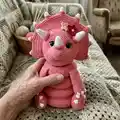
Make a charming Triceratops ring tower amigurumi that doubles as a stacking toy and decor. This pattern guides you through crocheting the head, rings, legs, tail, horns and decorative spots with clear step-by-step rounds and helpful assembly notes. Perfect for gifting or keeping as a playful handmade companion, you will enjoy shaping and finishing each part to bring this dinosaur to life.
Progress Tracker
0% Complete
— BASE :
Round 4 :
(1 sc; inc)*6 (18)
Round 7 :
(2 sc; inc)*6 (24)
Round 11 :
(3 sc; inc)*6 (30)
Round 16 :
(4 sc; inc)*6 (36)
Round 22 :
(5 sc; inc)*6 (42)
Round 29 :
(6 sc; inc)*6 (48)
Round 37 :
(7 sc; inc)*6 (54)
Round 46 :
(8 sc; inc)*6 (60)
Round 47 :
FLO (9 sc; inc)*6 (66)
Round 48 :
5 sc; inc; (10 sc; inc)*5; 5 sc (72)
Round 49 :
(11 sc; inc)*6 (78)
Round 50 :
6 sc; inc; (12 sc; inc)*5; 6 sc (84)
Round 51 :
(13 sc; inc)*6 (90)
Round 52 :
7 sc; inc; (14 sc; inc)*5; 7 sc (96)
Round 53 :
(15 sc; inc)*6 (102)
Round 54 :
8 sc; inc; (16 sc; inc)*5; 8 sc (108)
Round 55 :
(17 sc; inc)*6 (114)
Round 56-62 :
114 sc (114)
Round 63 :
(17 sc; dec)*6 (108)
Round 64 :
8 sc; dec; (16 sc; dec)*5; 8 sc (102)
Round 65 :
(15 sc; dec)*6 (96)
Round 66 :
7 sc; dec; (14 sc; dec)*5; 7 sc (90)
Round 67 :
(13 sc; dec)*6 (84)
Round 68 :
6 sc; dec; (12 sc; dec)*5; 6 sc (78)
Round 69 :
(11 sc; dec)*6 (72)
Round 70 :
5 sc; dec; (10 sc; dec)*5; 5 sc (66)
Round 71 :
(9 sc; dec)*6 (60)
Round 72 :
connect round 71 with round 47 (BLO) with 60 sc (60) fill with stuffing as you go, then continue to work in rounds.
Round 73 :
(8 sc; dec)*6 (54)
Round 74 :
(7 sc; dec)*6 (48)
Round 75 :
(6 sc; dec)*6 (42)
Round 76 :
(5 sc; dec)*6 (36)
Round 77 :
(4 sc; dec)*6 (30)
Round 78 :
(3 sc; dec)*6 (24)
Round 79 :
(2 sc; dec)*6 (18)
Round 80 :
(1 sc; dec)*6 (12)
Round 81 :
6 dec (6) cut the yarn, pull off hole, hide a tail.
— LEGS :
Info :
(make 2) With pink yarn
Round 3 :
(1 sc; inc)*6 (18)
Round 4 :
(2 sc; inc)*6 (24)
Round 5 :
(3 sc; inc)*6 (30)
Round 6 :
(4 sc; inc)*6 (36)
Round 7 :
BLO (2 sc; inc)*4; 24 sc (40)
Round 8 :
(3 sc; inc)*4; 24 sc (44)
Round 9 :
3 sc; dec; (4 sc; inc)*2; 3 sc; dec; 24 sc(44)
Round 10 :
2 sc; dec; (4 sc; dec)*2; 2 sc; dec; 24 sc(40)
Round 11 :
3 sc; (3 sc; dec)*2; 27 sc (38)
Round 12 :
3 sc; (2 sc; dec)*2; 27 sc (36)
Round 14 :
(4 sc; dec)*6 (30)
Round 15 :
(3 sc; dec)*6 (24) fill with stuffing
Round 16 :
BLO (2 sc; dec)*6 (18)
Round 17 :
(1 sc; dec)*6 (12) close the hole, leave a tail for sewing
NAILS (make 4 on each foot) :
With white yarn in one sc of the foot make (3 ch; 3 tr) and crochet them together, fasten off, cut the yarn, pull it through and tide a knot like in the pictures, then hide sticking yarn.
Info :
Sew legs to base in the front loops of round 16 like in the pictures (pin it before sewing, it really helps:)
— LARGE RING :
Round 1 :
60 ch; slst in 1st ch (60)
Round 2 :
(9 sc; inc)*6 (66)
Round 3 :
5 sc; inc; (10 sc; inc)*5; 5 sc (72)
Round 4 :
(11 sc; inc)*6 (78)
Round 5 :
6 sc; inc; (12 sc; inc)*5; 6 sc (84)
Round 6 :
(13 sc; inc)*6 (90)
Round 7 :
7 sc; inc; (14 sc; inc)*5; 7 sc (96)
Round 8 :
(15 sc; inc)*6 (102)
Round 16 :
(15 sc; dec)*6 (96)
Round 17 :
7 sc; dec; (14 sc; dec)*5; 7 sc (90)
Round 18 :
(13 sc; dec)*6 (84)
Round 19 :
6 sc; dec; (12 sc; dec)*5; 6 sc (78)
Round 20 :
(11 sc; dec)*6 (72)
Round 21 :
5 sc; dec; (10 sc; dec)*5; 5 sc (66)
Round 22 :
(9 sc; dec)*6 (60)
Info :
Sew round 22 with round 1, fill with stuffing as you go.
— MIDDLE RING :
Round 1 :
48 ch; slst in 1st ch (48)
Round 2 :
(7 sc; inc)*6 (54)
Round 3 :
4 sc; inc; (8 sc; inc)*5; 4 sc (60)
Round 4 :
(9 sc; inc)*6 (66)
Round 5 :
5 sc; inc; (10 sc; inc)*5; 5 sc (72)
Round 6 :
(11 sc; inc)*6 (78)
Round 7 :
6 sc; inc; (12 sc; inc)*5; 6 sc (84)
Round 8 :
(13 sc; inc)*6 (90)
Round 16 :
(13 sc; dec)*6 (84)
Round 17 :
6 sc; dec; (12 sc; dec)*5; 6 sc (78)
Round 18 :
(11 sc; dec)*6 (72)
Round 19 :
5 sc; dec; (10 sc; dec)*5; 5 sc (66)
Round 20 :
(9 sc; dec)*6 (60)
Round 21 :
4 sc; dec; (8 sc; dec)*5; 4 sc (54)
Round 22 :
(7 sc; dec)*6 (48)
Info :
Sew round 22 with round 1, fill with stuffing as you go.
— ARMS :
Info :
(make 2) With pink yarn
Round 3 :
(1 sc; inc)*6 (18)
Round 4 :
(2 sc; inc)*6 (24)
Round 10 :
(10 sc; dec)*2 (22)
Round 16 :
(9 sc; dec)*2 (20)
Round 22 :
(8 sc; dec)*2 (18)
Round 23 :
18 sc (18) fill with a little bit of stuffing
Round 24 :
(7 sc; dec)*2 (16)
Round 25 :
Fold in half and make 8 sc, fasten off, leave a long tail for sewing.
NAILS (make 3 on each hand) :
With white yarn in one sc of the hand make (2 ch; 2 dc) and crochet them together, fasten off, cut the yarn, pull it through and tide a knot the same way as we did with feet, then hide sticking yarn.
— SMALL RING :
Round 1 :
36 ch; slst in 1st ch (36)
Round 2 :
(5 sc; inc)*6 (42)
Round 3 :
3 sc; inc; (6 sc; inc)*5; 3 sc (48)
Round 4 :
(7 sc; inc)*6 (54)
Round 5 :
4 sc; inc; (8 sc; inc)*5; 4 sc (60)
Round 6 :
(9 sc; inc)*6 (66)
Round 7 :
5 sc; inc; (10 sc; inc)*5; 5 sc (72)
Round 8 :
(11 sc; inc)*6 (78)
Round 16 :
(11 sc; dec)*6 (72)
Round 17 :
5 sc; dec; (10 sc; dec)*5; 5 sc (66)
Round 18 :
(9 sc; dec)*6 (60)
Round 19 :
4 sc; dec; (8 sc; dec)*5; 4 sc (54)
Round 20 :
(7 sc; dec)*6 (48)
Round 21 :
3 sc; dec; (6 sc; dec)*5; 3 sc (42)
Round 22 :
(5 sc; dec)*6 (36)
Info :
Sew round 22 with round 1, fill with stuffing as you go.
Info :
Make "dimples" in the arms. Sew arms to the small ring as you can see in the pictures
— HEAD :
Info :
The head consists of three parts: main part, large bony frill and inner part.
MAIN PART (with pink yarn) :
Round 1. 6 sc in MR (6)
Round 3 :
(1 sc; inc)*6 (18)
Round 4 :
(5 sc; inc)*3 (21)
Round 5 :
(6 sc; inc)*3 (24)
Round 6 :
(7 sc; inc)*3 (27)
Round 7 :
(8 sc; inc)*3 (30)
Round 8 :
(9 sc; inc)*3 (33)
Round 9 :
(10 sc; inc)*3 (36)
Round 10 :
(11 sc; inc)*3 (39)
Round 11 :
(12 sc; inc)*3 (42)
Round 12 :
(13 sc; inc)*3 (45)
Round 13 :
(14 sc; inc)*3 (48)
Round 14 :
(15 sc; inc)*3 (51)
Round 15 :
(16 sc; inc)*3 (54)
Round 16 :
(8 sc; inc)*4; 17 sc; inc (59)
Round 17 :
(9 sc; inc)*4; 18 sc; inc (64)
Round 18 :
(10 sc; inc)*4; 19 sc; inc (69)
Round 19 :
(5 sc; inc)*8; 21 sc (77)
Round 20 :
(6 sc; inc)*7; 28 sc (84)
Round 27 :
(BLO 60 sc); 3 sc; 18 ch (skip 18 sc); 3 sc (84)
Round 29 :
(BLO 60 sc); 24 sc (84)
Round 34 :
(12 sc; dec)*6 (78)
Round 35 :
(11 sc; dec)*6 (72)
Round 36 :
(10 sc; dec)*6 (66)
Round 37 :
(9 sc; dec)*6 (60)
Round 38 :
(8 sc; dec)*6 (54)
Round 39 :
(7 sc; dec)*6 (48)
Round 40 :
(6 sc; dec)*6 (42)
Round 41 :
(5 sc; dec)*6 (36)
Round 42 :
(4 sc; dec)*6 (30)
Round 43 :
(3 sc; dec)*6 (24)
Round 44 :
(2 sc; dec)*6 (18)
Round 45 :
(1 sc; dec)*6 (12)
— LARGE BONY FRILL :
Info :
With pink yarn start to crochet in 60 front loops of R 26:
Round 1 :
5 sc; (2 inc; 10 sc)*4; 2 inc; 5 sc turn and continue to crochet in front loops of round 28; 5 sc; (2 inc; 10 sc)*4; 2 inc; 5 sc (140)
Round 3 :
Sew back loops of round 2, crochet FLO: dec; 4 sc; (2 inc; 12 sc)*4; 2 inc; 4 sc; 2 dec; 4 sc; (2 inc; 12 sc)*4; 2 inc; 4 sc; dec (156)
Round 5 :
Sew back loops of round 4, crochet FLO: dec; 4 sc; (2 inc; 14 sc)*4; 2 inc; 4 sc; 2 dec; 4 sc; (2 inc; 14 sc)*4; 2 inc; 4 sc; dec (172)
Round 7 :
Sew back loops of round 6, crochet FLO: dec; 4 sc; (2 inc; 7 sc)*8; 2 inc; 4 sc; 2 dec; 4 sc; (2 inc; 7 sc)*8; 2 inc; 4 sc; dec (204)
Round 9 :
Sew back loops of round 8, crochet FLO: 2 dec; 2 sc; (2 inc; 9 sc)*8; 2 inc; 2 sc; 4 dec; 2 sc; (2 inc; 9 sc)*8; 2 inc; 2 sc; 2 dec (232)
Round 10 :
232 sc (232) fasten off.
Info :
Now we need to make 9 points on edges, they will be located in places where we made 2 inc in the R9 of the frill. Sew stitches between those points FLO, fill with stuffing as you go.
POINTS on edges (9) :
With white yarn R1. BLO 4sc, turn 4 sc (8)
Round 3 :
(2 sc; dec)*2 (6)
Round 4 :
6 sc (6) fill with stuffing, fasten off.
Info :
With pink yarn make (1 sc; inc)*4 (12) in front loops around each point.
Info :
If you don't want to crochet all the details you may simply connect the edges with white yarn: 4sc; (1 hdc; 2 dc inc; 1 hdc; 9 sc)*8; 1 hdc; 2 dc inc; 1 hdc; 4 sc, fasten off.
Info :
Insert safety eyes in R16, between 11sc-12sc (15 sc apart) between 26sc-27sc or sew crochet eyes.
— INNER PART :
Info :
Now return to the hole that we left between rounds 26 and 27, continue to crochet in rounds:
Round 5 :
(4 sc; dec)*6 (30)
Round 8 :
(3 sc; dec)*6 (24)
Round 11 :
(2 sc; dec)*6 (18)
Round 13 :
(1 sc; dec)*6 (12)
Round 14 :
6 dec (6) fasten off.
— TAIL :
Round 4 :
(2 inc; 4 sc)*2 (16)
Round 6 :
1 sc; 2 inc; 6 sc; 2 inc; 5 sc (20)
Round 8 :
2 sc; 2 inc; 8 sc; 2 inc; 6 sc (24)
Round 10 :
3 sc; 2 inc; 10 sc; 2 inc; 7 sc (28)
Round 12 :
4 sc; 2 inc; 12 sc; 2 inc; 8 sc (32)
Round 14 :
5 sc; 2 inc; 14 sc; 2 inc; 9 sc (36)
Round 16 :
6 sc; 2 inc; 16 sc; 2 inc; 10 sc (40)
Round 18 :
7 sc; 2 inc; 18 sc; 2 inc; 11 sc (44)
Round 20 :
8 sc; 2 inc; 20 sc; 2 inc; 12 sc (48)
Round 22 :
9 sc; 2 inc; 22 sc; 2 inc; 13 sc (52)
Round 24 :
10 sc; 2 inc; 24 sc; 2 inc; 14 sc (56)
Round 26 :
11 sc; 2 inc; 26 sc; 2 inc; 15 sc (60)
Round 28 :
12 sc; 2 inc; 28 sc; 2 inc; 16 sc (64)
Round 29 :
64 sc (64) fasten off, fill with stuffing, sew to the base.
— LARGE SPOTS :
Info :
(make 3) With purple yarn
Round 3 :
(1 sc; inc)*6 (18)
Round 4 :
(2 sc; inc)*6 (24) fasten off, leave long tail for sewing.
— MEDIUM SPOTS :
Info :
(make 6) With purple yarn
Round 3 :
(1 sc; inc)*6 (18) fasten off, leave long tail for sewing.
— SMALL SPOTS :
Info :
(make 8) With purple yarn
Round 2 :
6 inc (12) fasten off, leave long tail for sewing.
— BROW HORNS :
Info :
(make 2) Start with white yarn
Round 2 :
(1 sc; inc)*3 (9)
Round 4 :
(2 sc; inc)*3 (12)
Round 6 :
(3 sc; inc)*3 (15)
Round 7-10 :
15 sc (15) change to pink color
Round 11 :
FLO (1 sc; inc)*6 (18)
Round 12 :
18 sc (18) fasten off.
— SHORT HORN :
Info :
(make 1) Start with white yarn
Round 2 :
(1 sc; inc)*3 (9)
Round 4 :
(2 sc; inc)*3 (12)
Round 6 :
(3 sc; inc)*3 (15)
Round 7-8 :
15 sc (15) change to pink color
Round 9 :
FLO (1 sc; inc)*6 (18)
Round 10 :
18 sc (18) fasten off.
Info :
Fill with stuffing and sew horns as in the pictures using back loops of round 10 (brow horns) and back loops of round 8 (short horn)
This Triceratops amigurumi pattern brings playful charm and detailed shaping to your crochet projects. Pin, sew and stuff each piece with care to create a lovable, huggable dinosaur companion. Finished project is a fun stacking ring tower and adorable display piece, perfect for gifting or keeping. 🧶🦖