🧢 Beautiful ✨ Detailed πŸ’ Adorable

Trapeze Bag Pattern

Trapeze Bag Pattern
4.6β˜… Rating
5-7 Hours Time Needed
4.1K Made This
βœ‚οΈ

Intermediate Level

Ideal for those with basic crochet experience, featuring slightly more advanced stitches and techniques to expand your skills.

⏱️

Weekend Treat

Takes 5-7 hours, making it an enjoyable project to finish over a couple of days.

✨

Stylish Touch

An elegant detail to elevate any look, combining traditional techniques with contemporary design sensibilities.

About This Trapeze Bag Pattern

This pattern creates a modern trapeze tote made from three hexagon panels joined with a central square panel. The design uses cord worked in double crochet motifs to create crisp geometric texture and eyelet rows. It is worked flat in pieces and assembled with slip stitches for a clean finish. The pattern includes photo steps for the magic ring and joining instructions so you can reproduce the look reliably.

Trapeze Bag Pattern crochet pattern - detailed view of completed project

The finished bag measures approximately 15" (38 cm) high and 12" (30.5 cm) wide using 3 mm cord and a 5 mm hook. Adjust yarn thickness or hook size to change the final bag size and drape.

Why You'll Love This Trapeze Bag Pattern

I absolutely love this pattern because it turns simple crochet shapes into a modern, structured bag with lots of visual interest. I enjoy how the hexagon and square panels interlock to create a sculptural silhouette that still feels lightweight. The project is satisfying because you work small panels and then assemble them into something bigger β€” that process always feels rewarding to me. I also love that the pattern is flexible: you can alter cord thickness or add colorful accents to make each bag unique.

Trapeze Bag Pattern step 1 - construction progress Trapeze Bag Pattern step 2 - assembly progress Trapeze Bag Pattern step 3 - details and accessories Trapeze Bag Pattern step 4 - final assembly and finishing

Switch Things Up

I love how easily this pattern can be customized by changing cord thickness or hook size; try a bulkier cord for a chunkier, sturdier bag or a thinner cord for a delicate mini version.

If you want color variation, I often alternate panel colors or make each hexagon a different shade to create a patchwork effect that still reads as a cohesive design.

I sometimes add a lining for added structure and to prevent small items from slipping through the eyelet rows; use a lightweight cotton lining and hand-sew it inside.

To change the bag size, I adjust the cord and hook: switching to a 6 mm hook and chunkier cord creates a much larger carryall, while a 4 mm hook with thinner cord makes a compact purse.

I also like to experiment with handles β€” leather handles give a polished finish while a crocheted chain strap keeps the look fully handmade.

Try adding decorative tassels or a zippered pocket inside for extra practicality; I often stitch a small pocket to the lining before inserting it.

If you prefer a firmer base, add a thin piece of stiff interfacing or cut-to-fit plastic canvas covered with fabric to the bottom before attaching the lining.

For a different texture, replace some double crochet rounds with half double crochets or front loop only rows to create subtle ridges β€” this changes how the panels fold and drape.

I also enjoy combining metallic or ribbon cord for accents around the eyelet rows to give the bag a touch of shine and durability at stress points.

Lastly, try making matching accessories like a small coin purse or phone sleeve using the square panel instructions so you have a coordinated set to gift or sell.

Common Mistakes & How to Fix Them

βœ— Not counting stitches after each round can cause shape distortion and mismatched corners; always count your stitches at the end of each round to confirm the total before moving on. βœ— Pulling the cord too tightly while working rounds can distort the hexagon shape and tighten corner holes; maintain an even, moderate tension and relax the cord when finishing rounds. βœ— Forgetting to leave long ends when instructed will make joining and closing rounds difficult; leave the specified lengths of cord (20 cm, 110-120 cm, 4 m) so you have enough for joining and finishing. βœ— Skipping the needle weave-in step leaves loose tails on the front side; always weave the starting tail between stitches on the wrong side and cut off as instructed. βœ— Joining hexagons with misaligned front sides will produce an uneven bag front; place pieces front side together as shown and pin or align before slip-stitch joining to ensure correct orientation.

Trapeze Bag Pattern

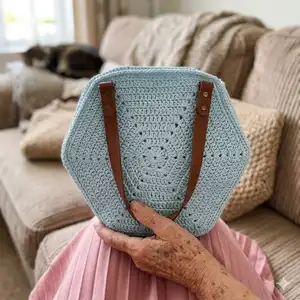
Make a stylish trapeze-shaped crochet bag using cord and simple geometric panels. This pattern walks you through crocheting hexagon and square panels, joining them, and finishing the bag with handles. You will enjoy the clean lines and modern look that suit everyday wear or gifting. Follow the step-by-step photos and clear instructions to create a lasting handmade accessory.

Intermediate 5-7 Hours

Materials Needed for Trapeze Bag Pattern

β€” Main Fabric

  • 01
    3-4 mm cotton, acrylic or polyester cord, 300-350 meters total
  • 02
    Sample used: 3 mm polyester cord (used in photographs), amount within the 300-350 m recommendation
  • 03
    Use 3 cords for hexagon and square panels as required by size adjustments

β€” Tools Required

  • 01
    Crochet hook size 5 mm
  • 02
    Scissors
  • 03
    Stitch markers
  • 04
    Yarn needle for sewing and hiding ends
  • 05
    Handles for bag with buttons or sewn ones (leather or alternative)
  • 06
    Pins (optional) to align pieces during assembly

Progress Tracker

0% Complete

β€” Description :

Info :

Make a Magic Ring. Step by step guide for making a Magic Ring (MR) can be found on page 12.

Round 1 :

in MR: ch5 (counts as 1dc and a ch2), [ 2dc, ch2 ]*5, 1dc, tighten the ring firmly, sl st in 3rd ch (12) (pic. 1-5)

Info :

ch2 space will be referred to as the corner chain space = corner (pic. 5)

Round 2 :

begin in the corner: (1sc, ch3, 1dc) 1sc and a ch1 counts as 1dc here and throughout pattern, dc in the next 2 stitches, [ in the next corner: (1dc, ch2, 1dc), 2dc ]*5, sl st in first ch of ch3 (24) (pic. 6-12)

Info :

Using a needle, weave in the loose thread that began the magic ring between stitches on the wrong side. Cut off the end (pic. 13)

Round 3 :

begin in the corner: (1sc, ch3, 1dc), 4dc, [ in the next corner: (1dc, ch2, 1dc), 4dc ]*5, sl st (36) (pic. 14)

Round 4 :

begin in the corner: (1sc, ch3, 1dc), 6dc, [ in the corner: (1dc, ch2, 1dc), 6dc ]*5, sl st (48)

Round 5 :

begin in the corner: (1sc, ch3, 1dc), 8dc, [ in the corner: (1dc, ch2, 1dc), 8dc ]*5, sl st (60)

Round 6 :

begin in the corner: (1sc, ch3, 1dc), 10dc, [ in the corner: (1dc, ch2, 1dc), 10dc ]*5, sl st (72)

Round 7 :

begin in the corner: (1sc, ch3, 1dc), 12dc, [ in the corner: (1dc, ch2, 1dc), 12dc ]*5, sl st (84)

Round 8 :

begin in the corner: (1sc, ch3, 1dc), 14dc, [ in the corner: (1dc, ch2, 1dc), 14dc ]*5, sl st (96)

Info :

Cut off the cord, leaving the end about 20 cm. Pull the cord out as shown on pic. 15. Using a needle close the round as it is shown on pic. 16-17. Hide the end on wrong side and cut it off.

Info :

Crochet two more hexagons using rows 1-8. In these 2 hexagons leave the ends of cord about 110-120 centimeters (pic. 22)

β€” Joining Hexagons :

Info :

Put the 1st and 2nd hexagons with the front side as shown on picture 21. Join parts: work sl st along 1 side through 2 layers (use the end of the 110 cm of cord that you left on the second hexagon). (pic. 22-24) Make the first and the last sl st in ch of corner spaces. (pic. 21) You'll have 18 sts in total. Hide the end on the wrong side and cut it off. (pic. 25-27)

Info :

Join the 2nd and 3rd hexagons in the same way (use the end of the 110 cm of cord that you left on the third hexagon) (pic. 28)

β€” Square Part :

Round 1 :

in MR: ch3 (counts as a 1 dc ), 3dc, [ ch2, 4dc ]*3, ch1, tighten the ring firmly, sl st in 3rd ch (16) (pic. 31-36)

Round 2 :

into the corner just behind: (1sc, ch1, 1dc) 1sc and a ch1 counts as 1dc here and throughout pattern, [ dc in the next 4 stitches, into the next corner: (2dc, ch2, 2dc) ]*3, 4dc, into the last corner: (2dc, ch1, sl st in ch1 ) (32) (pic. 38-46)

Info :

Using a needle, weave in the loose thread that began the magic ring between stitches on the wrong side (pic. 47)

Round 3 :

into the corner just behind: (1sc, ch1, 1dc), [ 8dc, into the next corner: (2dc, ch2, 2dc) ]*3, 8dc, into the last corner: (2dc, ch1, sl st) (48)

Round 4 :

into the corner just behind: (1sc, ch1, 1dc), [ 12dc, into the next corner: (2dc, ch2, 2dc) ]*3, 12dc, into the last corner: (2dc, ch2, sl st) (64) (pic. 48)

Info :

Leave the end of the cord about 4 meters long. Pull out the cord as shown on picture 49. Crochet the second square using rows 1-4 (pic. 50)

β€” Assembly :

Info :

Steam the parts. Follow the recommendations for your cord or yarn

Info :

Take the part of 3 hexagons and fold it in half, front side outside. Put a square part near as shown on picture 51. The long end of the cord should be on top. Join the square to the hexagon with a sl st. One square side has 16 dc. One side of hexagon has 16 dc. Make the first sl st in ch of the corner spaces (pic. 52)

Info :

Pay attention on how to work in corners, shown on pictures 55-56. Join one ch of the corner with ch of one hexagon, then join second ch with ch of another hexagon.

Info :

Continue work with sl st to the end of square part. (pic. 57-58)

Info :

Make 5 sl st on sides of hexagons, connecting them (pic. 59)

Info :

Hide the end of cord on the wrong side. Cut off. (pic. 60-61)

Info :

Join the square part on the other side of the bag. Work in the same way. (pic. 62-63)

Info :

Steam the bag. Follow the recommendations for your cord or yarn.

Info :

Insert or sew the handles at the top of the bag in the corner spaces. Your bag is finished! (pic. 64)

Assembly Instructions

  • Steam all parts according to the cord or yarn recommendations to shape panels before joining.
  • Fold the 3-hexagon strip in half (front side outside) and align a square panel at the top; join the square to the hexagon by slip stitching through both layers matching the 16 dc sides.
  • Join the three hexagons together by placing front sides together and slip stitching along one side through two layers, making the first and last sl st in the corner chain spaces; you will have 18 sts for that side.
  • Continue joining by slip stitching the square to the hexagon edges, then connect hexagon sides with 5 sl st where instructed to shape the bag body, hiding ends on the wrong side as you go.
  • After joining both sides with the square, steam the assembled bag and insert or sew handles at the top in the corner chain spaces for secure attachment.

Important Notes

  • πŸ’‘Leave the cord ends the required lengths for each piece: about 20 cm for the first hexagon finish, 110-120 cm for the two hexagons used for joining, and about 4 meters for the square joining; this ensures you have enough cord for joining.
  • πŸ’‘Work with the front sides oriented exactly as shown when joining panels to ensure the bag shape and decorative eyelet rows align correctly.
  • πŸ’‘Weave in and hide the starting tails on the wrong side between stitches with a needle to keep the front neat before cutting off excess cord.

This trapeze bag pattern blends simple geometry with modern style to create a handmade statement piece that is both functional and beautiful. The panels are quick to make and gratifying to assemble, turning small motifs into a roomy, sculpted bag. Perfect for gifting or keeping β€” grab your cord and let the hexagons fall into place! πŸ§ΆπŸ‘œ

You ask,

we answer.

FAQs

What size will the finished piece be?

The finished bag measures approximately 15" (38 cm) high and 12" (30.5 cm) wide when using 3 mm cord and a 5 mm hook.

Can I use different yarn weights for this pattern?

Yes, you can use different cord or yarn weights, but the final size and structure will change. Use an appropriate hook size for your chosen material and expect the bag to be larger with thicker cord.

Do I need prior crochet experience for this pattern?

This pattern is rated intermediate; basic knowledge of magic ring, double crochet, single crochet, and slip-stitch joining is recommended.

How long does this project typically take to complete?

Most crocheters complete this project in 5-7 hours, depending on experience, yarn choice, and how quickly you assemble the panels.