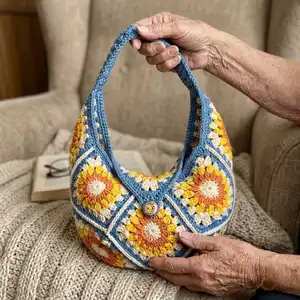
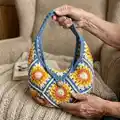
Make a charming Molly Boho Bag using DK yarn and easy-to-follow square motifs. This pattern guides you through 11 colorful granny-style squares, joining and shaping into a 3D boho bag with a crocheted strap. Youll love the mix-and-match colorplay and the clear step-by-step photos to help you through assembly.
Progress Tracker
0% Complete
— Supplies & Stitches :
Info :
1-5 colours of DK yarn. Size 6mm J + 5mm H Crochet hook. Needle. Scissors. Bag hooks (Hardware). Stitch markers.
Info :
US Terms used: Single Crochet, Double crochet, Cluster Stitch, Puff stitch, Half Double crochet, Treble crochet, Single Crochet Foundation Chain.
— Notes :
Info :
This bag is made of squares with 5 rows, you can use from 1-5 colours to make these bags, the one I have photographed in this pattern has used 4 colours with the cream one repeated twice. This bag is a really fun way to experiment with colorways and I have also made this bag using up just scrap yarn so each square is different and its really pretty, have fun with it and make it your own.
Info :
I have included a strap pattern that requires hardware of bag hooks, these can be purchased on ebay or amazon and come in a variety of colours. You may prefer to attach your handle directly to the bag or alternatively purchase a ready made handle, all of which look great so go with your preference.
— Square (5-row motif) :
Round 1 :
Using the 6mm J hook Magic Ring, Chain 3 (counts as first stitch) Double crochet 15 stitches more (16 stitches total)
Info :
Pull magic circle closed, slip stitch into first stitch.
Round 2 :
Change Colour. Chain 2 (counts as first stitch). Cluster stitch into each stitch (16 total). Slip stitch closed.
Info :
Cluster stitch: Start a Double crochet but only pull through the first loop leaving the second loop on the hook, yarn over and double crochet into same stitch and only pull through the first loops ending up with 3 loops on the hook (for the first cluster, the following clusters will have 4 loops on the hook), pull through all 3 loops and chain 1.
Info :
3 stitches per cluster, 16 clusters total.
Round 3 :
Change colour, Chain 2. As before cluster stitches but this time its 4 stitches per cluster and chain 2 between each. Slip stitch closed.
Round 4 :
Change Colour, Chain 2 (counts as first Double).
Round 4 :
1. Double crochet 3 times into the same stitch.
Round 4 :
2. Half Double crochet 3 times into the next stitch.
Round 4 :
3. Double crochet 3 times into the next stitch.
Round 4 :
4. Treble crochet 3 times into the next stitch.
Round 4 :
5. Chain 1 Treble crochet 3 times into the same stitch as the first set of trebles creating a corner.
Round 4 :
Repeat 1-5 all around.
Round 5 :
Change Colour, Chain 2 (counts as first Double stitch). Double crochet 3 times into each stitch.
Round 5 :
Once you get to the corner Double crochet 3 times, chain 1, Double crochet 3 times again into the same corner stitch, continue round.
Info :
You need to make 11 of these squares.
— Layout & Joining :
Info :
Start with 8 of the 11 squares and lay them out in the arrangement shown in the pattern images (sample uses 8 laid out and then additional squares added at top corners).
Info :
Its time to start to stitch the squares together. Using Single crochet in the back stitch only of the squares. I find placing the squares back to back helps this.
Info :
I have used a contrasting colour but you can use the same colour if you dont want it to be as visible.
— Assembly (forming the bag) :
Info :
Fold in half. You now need to stitch the bag along these lines. The bag will start to take on its 3D shape and not sit flat anymore.
Info :
Now you add 2 more squares at the top corners, these will be folded in half.
Info :
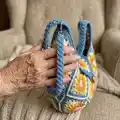
The last Square will need a little manipulation again adding to the 3D shape of the final bag. Stitch it to the back of the bag so it can be folded over the front.
Info :
Now all the squares are joined Single crochet around the whole of the edge of the bag. Once you reach the point of the flap chain 8 and slip stitch back into the same stitch. Continue Single crochet around until you reach each corner (marked with yellow stars on the picture above) Chain 5 and slip stitch into the same stitch.
Info :
Single crochet around again and add 8 stitches into the chain loop for the button hole and 5 stitches into the chain loops at the sides of the bag.
Info :
Choose your button and pick the best spot to place it on your bag, stitch it on.
— Strap :
Row 1 :
Using a size 5mm H hook Start by making a row of Single crochet foundation chain. Make this row as long as you like in multiples of 2, I have done 100 stitches. Going down a hook size for the foundation row helps to keep it neat and tidy.
Row 2 :
Going back to the 6mm J hook, chain 1, Turn work, Single crochet along the whole row. Chain 4, turn work.
Row :
Skip 1 stitch and Double crochet.
Info :
This row is a bead stitch row so you are going to essentially be doing a sideways puff stitch onto the Double crochet you have just made.
Info :
Loop over the hook 4 times before pulling the working yarn through and chain 1, Skip 1, Double crochet, Bead stitch, Skip 1.... cont. On the last stitch leave it as a Double.
Row :
Chain 1, Turn work. Single crochet into each stitch along. One on top of each bead and one between as shown in the photos.
Row :
Single crochet twice into the last stitch space, chain 1 and turn work. Single crochet along every stitch, chain 1 and turn work, repeat for a third time.
Info :
Cut and weave in your ends.
Info :
Take a needle and length of yarn and simply sew your bag clips to the ends of your strap. Clip it to your bag and wear with pride!
— Finishing :
Info :
Now its time to start the strap: sew clips to strap ends, attach to bag hooks and adjust length as desired. Ensure all ends are securely woven in and the button is firmly stitched to the flap for regular use.
This Molly Boho Bag pattern is a joyful mix of colour, texture and handmade charm you can personalise endlessly. Make it in scraps or a carefully chosen palette to suit your style, and enjoy the meditative process of creating each square by hand. Share your finished bag with pride and wear it everywhere! 🧶✨