About This Tishka the cat Amigurumi Pattern
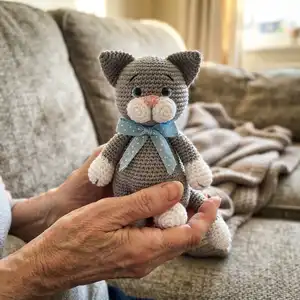
This pattern creates a standing amigurumi cat named Tishka with a sculpted muzzle, expressive eyes, and fluffy fur detailing. It covers crocheting the head, body, ears, paws, tail and muzzle, plus assembly and decorating tips. The design includes instructions for combining grey and white colors and finishing touches for a professional look.
You'll get detailed round-by-round instructions and notes on stuffing, joint placement and combing. Helpful photos and a short sculpting video link are included to guide the finishing steps.
Why You'll Love This Tishka the cat Amigurumi Pattern
I absolutely love this pattern because it balances classic amigurumi techniques with sculpting details that really bring the character to life. I enjoy the process of shaping the muzzle and defining the eyes to create expression. The alternating color paws and tail give Tishka a charming, handcrafted look that feels unique every time. I also appreciate how the pattern encourages small finishing touches like combing and trimming to achieve a fluffy, professional result.
Switch Things Up
I love how easy it is to personalize Tishka by changing colors; try pastel shades for a baby-safe look or bold colors for a playful collectible.
If you want a mini keychain version, use fingering weight yarn and a smaller hook to scale the pattern down and add a keyring.
I sometimes swap the glass eyes for embroidered eyes for a fully child-safe toy; this gives a sweet, handcrafted expression.
For a squishier version, use a slightly looser tension and add more stuffing to create a plush, cuddly feel.
I like to embroider different eyebrow shapes to change the character's expression — try angled brows for curiosity or soft curves for a gentle look.
Try adding tiny crocheted accessories like a bow tie, scarf, or a little hat to give each cat its own personality and story.
If you want posable limbs, use wire inside the arms or choose a larger plastic joint for stronger support and movement.
I often add a small bell or a tag to the collar area for a charming finishing touch and to make the toy gift-ready.
For texture variation, combine a fluffy mohair held together with Nako Paris for an extra furry coat or use boucle yarn for a curly effect.
I recommend testing placement of eyes and muzzle before gluing — try temporarily pinning them and photographing from the front to ensure the face reads well.
Common Mistakes & How to Fix Them
✗ Skipping stitch markers during rounds can shift your increases and decreases; place a marker at the start of each round and move it after each completed round to maintain alignment.
✗ Forgetting to stuff gradually leads to lumps or uneven shaping; stuff a little at a time and shape as you go to keep smooth curves and consistent firmness.
✗ Overstuffing small pieces like the muzzle or paws makes seams hard to close; use modest stuffing and add more only if the shape needs it to avoid bulk.
✗ Not placing the plastic joint at the recommended row will affect limb movement and stability; lock the plastic joint in the row specified and test placement before securing.
✗ Crocheting into slip stitch joins when combining parts can distort the seam; follow the note to join parts with sl st and then crochet around without inserting SC into the sl st to keep an even edge.


