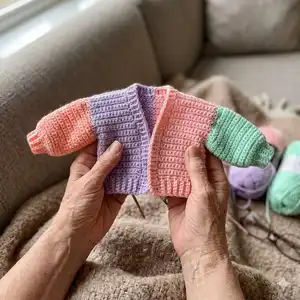
Make an oversized, slouchy Cumulus Cardigan with this clear, photographed crochet pattern designed to teach you a ribbed look using basic stitches. You will learn how to work panels, cuffs, and sleeves, then join them with a flat SLST granny join for crisp seams. The pattern is graded for multiple sizes and includes guidance for custom measurements so you can tailor the fit to your body.
Progress Tracker
0% Complete
— Measurement, Materials, Abbreviation, and Gauge :
Info :
Materials: 4ply Milk cotton yarn or any Size 2 Sport Weight yarn. 4mm crochet hook. Stitch markers. Scissors. Measuring tape. Darning needle.
Info :
Gauge: 21 SC BLO x 22 rows = 4 x 4 inches. Note: Creating a gauge swatch before starting your project is highly encouraged, especially if you will be using a different kind of yarn and hook size from what is recommended.
— Overview :
Info :
The cardigan is composed of a total of 5 pieces worked separately: one back panel, two front panels, and two sleeves. Each piece will end with a row of SLST(s) and will be joined together using the flat SLST granny join method. The diagram shows the direction in which the pieces should be worked and the total number of rows and stitches per row needed for each size (XS/S, M/L, XL/XXL).
— Back Panel :
Foundation Chain :
(111,121,131)
Number of Rows :
(153,175,197)
— Front Panels :
Foundation Chain :
(111,121,131)
Number of Rows :
(57,67,77)
— Sleeves :
Number of Rows :
(113,129,145)
— Front/Back Panel and Ribbing :
Foundation Chain :
CH (111,121,131). For custom sizing: CH until you reach your Front and Back Panel Foundation Chain length and CH 1.
Row 1 :
Starting from the 2nd CH from the hook SLST 15, SC until the end of the row. You should end with a total of (110,120,130) ST(s). CH 1, and turn.
Tip :
Insert your hook into the back ridge of the CH for a neater look.
Row 2 :
SC 1, SC BLO across until 15 CHS REM, SLST BLO 14, SLST 1, CH 1, and turn.
Tip :
Turn your work in the same direction every time you reach this point in the piece, this will ensure that the ends of your ribbing have a consistently nice and straight edge.
Row 3 :
SLST 1, SLST BLO 14, SC BLO across until 1 CH REM, SC 1, CH 1, and turn your work.
Repeat :
Repeat rows 2 and 3 until you complete (153,175,197) rows for the back panel and (57,67,77) rows for the front panels.
Info :
For the back panel and just one of the front panels, do not fasten off; instead secure the last stitch with a stitch marker and leave a trail of yarn that is at least 4 times as long as the width of your piece; that will be used to join the pieces/panels together.
Edging :
This is done in preparation for the joining of pieces and to ensure minimal to no visible gaps in the seams. You will need to SLST into each stitch of the top side of your panel.
— Cuff and Sleeve :
Info :
Like the front/back piece, each row is divided into 2 sections, the cuff and the sleeve section. The cuff will be the section worked using SLST(s) and SLST BLO stitches, while the sleeve section will be worked using SC(s) and SC BLO stitches.
Foundation Chain :
CH 76. For custom sizing: CH until you reach your Sleeve Foundation Chain length and CH 1.
Row 1 :
Starting from the 2nd CH from the hook SLST 15, SC across the row until 1 CH REM, SC 1. You should end with a total of 75 ST(s). CH 1 and turn.
Info :
For custom sizing: Instead of making 15 SLST(s), make as much as you would like the height of the cuff to be, and then make SC(s) on the rest of the remaining ST(s) of the row. CH 1 and turn.
Tip :
Insert your hook into the back ridge of the CH for a neater look.
Rows 2 :
SC 1, SC BLO 58, SC 1. You should end with a total of 60 ST(s). CH 1, and turn.
Row 4 :
SC 1, SC BLO 58, On CH 60 insert your hook through the last ST of the 3rd, 2nd, and 1st row, yarn over and pull through 2 CH(s), and then yarn over and pull through 2 loops. SLST BLO 14, SLST 1. You should end with a total of 75 ST(s). CH 1 and turn. (See photos 1-11 in page 6 or watch the quick tutorial here: https://youtu.be/NCWktH0rmvQ)
Tip :
Turn your work in the same direction every time you reach this point in the piece, this will ensure that the ends of your ribbing have a consistently nice and straight edge.
Row 5 :
SLST 1, SLST BLO 14, SC 1, SC BLO 58, SC 1. You should end with a total of 75 ST(s). CH 1, and turn. Repeat rows 2-5 until you have a total of (113,129,145) rows on your sleeve section.
Info :
For custom sizing - Row 5: Repeat rows 2-5 until you meet your desired cuff width and make sure you end with an odd number of rows. When measuring your cuff make sure that your cuff lays on a flat surface and is not overly stretched out vertically.
Info :
Edging: After ending your last row with a CH 1, do not turn your work and SLST into each space of the top edge of your work starting from the first space of the last stitch of your last row. Do not fasten off, instead secure unfinished ST with a stitch marker and leave a trail of yarn that is at least 4 times as long as the length of your sleeve; this will be used later on to close up the sleeves.
— Sleeves Right Side :
Info :
The right side of the sleeves shows the braided side of the SLST.
— Sleeves Wrong Side :
Info :
The wrong side of the sleeves shows "bumps" that separate the sleeve from the cuff.
— Seaming and Ribbing :
Info :
To join the pieces we will be using the flat SLST granny join method. The right side of the front and back panels, and the sleeves should show the braided side of the SLST.
Attaching the Left Front Panel to the Back Panel (P1) :
In this step you will be joining the front panel with the excess yarn from the edge of the to the back panel. The excess yarn from the front panel's edge will act as the working yarn to join the pieces together. Lay your pieces, right sides facing up. Taking the front panel, re-insert your hook into the last unfinished stitch of the edge, and make sure that your working yarn is under the pieces. Insert your hook into the 2nd CH from the hook and through the 1st SLST of the back panel. Yarn over and pull through both ST(s) and through the first loop on your hook. (See photos 1-8 in page 8 or watch the quick tutorial here: https://youtu.be/KRNf1KvQDl8)
Attaching the Left Front Panel to the Back Panel - Next Step :
On the next stitch, insert your hook into the loop nearest the back panel and through the loop nearest front panel, yarn over and pull through all loops. Repeat this step until you only have one stitch left on the front panel. On the last stitch insert your hook through the last SLST from the front panel and on the next stitch from the back panel, yarn over and pull through both stitches and the last loop, CH1 and fasten off. Make sure to leave a trail long enough to weave in.
Attaching the Right Front Panel to the Back Panel (P1) :
In this step you will be joining the back panel to the front panel. The excess yarn from the back panel's edge will act as the working yarn to join the pieces together. Lay your pieces, right sides facing up. Taking the back panel, re-insert your hook into the last unfinished stitch of the edge, and make sure that your working yarn is under the pieces. Insert your hook into the 2nd SLST from the hook and through the 1st SLST of the front panel. Yarn over and pull through both ST(s) and through the first loop on your hook. On the next stitch, insert your hook into the loop nearest the front panel and through the loop nearest back panel, yarn over and pull through all loops. Repeat this step until you only have one stitch left on the front panel. On the last stitch insert your hook through the SLST from the back panel and on the last stitch from the front panel, yarn over and pull through both stitches and the last loop, CH1 and fasten off. Make sure to leave a trail long enough to weave in.
Attaching the Sleeves to the Front and Back Panel (P1) :
Before the sleeves are attached to the front and back panels you must create an edge across the entire length of the body. If you are working on the left side of the body, start the edge from the bottom of the front piece, and if you are working on the right side start from the bottom of the back piece. Edging of the body piece: create a slip knot and SLST into each ST across the body starting from the very first ST of the row. Once you reach the seam between the back and front panel SLST into the last ST before the seam and SLST into the first ST after the seam and across the entire row, CH 1. Do not fasten off, secure unfinished ST with a stitch marker. (See photos 10.5-10.8 in page 10 and across the entire row, CH 1. Do not fasten off, secure unfinished ST with a stitch marker.)
Attaching the Sleeves - Centering :
To ensure that your sleeve is centered you need to subtract the number of SLST(s) on the edging of the sleeves from the edging of the body pieces, divide the difference by 2 to determine the number of STS you need to skip on the body piece. Example in pattern: Number of STS across the body piece's edge (STS BPE) = 240. Number of STS across the sleeve's edge (STS SE) = 146. Difference = 94. Quotient = 94/2 = 47. Start joining your sleeve on the 48th ST of the body piece's edge.
Info :
To join the body piece to the sleeves follow photos in page 8 and 9 (or watch the quick tutorial here: https://youtu.be/UH6PLdM5hpl). The excess yarn from the sleeve's edge will act as the working yarn to join the pieces together. At the end of the sleeve do not fasten off, instead secure unfinished ST with a stitch marker and make sure to leave a trail 4 times as long as the length of your sleeve; this will later on be used to close up the sleeves.
Closing up the sides of the cardigan and the sleeves :
In this step you will be using the excess yarn from the edge of the body piece and the excess yarn from the sleeve's and the body piece's seam. Follow photos in page 8 and 9 to start joining the body piece together. Once you reach the last ST before the sleeves section, insert your hook into the unfinished stitch of the sleeve's seam, pull through the loop and continue joining the sleeves. (See photos 1-4 in page 12)
— Ribbing :
Info :
The ribbing consists of SLST(s) across the inner sides of the front panels and the neck line starting from the bottom of the right panel. For custom sizing: Increase/decrease the number of rows for a thicker/thinner ribbing.
Row 1 :
Create a slip knot and SLST into each ST across the body starting from the very first ST of the row. Once you reach the front and back panel seam, SLST into the next available CH after the seam, continue to SLST across the front panel and then CH1, and turn.
Row 2 :
SLST 1, SLST FLO across until 1 REM, SLST, CH1, and turn.
Row 3 :
SLST 1, SLST BLO across until 1 REM, SLST CH1, and turn. Repeat to achieve your desired thickness. Fasten off and weave in ends.
Optional :
Adding front ties Row 4: SLST BLO until the closing point where you would like to have the ties, CH until it measure 13 inches or your desired length, skip 1 CH and SLST on each CH across, SLST BLO until you reach the closing point on the opposing side, CH the same number as on the right side, skip 1 CH and SLST on each CH across, SLST BLO across until 1 REM, SLST1, CH1 and fasten off.
— Finishing :
Info :
Weave in all loose ends. Block lightly if desired to relax ribbing and even out shape. Ensure all seams are secured and tails are woven in.
Info :
The pattern ends with photos showing SLST placement at the seams to illustrate the finished joining. End.
This Cumulus Cardigan pattern helps you craft a roomy, modern cardigan with soft ribbed texture and beautifully finished seams. Whether you follow the graded sizes or customize your measurements, the step-by-step photos and join method make assembly simple and satisfying. Have fun creating a piece you will reach for again and again. 🧶✨