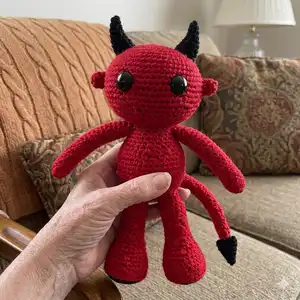
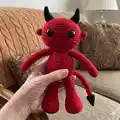
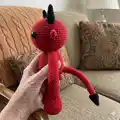
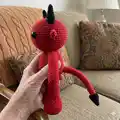
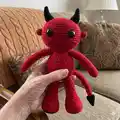
Create a charming little devil amigurumi with this detailed crochet pattern designed for intermediate makers. Youll work small pieces in continuous rounds and learn options for horns, wings, and a tail. The pattern includes clear round-by-round instructions, material lists, and helpful assembly notes so you can finish a playful handmade companion.
Progress Tracker
0% Complete
— Ears :
Info :
Use a 3.00 mm crochet hook. Use main body color. The ears are worked in continuous rounds so you will need a stitch marker for this portion of the tutorial.
Round 1 :
Ch 2. Place 6 sc into the the 2nd ch from your hook. Place your stitch marker. (6 sts)
Round 2-3 :
Sc around. Place stitch marker. (6 sts)
Info :
Break yarn with a long tail for sewing. Do not stuff the ears. Place them aside for now!
— Horns :
Info :
There are two options for horns. Use 2.00 mm crochet hook. Use accent color. The horns are worked in continuous rounds so you will need a stitch marker for this portion of the tutorial. Make 2 horns.
Option 1 (P1) :
Round 1: Ch 2. Place 4 sc into the 2nd ch from your hook. Place your stitch marker. (4 sts)
Round 2 :
{sc, inc} Repeat what's inside the { } for the entire round. Place stitch marker. (6 sts)
Round 3 :
{sc 2, inc} Repeat what's inside the { } for the entire round. Place stitch marker. (8 sts)
Round 4 :
Sc around. Place stitch marker. (8 sts)
Round 5 :
{sc 3, inc} Repeat what's inside the { } for the entire round. Place stitch marker. (10 sts)
Round 6 :
Sc around. Place stitch marker. (10 sts)
Round 7 :
Inc, sc, inc, sc 7. Place stitch marker. (12 sts)
Round 8 :
Sc around. (12 sts)
Round 9 :
Inc, sc 2, inc, sc 8. Place stitch marker. (14 sts)
Round 10 :
Sc around. Place stitch marker. (14 sts)
Round 11 :
Inc, sc 3, inc, sc 9. Place stitch marker. (16 sts)
Round 12 :
inc, sc 14, inc. Place stitch marker. (18 sts)
Round 13 :
Sc 16. Inc twice. Place stitch marker. (20 sts)
Round 14 :
Sc around. (20 sts)
Info :
Break yarn with a long tail for sewing. Gently stuff. Set aside for now!
Option 2 (P1) :
Use 2.00 mm crochet hook. Use accent color. The horns are worked in continuous rounds so you will need a stitch marker for this portion of the tutorial. Make 2 horns.
Round 1 :
Ch 2. Place 4 sc into the 2nd ch from your hook. Place your stitch marker. (4 sts)
Round 2 :
{sc, inc} Repeat what's inside the { } for the entire round. Place stitch marker. (6 sts)
Round 3 :
{sc 2, inc} Repeat what's inside the { } for the entire round. Place stitch marker. (8 sts)
Round 4 :
Sc around. Place stitch marker. (8 sts)
Round 5 :
{sc 3, inc} Repeat what's inside the { } for the entire round. Place stitch marker. (10 sts)
Round 6 :
Sc around. Place stitch marker. (10 sts)
Round 7 :
Inc, sc, inc, sc 7. Place stitch marker. (12 sts)
Round 8 :
Sc around. Place stitch marker. (12 sts)
Info :
Break yarn with a long tail for sewing. Gently stuff. Set aside for now!
— Legs :
Info :
Use 3.00 mm crochet hook. Start with accent color! WATCH for directions on when to change color. The legs are worked in continuous round so you will need a stitch marker for this portion of the tutorial. Make 2 legs. Stuff the legs with poly-fill as you go!
Round 1 :
Ch 2. Place 10 sc into the 2nd ch from your hook. Place your stitch marker. (10 sts)
Round 2 :
{sc, inc} Repeat what's inside the { } for the entire round. Place stitch marker. (15 sts)
Round 3 :
{sc 2, inc} Repeat what's inside the { } for the entire round. Place stitch marker. (20 sts)
Round 4 :
{sc 3, inc} Repeat what's inside the { } for the entire round. Place stitch marker. (25 sts)
Round 5 :
{sc 4, inc} Repeat what's inside the { } for the entire round. Place stitch marker. (30 sts)
Round 6 :
In the blo! {sc 4, dec} Repeat what's inside the { } for the entire round. Place stitch marker. (25 sts)
Round 7-8 :
Sc around. Place your stitch marker. (25 sts)
Round 9 :
{sc 3, dec} Repeat what's inside the { } for the entire round. Place stitch marker. (20 sts)
Round 10-12 :
Sc around. Place your stitch marker. (20 sts)
Round 13 :
{sc 2, dec} Repeat what's inside the { } for the entire round. Place stitch marker. (15 sts)
Round 14-24 :
Sc around. Place your stitch marker. (15 sts)
Round 25 :
{sc, dec} Repeat what's inside the { } for the entire round. Place stitch marker. (10 sts)
Info :
Do not stuff the last two rounds with poly-fill!
Round 26-27 :
Sc around. Place your stitch marker. (10 sts)
Info :
Break yarn with a long tail for sewing! Gently stuff the leg. Make sure to leave the last two rounds unstuffed. Set aside for now!
— Tail :
Info :
The tail is optional! Use 3.00 mm crochet hook. Use main body color. The tail is worked in continuous rounds so you will need a stitch marker for portion of the tutorial. Make 1. Stuff the tail with poly-fill as you go!
Round 1 :
Ch 2. Place 6 sc into the 2nd ch from your hook. Place your stitch marker. (6 sts)
Round 2-28 :
Sc around. Place stitch marker. (6 sts)
Info :
Break yarn with a long tail for sewing. Set tail aside for now!
— Tail Spike :
Info :
Use 2.00 mm crochet hook. Use accent color yarn. The tail spike is worked in continuous rounds so you will need a stitch marker for this portion of the tutorial. Make 1.
Round 1 :
Ch 2. Place 4 sc into the 2nd ch from your hook. Place your stitch marker. (4 sts)
Round 2 :
{sc, inc} Repeat what's inside the { } for the entire round. Place stitch marker. (6 sts)
Round 3 :
{sc 2, inc} Repeat what's inside the { } for the entire round. Place stitch marker. (8 sts)
Round 4 :
Sc around. Place stitch marker. (8 sts)
Round 5 :
{sc 3, inc} Repeat what's inside the { } for the entire round. Place stitch marker. (10 sts)
Round 6 :
Sc around. Place stitch marker. (10 sts)
Round 7 :
Inc, sc, inc, sc 7. (12 sts)
Round 8 :
Sc around. Place stitch marker. (12 sts)
Info :
Break yarn with a long tail for sewing. Flatten the spike. Do not stuff with poly-fill. Take your tapestry needle and sew the tail spike securely in place on the end of your tail. Break yarn and sew in your ends.
— Body :
Info :
Use 3.00 mm crochet hook. Use main body color. The body is worked in continuous rounds so you will need a stitch marker for this portion of the tutorial. Make 1.
Round 1 :
Ch 2. Place 10 sc into the 2nd ch from your hook. Place your stitch marker. (10 sts)
Round 2 :
{sc, inc} Repeat what's inside the { } for the entire round. Place stitch marker. (15 sts)
Round 3 :
{sc 2, inc} Repeat what's inside the { } for the entire round. Place stitch marker. (20 sts)
Round 4 :
{sc 3, inc} Repeat what's inside the { } for the entire round. Place stitch marker. (25 sts)
Round 5 :
{sc 4, inc} Repeat what's inside the { } for the entire round. Place stitch marker. (30 sts)
Round 6 :
{sc 5, inc} Repeat what's inside the { } for the entire round. Place stitch marker. (35 sts)
Round 7 :
{sc 6, inc} Repeat what's inside the { } for the entire round. Place stitch marker. (40 sts)
Round 8 :
{sc 6, dec} Repeat what's inside the { } for the entire round. Place stitch marker. (35 sts)
Round 9-11 :
Sc around. Place stitch marker. (35 sts)
Round 12 :
{sc 5, dec} Repeat what's inside the { } for the entire round. Place stitch marker. (30 sts)
Round 13-14 :
Sc around. Place stitch marker. (30 sts)
Round 15 :
{sc 4, dec} Repeat what's inside the { } for the entire round. Place stitch marker. (25 sts)
Round 16-17 :
Sc around. Place stitch marker. (25 sts)
Round 18 :
{sc 3, dec} Repeat what's inside the { } for the entire round. Place stitch marker. (20 sts)
Round 19-20 :
Sc around. Place stitch marker. (20 sts)
Info :
Break yarn with a long tail for sewing. Optionally you can use a tapestry needle and embroidery floss/yarn to stitch on a belly button. Gently stuff the body. Set aside for now!
— Arms :
Info :
Use 3.00 mm crochet hook. Use main body color. The arms are worked in continuous rounds so you will need a stitch marker for this portion of the tutorial. Make 2. Stuff the arms with poly-fill as you go!
Round 1 :
Ch 2. Place 8 sc into the 2nd ch from your hook. Place your stitch marker. (8 sts)
Round 2-22 :
Sc around. Place stitch marker. (8 sts)
Info :
Break yarn with a long tail for sewing. Set aside. The arms could be totally done at this point but if you would like to add wings to the arms follow the steps below!
— Wings :
Info :
Use 2.00 mm crochet hook. Use accent color. Make 2. The wings are worked in rows. You will ch 1 before each new row. The ch 1 does not count as a stitch unless stated otherwise.
Row 1 :
Ch 3. Place 1 sc into the 2nd ch from your hook. Sc across. (2 sts)
Row 2 :
Ch 1 and turn your work. In the blo place 1 sc into the 1st st of the row. In the blo place 3 sc into the last st of the row. (4 sts)
Row 3 :
Ch 1 and turn your work. In the blo sc across. (4 sts)
Row 4 :
Ch 1 and turn your work. In the blo place 1 sc into the 1st three sts of the row. In the blo place 3 sc into the last st of the row. (6 sts)
Row 5 :
Ch 1 and turn your work. In the blo sc across. (6 sts)
Row 6 :
Ch 1 and turn your work. In the blo place 1 sc into the 1st 5 sts of the row. In the blo place 3 sc into the last st of the row. (8 sts)
Row 7 :
Ch 1 and turn your work. In the blo sc across. (8 sts)
Row 8 :
Ch 1 and turn your work. In the blo place 1 sc into the 1st 7 sts of the row. In the blo place 3 sc into the last st of the row. (10 sts)
Row 9 :
Ch 1 and turn your work. In the blo sc across. (10 sts)
Row 10 :
Ch 1 and turn your work. In the blo place 1 sc into the 1st 9 sts of the row. In the blo place 3 sc into the last st of the row. (12 sts)
Row 11 :
Ch 1 and turn your work. In the blo sc across. (12 sts)
Row 12 :
Ch 1 and turn your work. In the blo place 1 sc into the 1st 11 sts of the row. In the blo place 3 sc into the last st of the row. (14 sts)
Row 13 :
Ch 1 and turn your work. In the blo sc across. (14 sts)
Row 14 :
Ch 1 and turn your work. In the blo place 1 sc into the 1st 13 sts of the row. In the blo place 3 sc into the last st of the row. (16 sts)
Row 15 :
Ch 1 and turn your work. In the blo sc across. (16 sts)
Row 16 :
Ch 1 and turn your work. In the blo place 1 sc into the 1st 15 sts of the row. In the blo place 3 sc into the last st of the row. (18 sts)
Row 17 :
Ch 1 and turn your work. In the blo sc across. (18 sts)
Row 18 :
Ch 1 and turn your work. In the blo place 1 sc into the 1st 17 sts of the row. In the blo place 3 sc into the last st of the row. (20 sts)
Row 19 :
Ch 1 and turn your work. In the blo sc across. (20 sts)
Row 20 :
Ch 1 and turn your work. In the blo place 1 sc into the 1st 19 sts of the row. In the blo place 3 sc into the last st of the row. (22 sts)
Row 21 :
Ch 1 and turn your work. In the blo sc across. (22 sts)
Row 22 :
Ch 1 and turn your work. In the blo place 1 sc into the 1st 21 sts of the row. In the blo place 3 sc into the last st of the row. (24 sts)
Info :
Break yarn with a long tail for sewing. Your wing is finished. See image. Pin the wing to the arm before sewing and do not break the yarn after sewing the wing to the arm if you plan to sew the wing to the body during assembly.
— Head :
Info :
Use 3.00 mm crochet hook. Use main body color. The head is worked in continuous rounds so you will need a stitch marker for this portion of the tutorial. Make 1.
Round 1 :
Ch 2. Place 6 sc into the 2nd ch from your hook. Place your stitch marker! (6 sts)
Round 2 :
Inc into each st of the round. Place your stitch marker! (12 sts)
Round 3 :
{sc 1, inc.} Repeat what's inside the { } for the entire round. Place your stitch marker! (18 sts)
Round 4 :
{sc 2, inc} Repeat what's inside the { } for the entire round. Place your stitch marker! (24 sts)
Round 5 :
{sc 3, inc} Repeat what's inside the { } for the entire round. Place your stitch marker! (30 sts)
Round 6 :
{sc 4, inc} Repeat what's inside the { } for the entire round. Place your stitch marker! (36 sts)
Round 7 :
{sc 5, inc} Repeat what's inside the { } for the entire round. Place your stitch marker! (42 sts)
Round 8 :
{sc 6, inc} Repeat what's inside the { } for the entire round. Place your stitch marker! (48 sts)
Round 9 :
{sc 7, inc} Repeat what's inside the { } for the entire round. Place your stitch marker! (54 sts)
Round 10-17 :
Place 1 sc into each st of the round. Place your stitch marker. (54 sts)
Round 18 :
{sc 7, dec.} Repeat what's inside the { } for the entire round. Place your stitch marker! (48 sts)
Round 19 :
{sc 6, dec.} Repeat what's inside the { } for the entire round. Place your stitch marker! (42 sts)
Round 20 :
{sc 5, dec.} Repeat what's inside the { } for the entire round. Place your stitch marker! (36 sts)
Round 21 :
{sc 4, dec.} Repeat what's inside the { } for the entire round. Place your stitch marker! (30 sts)
Info :
Place safety eyes between Round 13 & 14. Place safety eyes 8-9 stitches apart. You can use embroidery floss/yarn to stitch on some freckles. Firmly stuff your head with polyfill.
Round 22 :
{sc 3, dec.} Repeat what's inside the { } for the entire round. Place your stitch marker! (24 sts)
Round 23 :
{sc 2, dec.} Repeat what's inside the { } for the entire round. Place your stitch marker! (18 sts)
Round 24 :
{sc, dec.} Repeat what's inside the { } for the entire round. Place your stitch marker! (12 sts)
Round 25 :
dec around. (6 sts)
Info :
Add more poly-fill if needed! Use a running stitch to close the remaining hole. Break yarn and weave in your ends.
This delightful Little Devil pattern is a playful amigurumi project that lets you customize horns, wings, and tails for a one-of-a-kind friend. Make it sparkly with sequins or soft with embroidered freckles — the choice is yours! Perfect for gifting or decorating, this little companion brings lots of handmade charm. 🧶✨