About This The Festive Lights Amigurumi Pattern
This pattern creates a string of plush amigurumi lightbulbs with a crocheted cap and socket so each bulb twists in securely. It uses Bernat Blanket (Size 6) yarn and is worked in continuous rounds for a neat finish. The bulbs can be left plain or given faces and embroidery to add charm and personality.
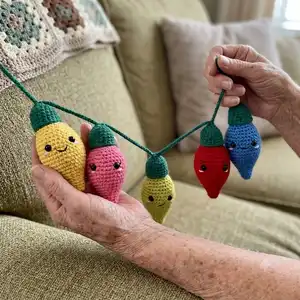
Includes full round-by-round instructions for the bulb, cap (screw), socket, and cord joining method. Safety eye placement, stuffing guidance, and finishing notes are included for a polished result.
Why You'll Love This The Festive Lights Amigurumi Pattern
I absolutely love this pattern because it transforms simple stitches into a playful garland that lights up any room with handmade charm. I enjoy how the screw-style cap and snug socket make the bulbs feel interactive and sturdy. The design is flexible — I often change colours or add tiny embroidered faces to make each bulb unique. Working with blanket yarn gives such a squishy, comforting texture that feels great to hold and display. Sharing these as gifts always brings smiles, and I love knowing the maker added a personal touch.
Switch Things Up
I love customizing these bulbs by swapping colours — try pastel shades for a soft nursery garland or bold jewel tones for a festive display.
You can change the size easily: using bulky yarn and a larger hook makes a chunky, statement bulb while thinner yarn creates tiny bulbs for keychains.
I often embroider different facial expressions on each bulb to give the garland personality; tiny smiles, winks, or sleepy eyes work great.
For a posable version, I sometimes add a short length of wire through the cord or inside the socket to help arrange the bulbs how I want.
If you want lights that actually glow, you can hide a small LED puck light inside a bulb — just make sure the battery and wiring fit and wont interfere with the bulb shape.
Try mixing yarn textures for contrast — a velvet style like Bernat Blanket for bulbs and a smoother worsted cotton for the cord looks attractive and gives different hand feels.
I also like to make mini versions as ornaments or keyrings by using thinner yarn and a 3.5-4 mm hook, adjusting stitch counts to keep the bulb shape.
Play with spacing by CHing more or fewer chains between sockets — this changes the density of lights on your garland and how they hang.
Make themed sets: red/green for Christmas, pastel mix for spring, or team colours for party decor — they make great gifts and party decorations.
Dont be afraid to add props like tiny crocheted hats or bows to a bulb for seasonal flair; theyre quick to make and add instant charm.
Common Mistakes & How to Fix Them
✗ Skipping stitch markers when marking the start of your cap can make the screw coil placement confusing; place a secondary marker in the front loop at the start and another at the end to mark the coil precisely.
✗ Not stuffing gradually causes an uneven bulb shape and hard lumps at the tip; start stuffing from the narrow tip and add small amounts evenly while shaping the bulb for a smooth finish.
✗ Placing safety eyes too close or too far apart can look off; place safety eyes between rounds 15 and 16 about 5 stitches apart to achieve balanced facial placement.
✗ Ignoring tension differences when switching yarn or hooks can make bulbs not fit sockets; make sure all pieces use the same yarn type and 6 mm hook and adjust tension so bulbs twist snugly into sockets.
✗ Fastening off and closing the opening before finishing the cap coil will prevent you from making the screw neatly; leave a tail after the cap rounds and create the coil by SLSTing in front loops before closing.