🧢 Beautiful ✨ Detailed πŸ’ Adorable

Elephant Amigurumi Pattern

Elephant Amigurumi Pattern
4.5β˜… Rating
2-4 Hours Time Needed
1.4K Made This
βœ‚οΈ

Intermediate Level

Ideal for those with basic crochet experience, featuring slightly more advanced stitches and techniques to expand your skills.

⏱️

Bite-Sized Project

Finishes in 2-4 hoursβ€”perfect for an afternoon of creative relaxation.

🧸

Cute Companion

An adorable friend to cherish, handcrafted with love to bring comfort and joy for years to come.

About This Elephant Amigurumi Pattern

This pattern guides you to crochet a tiny elephant amigurumi about 10 cm tall using simple rounds and clear step-by-step photos. It features a shaped trunk, large ears, little legs and a removable ribbon bow for a sweet finishing touch. The instructions use standard single crochet rounds, increases and decreases and include assembly and finishing tips to help you create a polished toy.
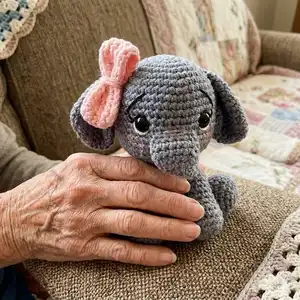
Elephant Amigurumi Pattern crochet pattern - detailed view of completed project

Perfect for making a small gift or a collectible, the pattern includes clear photos for shaping and assembly. Materials are basic: grey yarn, safety eyes, stuffing and a 2.5 mm hook.

Why You'll Love This Elephant Amigurumi Pattern

I absolutely love this pattern because it captures a lot of personality in such a small, manageable project. I enjoy how the trunk and ears are shaped β€” they give the elephant a lifelike, expressive face. The pattern comes with helpful photos showing how to join pieces and embroider the eyes and eyebrows, which really brings the character to life. I also appreciate that it is quick to make, so you can finish a cute amigurumi in an afternoon and gift it right away.

Elephant Amigurumi Pattern step 1 - construction progress Elephant Amigurumi Pattern step 2 - assembly progress Elephant Amigurumi Pattern step 3 - details and accessories Elephant Amigurumi Pattern step 4 - final assembly and finishing

Switch Things Up

I love using different colors to make each elephant unique; try pastel shades for a nursery-friendly version or bright colors for a playful toy.

To make a larger or smaller elephant, change your yarn weight and adjust the hook size; a bulkier yarn will create a chunky plush while thin yarn makes a tiny keychain version.

I often swap safety eyes for embroidered eyes to make the toy safer for babies and give it a softer, handmade look.

You can replace the ribbon with a small crocheted hat, scarf or a tiny flower for seasonal decoration or personalization.

If you want posable limbs, add a short piece of floral wire inside the arms and legs before stuffing for gentle posing.

Embroider different eyebrow shapes or mouth lines to change the expression β€” a little curve or angle makes the elephant look curious, sleepy or cheerful.

Try mixing fibers like alpaca or boucle for extra texture on the body and ears to create a fluffy, tactile finish.

I sometimes add small beads inside the feet for weight so the elephant sits more steadily; just securely close and test before gifting.

Make a family set by crocheting elephants in a range of sizes and colors β€” they make a lovely coordinated gift set for baby showers or birthdays.

For a modern look, use neutral greys with a brightly colored ribbon or accessory; for a whimsical look, use mismatched eyes or hand-sewn blush and freckles.

Common Mistakes & How to Fix Them

βœ— Forgetting to weave in ends as you go creates a big finishing task later; weave in ends gradually and secure tails as you complete each piece. βœ— Skipping the placement of eyes before stuffing can misplace features; place and check eye spacing at round 10 before closing and stuffing the head. βœ— Overstuffing limbs or head makes shaping and sewing difficult; stuff gradually and check shape frequently, adding small amounts until the piece is firm but not stretched. βœ— Not leaving long yarn tails for sewing results in hard-to-attach parts; leave long yarn when finishing small parts so you can comfortably sew them into place for secure assembly.
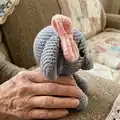
Elephant Amigurumi Pattern

Create an adorable 10 cm elephant amigurumi with this clear, photo-supported pattern. You will make a tiny, poseable elephant with a cute trunk, big ears and a sweet ribbon β€” perfect for gifts or shelf decor. The pattern includes step-by-step rounds, assembly tips and finishing touches to help you complete a charming handmade friend.

Intermediate 2-4 Hours

Materials Needed for Elephant Amigurumi Pattern

β€” Main Fabric

  • 01
    Cotton or wool thread - Grey (main color) - quantity as needed for a 10cm amigurumi
  • 02
    Cotton or wool thread - White (small amounts for details)
  • 03
    Cotton or wool thread - Black (for embroidery and small details)
  • 04
    Cotton or wool thread - Pink (for ribbon and blush)
  • 05
    Fiberfill or padding - small amount for stuffing body and limbs

β€” Tools Required

  • 01
    Crochet hook no. 2.5mm
  • 02
    Wool needle (yarn/tapestry needle) for sewing parts and embroidery
  • 03
    Plastic safety eyes No. 10 (2 pieces)
  • 04
    Scissors
  • 05
    Stitch markers (optional)
  • 06
    Pins for positioning pieces while sewing
  • 07
    Polyester stuffing / fiberfill

Progress Tracker

0% Complete

β€” Head + Body :

Info :

weave spiral

Round 1 :

Magic ring 6sc (6)

Round 2 :

1inc at all stitches (12)

Round 3 :

(1sc, 1inc) x6 (18)

Round 4 :

(2sc, 1inc) x6 (24)

Round 5 :

(3sc, 1inc) x6 (30)

Round 6 :

(4sc, 1inc) x6 (36)

Round 7 - 11 :

36sc (36)

Round 12 :

9sc, (1inc) x3, 3sc, 6ch (leave 6 free stitches), 3sc, (1inc) x3, 9sc (42)

Round 13 - 15 :

42sc (42)

Round 16 :

(5sc, 1dec) x6 (36)

Info :

Place eyes in Round NΒΊ10, on the sides of the opening made.

Round 17 :

(4sc, 1dec) x6 (30)

Round 18 :

(3sc, 1dec) x6 (24)

Round 19 :

(2sc, 1dec) x6 (18). Fill

Round 20 :

(1sc, 1dec) x6 (12)

Round 21 :

(1sc, 1inc) x6 (18)

Round 22 :

(2sc, 1inc) x6 (24)

Round 23 - 28 :

24sc (24)

Round 29 :

(2sc, 1dec) x6 (18). Fill

Round 30 :

(1sc, 1dec) x6 (12)

Round 31 :

(1dec) x6 (6). Fasten off

β€” Trunk :

Round 1 :

Magic ring 4sc (4)

Round 2 :

(1sc, 1inc) x2 (6)

Round 3 :

6sc (6)

Round 4 :

(2sc, 1inc) x2 (8)

Round 5 :

8sc (8)

Round 6 :

(3sc, 1inc) x2 (10)

Round 7 :

10sc (10)

Round 8 :

(4sc, 1inc) x2 (12). Do not fill

Info :

Leave a long yarn for sewing. Join the edge of the trunk as shown in the images.

Info :

Join the trunk to the face in the opening that we left previously.

Info :

Embroider the eyes and eyebrows as shown in the images.

Info :

Shape the face as shown in the images.

β€” Ears (x2) :

Round 1 :

Magic ring 6sc (6)

Round 2 :

1inc at all stitches (12)

Round 3 :

(1sc, 1inc) x6 (18)

Round 4 :

(2sc, 1inc) x6 (24)

Round 5 :

(3sc, 1inc) x6 (30)

Round 6 :

(1dec) x2, 1sc, (3sc in the same stitch) x22, 1sc, (1dec) x2 (66)

Info :

Leave a long yarn for sewing. Pin the top to shape the ear, then pin the ears to the head.

β€” Legs (x2) :

Round 1 :

Magic ring 6sc (6)

Round 2 :

1inc at all stitches (12)

Round 3 :

(1sc, 1inc) x6 (18)

Round 4 :

Taking the back chain: 18sc (18)

Round 5 :

(1sc, 1dec) x6 (12). Fill

Round 6 :

(1dec) x6 (6)

Round 7 :

6sc (6)

Info :

Leave a long yarn for sewing. Join the legs to the body from Round NΒΊ25.

β€” Arms (x2) :

Round 1 :

Magic ring 6sc (6)

Round 2 :

1inc at all stitches (12)

Round 3 :

(1sc, 1inc) x6 (18)

Round 4 :

Taking the back chain: 18sc (18)

Round 5 :

(1sc, 1dec) x6 (12). Fill

Round 6 :

(2sc, 1dec) x3 (9)

Round 7 :

9sc (9)

Round 8 :

(1sc, 1dec) x3 (6)

Round 9 :

6sc (6)

Info :

Leave a long yarn for sewing. Join the arms to the body from Round NΒΊ21.

β€” Tail :

Round 1 :

8ch

Round 2 :

8st

Info :

Attach the tail to the body.

β€” Ribbon (Pink) :

Round 1 :

Ring of 26ch

Round 2 :

26sc (26)

Round 3 - 5 :

26sc (26)

Round 6 :

8ch

Info :

Shape the ribbon by joining the last chain with the first chain as shown in the images.

β€” Finishing & Assembly :

Info :

Apply blush on the cheeks and on the trunk as seen in the images.

Info :

Join the ribbon to the head.

Info :

You already have your Elephant finished! Refer to the images for final shaping and placement of features.

Assembly Instructions

  • Join the trunk to the face by sewing it into the opening left in the head, matching edges and securing with a yarn needle.
  • Embroider the eyes and eyebrows as shown in the photos to achieve the expressive look; use black yarn and a wool needle for embroidery.
  • Pin ears into position, shape the top to create curvature, then sew each ear to the head using the long yarn tail and secure tightly.
  • Attach legs to the body starting at Round NΒΊ25, spacing them evenly and sewing through the body rounds for a stable base.
  • Join the arms to the body from Round NΒΊ21, angle them slightly forward and sew securely with the long yarn tail left earlier.
  • Attach the tail and ribbon bow to the body and head respectively, then apply blush to cheeks and trunk for finishing touches.

Important Notes

  • πŸ’‘Work in continuous spiral rounds (weave spiral) for a seamless look unless otherwise indicated by the pattern.
  • πŸ’‘Place safety eyes before closing the head and stuffing, and check spacing carefully to keep features symmetrical.
  • πŸ’‘Leave a long yarn tail when finishing small parts to make sewing and attaching pieces much easier and more secure.
  • πŸ’‘Stuff parts gradually and shape as you go for the best final appearance; overstuffing can distort shaping.
  • πŸ’‘Pin pieces in place before sewing to ensure accurate placement and balanced final assembly.

Thank you for choosing this Elephant amigurumi pattern β€” I hope it brings a smile to your crafting table! 🧢 This little elephant is designed to be quick, charming and fun to assemble, with clear photos to guide you. 🐘 Share your finished friend online and tag #ternura_amigurumi so I can see your adorable creations! ✨

You ask,

we answer.

FAQs

What size will the finished piece be?

The finished amigurumi measures approximately 10 cm tall when using the recommended thread and a 2.5 mm hook.

Can I use different yarn weights for this pattern?

Yes, you can use different yarn weights but the final size will change; choose an appropriate hook for your yarn and adjust eye size accordingly.

Do I need prior crochet experience for this pattern?

This pattern is rated intermediate, so basic experience with single crochet, increases and decreases is recommended for the best results.

How long does this project typically take to complete?

Most crocheters complete this mini elephant in 2-4 hours, depending on experience and how much time you spend on assembly and embroidery.