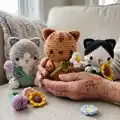
Make three adorable sitting kitty amigurumi and a collection of tiny crochet flowers with clear step-by-step instructions. You will love the sweet shapes, color stripes and small embroidered faces that bring each cat to life. The patterns include petals, stems and leaves so you can mix and match flowers to accessorize your kitties. Perfect for gifting or a cozy display, this pattern guides you from materials to final assembly.
Progress Tracker
0% Complete
— Flowers :
Sunflower - Leaves (make 2, green yarn) :
Crochet into a magic ring: 3 ch, 2 dc, 1 hdc, 2 ch, 1 hdc, 2 dc, 3 ch, sl st then tighten the ring. Fasten off, leaving a tail for sewing.
Disc floret (brown yarn) :
Rnd 1: sc 6 into a magic ring [6]
Round 2 :
inc in each st around [12]
Round 3 :
(inc in next st, sc in next st) repeat 6 times [16]
Round 4 :
sc in next st, inc in next st, (sc in next 2 st, inc in next st) repeat 5 times, sc in next st [24]
Info :
Fasten off, making an invisible join and weave in the ends.
Stem and receptacle (green yarn) - Rnd 1 :
sc 5 into a magic ring [5]
Rounds 2-19 :
(18 rnds): sc in each st around [5]
Round 20 :
sc in next 4 st, inc in next st [6]
Round 21 :
inc in each st around [12]
Round 22 :
(inc in next st, sc in next st) repeat 6 times [16]
Round 23 :
sc in next st, inc in next st, (sc in next 2 st, inc in next st) repeat 5 times, sc in next st [24]
Info :
Fasten off, making an invisible join and weave in the ends.
Petals (yellow yarn) :
Place the wrong sides of the disc floret and the receptacle facing each other and crochet through the both parts, take the yellow yarn: * ch 2, bobble stitch (of 3 hdc) in the next st (photos a1, a2, a3); ch 2 (photo a4), sl st into the back ridge of the 2nd ch from hook, ch 3, sl st in next st * (first petal made - photo a6). Repeat the instruction between * 11 more times, stuff the flower lightly before closing (photo a6). Sew the leaves on the stem (photos a7, a8).
Daisy - Leaves (make 2, green yarn) :
Ch 5, starting the 2nd ch from hook, sc, dc in next ch, hdc in next ch, {sc, ch 2, sc} in the last ch; working in unused loops on other side of starting ch, hdc in next ch, dc in next ch, sc in next ch. Fasten off, leaving a tail for sewing.
Disc floret (yellow yarn) - Rnd 1 :
sc 8 into a magic ring [8]
Round 2 :
(inc in next st, sc in next 3 st) repeat 2 times [10]
Round 3 :
sc in each st around [10]
Info :
Fasten off, making an invisible join and weave in the ends.
Tulip - Leaves (make 2, green yarn) :
Ch 11, starting the 2nd ch from hook, crochet in the back ridge of the ch, sl st, sc in next 2 ch, hdc in next 2 ch, dc in next 2 ch, hdc in next ch, sc in next ch, sl st in next ch. Fasten off, leaving a tail for sewing.
Petals (make 3, purple yarn) - Rnd 1 :
Ch 8, starting the 2nd ch from hook, inc, hdc in next ch, dc in next 3 ch, hdc in next ch, {3 sc} in the last ch; working in unused loops on other side of starting ch, hdc in next ch, dc in next 3 ch, hdc in next ch, sc in next ch [16]
Round 2 :
sc in next st, inc in next st, sc in next 6 st, inc in next st, sc in next 6 st, inc in next st [19]
Info :
Fasten off, leaving a tail for sewing.
— Sunny Kitty :
Head and Body - Rnd 1 :
sc 8 into a magic ring [8]
Round 2 :
inc in each st around [16]
Round 3 :
(sc in next st, inc in next st) repeat 8 times [24]
Round 4 :
(sc in next 2 st, inc in next st) repeat 3 times, (brown yarn: sc in next 2 st; dark brown yarn: inc in next st) repeat 3 times, brown yarn: (sc in next 2 st, inc in next st) repeat 2 times [32]
Round 5 :
(sc in next 3 st, inc in next st) repeat 3 times, (brown yarn: sc in next 2 st; dark brown yarn: sc in next st, inc in next st) repeat 3 times, brown yarn: (sc in next 3 st, inc in next st) repeat 2 times [40]
Round 6 :
sc in next st, inc in next st, (sc in next 4 st, inc in next st) repeat 3 times, (dark brown yarn: sc in next 3 st; brown yarn: sc in next st, inc in next st) repeat 3 times, sc in next 4 st, inc in next st, sc in next 3 st [48]
Rounds 7-8 :
(2 rnds): sc in next 21 st, (dark brown yarn: sc in next 3 st; brown yarn: sc in next 3 st) repeat 3 times, sc in next 9 st [48]
Round 9 :
sc in next 22 st; dark brown yarn: sc in next st; brown yarn: sc in next 4 st; dark brown yarn: sc in next 3 st; brown yarn: sc in next 4 st; dark brown yarn: sc in next st, brown yarn: sc in next 13 st [48]
Round 10 :
sc in next 28 st; dark brown yarn: sc in next st; brown yarn: sc in next 19 st [48]
Info :
Fasten off the dark brown yarn, continue with brown yarn.
Round 11 :
(sc in next 7 st, inc in next st) repeat 6 times [54]
Rounds 12-15 :
(4 rnds): sc in each st around [54]
Round 16 :
(sc in next 8 st, inc in next st) repeat 6 times [60]
Round 17 :
sc in each st around [60]
Info :
Insert the eyes between rnds 15 & 16, 8 st apart. Make sure the eyes are in the center of the face. Start stuffing the head firmly, adding more as you go.
Round 18 :
(sc in next 8 st, dec) repeat 6 times [54]
Round 19 :
sc in next 3 st, dec, (sc in next 7 st, dec) repeat 5 times, sc in next 4 st [48]
Round 20 :
(sc in next 6 st, dec) repeat 6 times [42]
Round 21 :
sc in next 2 st, dec, (sc in next 5 st, dec) repeat 5 times, sc in next 3 st [36]
Round 22 :
(sc in next 4 st, dec) repeat 6 times [30]
Round 23 :
sc in next st, dec, (sc in next 3 st, dec) repeat 5 times, sc in next 2 st [24]
Round 24 :
sl st in each st around [24]
Round 25 :
(sc in next 2 st, inc in next st) repeat 8 times [32]
Round 26 :
sc in next 28 st; dark brown yarn: sc in next 4 st [32]
Round 27 :
sc in next 13 st; brown yarn: sc in next 15 st; dark brown yarn: sc in next 4 st [32]
Round 28 :
(sc in next 3 st, inc in next st) repeat 3 times, sc in next 2 st, inc in next st, (sc in next 3 st, inc in next st) repeat 4 times [40]
Rounds 29-30 :
(2 rnds): sc in each st around [40]
Round 31 :
(sc in next 4 st, inc in next st) repeat 6 times, sc in next 4 st; dark brown yarn: inc in next st, sc in next 4 st, inc in next st [48]
Round 32 :
sc in next 21 st; brown yarn: sc in next 19 st; dark brown yarn: sc in next 8 st [48]
Round 33 :
sc in next 21 st; brown yarn: sc in next 27 st [48]
Round 34 :
(sc in next 11 st, inc in next st) repeat 4 times [52]
Round 35 :
sc in each st around [52]
Round 36 :
sc in next 44 st; dark brown yarn: sc in next 8 st [52]
Round 37 :
sc in next 21 st; brown yarn: sc in next 23 st; dark brown yarn: sc in next 8 st [52]
Round 38 :
sc in next 21 st; brown yarn: sc in next 31 st [52]
Info :
Fasten off the dark brown yarn, continue with brown yarn.
Round 39 :
(sc in next 11 st, dec) repeat 4 times [48]
Round 40 :
sc in each st around [48]
Round 41 :
(sc in next 4 st, dec) repeat 8 times [40]
Round 42 :
sc in next st, dec, (sc in next 3 st, dec) repeat 7 times, sc in next 2 st [32]
Round 43 :
(sc in next 2 st, dec) repeat 8 times [24]
Round 44 :
(sc in next st, dec) repeat 8 times [16]
Round 45 :
dec 8 times [8]
Info :
Finish stuffing. Fasten off and close the remaining st, weaving in the ends. Using thread, embroider a nose between the eyes. Embroider whiskers under each eye, and the eyebrow over each eye. Using a small makeup brush, apply blusher to the cheeks (photos 1,2).
Arms (make 2, brown yarn) - Rnd 1 :
sc 8 into a magic ring [8]
Round 2 :
(inc in next st, sc in next st) repeat 4 times [12]
Rounds 3-8 :
(6 rnds): sc in each st around [12]
Info :
Stuff the arm lightly. Flatten the opening of the arm and sc in next 6 st through both layers to close the opening. Fasten off, leaving a long tail for sewing. Using thread and needle, embroider 3 straight lines (for claws) at rnd 2 of each arm (photo 6).
Legs (make 2, begin with dark brown yarn) - Rnd 1 :
sc 8 into a magic ring [8]
Round 2 :
inc in each st around [16]
Info :
At the end of rnd 2, change to brown yarn. Fasten off the dark brown yarn.
Round 3 :
sc in next st, inc in next st, sc in next 5 st, inc in next 2 st, sc in next 5 st, inc in next st, sc in next st [20]
Round 4 :
sc in each st around [20]
Round 5 :
sc in next 6 st, dec 4 times, sc in next 6 st [16]
Round 6 :
[sc in next 4 st, dec] repeat 2 times, sc in next 4 st [14]
Round 7 :
sc in next 6 st, dec, sc in next 6 st [13]
Round 8 :
sc in next 6 st, inc in next st, sc in next 6 st [14]
Info :
Stuff the leg lightly. Flatten the opening of the leg and sc in next 7 st through both layers to close the opening. Fasten off, leaving a long tail for sewing. Using thread and needle, embroider 3 straight lines (for claws) at rnd 3 of each leg (photo 7).
Ears (make 2, begin with brown yarn) - Rnd 1 :
sc 6 into a magic ring [6]
Round 2 :
(inc in next st, sc in next st) repeat 3 times [9]
Round 3 :
inc in next st, sc in next 2 st, inc in next st; dark brown yarn: sc in next st; brown yarn: sc in next st, inc in next st, sc in next 2 st [12]
Round 4 :
sc in next 5 st; dark brown yarn: sc in next 3 st; brown yarn: sc in next 4 st [12]
Round 5 :
sc in next 3 st, inc in next st, sc in next st; dark brown yarn: sc in next 2 st, inc in next st; brown yarn: sc in next 3 st, inc in next st [15]
Round 6 :
sc in next 4 st, inc in next st, sc in next st; dark brown yarn: sc in next 3 st, inc in next st; brown yarn: sc in next 4 st, inc in next st [18]
Info :
Fasten off, leaving a long tail for sewing (photo 8).
Tail (begin with dark brown yarn) - Rnd 1 :
sc 6 into a magic ring [6]
Round 2 :
(inc in next st, sc in next st) repeat 3 times [9]
Rounds 3-6 :
(4 rnds): sc in each st around [9]
Info :
At the end of rnd 6, change to brown yarn. Fasten off the dark brown yarn. Start stuffing the tail, adding more as you go.
Rounds 7-26 :
(20 rnds): sc in each st around [9]
Info :
Flatten the opening of the tail and sc in next 4 st through both layers to close the opening. Fasten off, leaving a long tail for sewing (photo 9).
Assembly :
Position the ears on either side of the head (between rnds 4 & 10) and sew in place (photos 10, 11, 12). Position the arms on either side of the body (photos 13, 14), below the head. Using long tails and yarn needle, sew them in place. Position and sew the legs on either side of the body (photos 15, 16). Position and sew the tail to center back at base of the body. Tack a few rounds of the tail to the body (photos 17, 18).
— Cloudy Kitty :
Head and Body (begin with grey yarn) - Rnd 1 :
sc 8 into a magic ring [8]
Round 2 :
inc in each st around [16]
Round 3 :
(sc in next st, inc in next st) repeat 8 times [24]
Round 4 :
(sc in next 2 st, inc in next st) repeat 8 times [32]
Round 5 :
sc in next st, inc in next st, (sc in next 3 st, inc in next st) repeat 7 times, sc in next 2 st [40]
Round 6 :
(sc in next 4 st, inc in next st) repeat 8 times [48]
Rounds 7-10 :
(4 rnds): sc in each st around [48]
Round 11 :
(sc in next 7 st, inc in next st) repeat 2 times, sc in next 7 st; white yarn: inc in next st; grey yarn: (sc in next 7 st, inc in next st) repeat 3 times [54]
Info :
At the end of rnd 4, change to grey yarn. Fasten off the white yarn. Insert the eyes between rnds 15 & 16, 8 st apart. Start stuffing the head firmly, adding more as you go.
Rounds 12-16 :
See pattern for color placements and rounds 12-16 that shape the head to 60 stitches at rnd 16. Fasten off the grey yarn, continue with the white yarn as instructed in the pattern to create facial marking stripes.
Rounds 17-45 :
Continue shaping exactly as shown for Sunny Kitty (round counts and decreases mirror the Sunny Kitty rounds). Finish stuffing. Fasten off and close the remaining st, weaving in the ends.
Arms (make 2, grey yarn) - Rnd 1 :
sc 8 into a magic ring [8]
Round 2 :
(inc in next st, sc in next st) repeat 4 times [12]
Rounds 3-8 :
(6 rnds): sc in each st around [12]
Info :
Stuff the arm lightly. Flatten the opening of the arm and sc in next 6 st through both layers to close the opening. Fasten off, leaving a long tail for sewing. Using thread and needle, embroider 3 straight lines (for claws) at rnd 2 of each arm.
Legs (make 2, begin with white yarn) - Rnd 1 :
sc 8 into a magic ring [8]
Round 2 :
inc in each st around [16]
Info :
At the end of rnd 2, change to grey yarn. Fasten off the white yarn and continue rounds as for Sunny Kitty legs. Stuff, flatten opening, sc to close, leave tail for sewing. Embroider 3 straight lines (claws) at rnd 3 of each leg.
— Windy Kitty :
Head and Body (begin with black yarn) - Rnd 1 :
sc 8 into a magic ring [8]
Round 2 :
inc in each st around [16]
Round 3 :
(sc in next st, inc in next st) repeat 8 times [24]
Round 4 :
(sc in next 2 st, inc in next st) repeat 8 times [32]
Rounds 5-16 :
Continue as shown for other kitties, changing to white yarn where indicated for facial marking, following the color instructions printed in the pattern to reach rounds 16-17 with 60 sts. Fasten off black yarn and continue in white yarn when instructed.
Rounds 17-45 :
Follow shaping and decrease rounds as in previous kitty patterns. Finish stuffing, fasten off and close remaining stitches. Embroider nose and whiskers with black thread and pink yarn as instructed. Apply blusher to cheeks.
Arms (make 2, begin with white yarn) - Rnd 1 :
sc 8 into a magic ring [8]
Round 2 :
(inc in next st, sc in next st) repeat 4 times [12]
Round 3 :
sc in each st around [12] — at the end of rnd 3 change to black yarn, fasten off the white yarn.
Rounds 4-8 :
(5 rnds): sc in each st around [12]. Stuff and close as for other arms, embroider claws at rnd 2.
Legs (make 2, begin with pink yarn) - Rnd 1 :
sc 8 into a magic ring [8]
Round 2 :
inc in each st around [16]
Info :
At the end of rnd 2, change to white yarn. Fasten off the pink yarn and continue shaping as shown for leg rounds, stuffing and closing as explained previously.
Assembly (general) :
Position ears on either side of the head (between the rounds indicated for each kitty) and sew in place. Position arms on either side of the body below the head and sew with long tails. Position and sew legs on either side of the body. Position and sew the tail to the center back at base of the body. Tack a few rounds of the tail to the body for extra security. Embroider nose and whiskers and apply blusher to cheeks as directed.
This pattern booklet brings together cozy kitties and beautiful tiny flowers to brighten any shelf or desk. Whether you make a single kitty or the whole trio with a bouquet of sunflowers, daisies and tulips, the results are charming and collectible. Perfect for gifting, display, or to keep as little companions — happy crocheting and enjoy every stitch! 🧶🐱✨