🧢 Beautiful ✨ Detailed πŸ’ Adorable

Succulent Turtle Amigurumi Pattern

Succulent Turtle Amigurumi Pattern
4.8β˜… Rating
5-7 Hours Time Needed
2.8K Made This
βœ‚οΈ

Intermediate Level

Ideal for those with basic crochet experience, featuring slightly more advanced stitches and techniques to expand your skills.

⏱️

Weekend Treat

Takes 5-7 hours, making it an enjoyable project to finish over a couple of days.

🧸

Cute Companion

An adorable friend to cherish, handcrafted with love to bring comfort and joy for years to come.

About This Succulent Turtle Amigurumi Pattern

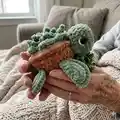
This pattern creates a plush succulent-topped turtle using size 6 super-bulky chenille yarn for a squishy, soft finish. Youll crochet a rounded shell worked in back loops with a separate spiral succulent worked into the front loops for layered texture. The design includes instructions for head, legs, tail, and how to attach pieces into the body for a neat, stable finish.

Succulent Turtle Amigurumi Pattern crochet pattern - detailed view of completed project

Clear round-by-round instructions guide you through shaping and assembly, with photos referenced for placement. The succulent top is made in a continuous spiral to create 16 leafy segments for a realistic look.

Why You'll Love This Succulent Turtle Amigurumi Pattern

I absolutely love this pattern because it combines classic amigurumi shaping with a playful succulent detail that makes the turtle unique. I enjoy how the chenille yarn creates a super-soft, huggable toy that still holds nice stitch definition for the succulent leaves. The construction is satisfying β€” you crochet the shell base in BLO and then build the succulent in the front loops for a layered effect I find very rewarding. And sewing the legs and tail into the body round gives the finished piece a very neat, polished look I always appreciate.

Succulent Turtle Amigurumi Pattern step 1 - construction progress Succulent Turtle Amigurumi Pattern step 2 - assembly progress Succulent Turtle Amigurumi Pattern step 3 - details and accessories Succulent Turtle Amigurumi Pattern step 4 - final assembly and finishing

Switch Things Up

I love to change colors to create different moods for the turtle; try pastels for a soft nursery look or bold jewel tones for a statement piece.

I often swap the chenille yarn for a worsted weight yarn and a smaller hook to make a mini version suitable for keychains or tiny gifts.

I sometimes use a chunkier bulky yarn and a larger hook to make a super-cuddly oversized turtle that doubles as a pillow or nursery decor.

For the succulent, try alternating two close shades of green to create depth between inner and outer leaves, making the spiral more dimensional.

I add embroidered details like small freckles or a smile to change the turtles expression and give each one a unique personality.

Want poses? I sometimes add a short piece of floral wire inside the legs before stuffing to make them poseable and adjustable.

Swap safety eyes for embroidered eyes for a toddler-safe version, and use felt highlights glued on for an extra shiny eye detail.

Try making a family set by crocheting multiple turtles in coordinating colors and arranging them on a shelf or gifting them as a set.

I also like to add tiny felt or crocheted accessories like a flower on the shell or a miniature blanket for seasonal variations.

Finally, experiment with yarn textures such as boucle or faux fur for novelty versions, and always adjust stuffing and hook size to match the new yarn for best results.

Common Mistakes & How to Fix Them

βœ— Skipping stitch markers when working front and back loops can cause lost loop alignment; place stitch markers to mark the first front loop of each round so you know where to start the succulent and subsequent rounds. βœ— Forgetting to fold and work through both sides when making leg half-circles will give the wrong shape; always fold the circle in half and SC through both layers around the curve until you reach the end to form a proper leg. βœ— Attaching legs and tail into the wrong body round will misplace limbs; attach your legs and tail into the specified round (round 11) by inserting your hook through the leg/tail first then the body stitch to ensure correct placement. βœ— Not stuffing as you go can make shaping difficult and lumpy; stuff gradually to your desired firmness before closing, especially the head and body, to achieve smooth shaping. βœ— Changing color or dropping yarn incorrectly can leave loose loops; when switching to Terracotta for the shell underside, secure your yarn tails and weave ends in as instructed to keep the shell neat.

Succulent Turtle Amigurumi Pattern

Make an adorable Succulent Turtle amigurumi with this detailed intermediate crochet pattern. Youll create a plush turtle body with a layered succulent top using super-bulky chenille yarn for a soft, tactile finish. The pattern includes step-by-step rounds, assembly notes, and finishing tips to help you sew and position legs, tail, and eyes with confidence. Perfect as a gift or cozy decoration, this pattern combines simple shaping with a fun textured succulent detail.

Intermediate 5-7 Hours

Materials Needed for Succulent Turtle Amigurumi Pattern

β€” Main Fabric

  • 01
    Size 6 Super Bulky Yarn (Chenille Home Slim) - Agave (green) for succulent, head, legs, shell top
  • 02
    Size 6 Super Bulky Yarn (Chenille Home Slim) - Sand for shell middle round
  • 03
    Size 6 Super Bulky Yarn (Chenille Home Slim) - Terracotta for shell underside
  • 04
    Poly-fil stuffing for head and body
  • 05
    18mm safety eyes (2 pieces)

β€” Tools Required

  • 01
    Crochet hook size 6.0mm
  • 02
    Tapestry needle
  • 03
    Scissors
  • 04
    Stitch markers
  • 05
    Poly-fil stuffing
  • 06
    18mm safety eyes (2 pieces)

Progress Tracker

0% Complete

β€” Front Legs :

Round 1 :

8SC in MR

Round 2 :

Inc (16)

Round 3 :

SC, Inc (24)

Round 4 :

3SC, Inc (30)

Info :

Fold your circle in half to make a half circle. Working around the half circle and through both sides, SC through both stitches (about 15 SC). Continue until you reach the end of the half circle. FO, there is no need to leave a tail for sewing, you will SC the legs into a round of the body.

β€” Back Legs :

Round 1 :

8SC in MR

Round 2 :

Inc (16)

Round 3 :

SC, Inc (24)

Info :

Fold your circle in half to make a half circle. Working around the half circle and through both sides, SC through both stitches (about 12 SC). Continue until you reach the end of the half circle. FO, there is no need to leave a tail for sewing, you will SC the legs into a round of the body.

β€” Tail :

Round 1 :

6SC in MR

Round 2-3 :

SC (6)

Info :

FO, there is no need to leave a tail for sewing, you will SC the tail piece into a round of the body.

β€” Head :

Round 1 :

8SC in MR

Round 2 :

Inc (16)

Round 3 :

SC, Inc (24)

Round 4-6 :

SC (24)

Round 7 :

SC, Dec (16)

Round 8 :

2SC, Dec (12)

Info :

FO, leave a long tail for sewing. I leave about 8-9 inches. Add eyes and stuff the head. I added my eyes at around rounds 5-6 and about 8 stitches apart across the front of the face.

β€” Shell/Body :

Info :

Part of the top of the shell is worked in the BLO (back loops only) of the previous round. The succulent is formed in the front unworked loops once the top of the shell is completed.

Round 1 :

8 SC in MR

Round 2 :

Working in BLO: Inc (16)

Info :

*I highly suggest stitch markers to mark your front loops, at least one in the front loop of the first stitch of each round.

Round 3 :

Working in BLO: SC, Inc (24)

Round 4 :

Working in BLO: 3SC, Inc (30)

Info :

Color change to Sand

Round 5 :

Working in BLO: 4SC, Inc (36)

Round 6 :

SC (36)

Info :

We will now make the succulent top. Drop your working yarn, the rest of the body will be finished after we complete the succulent top.

β€” Succulent :

Info :

Succulent: To make the succulent, you will be working in a continuous spiral on top of the shell in the unworked front loops of each round.

Info :

Grab your Agave yarn and attach it with a SS in the very first unworked front loop of round 2. Working into the remaining front loops repeat the following pattern: (Each stitch is placed into individual stitches) [HDC, DC, CH2 SS into 2nd CH from the hook, DC, HDC, SS, HDC, TC, CH2 SS into 2nd CH from the hook, TC, HDC, SS] x 8

Info :

You should have 16 leaves at the end. If you do not and you missed or skipped some stitches that is ok as long as you are happy with how your succulent looks. Feel free to pull on the leaves and move them how you like them to look. FO, weave in the ends.

β€” Continue Shell/Body :

Info :

Picking up where you left off in round 6. Color change to Terracotta.

Round 7 :

Working in FLO of round 6: * SC (36)

Info :

*It will help for the next round to place a stitch marker in the first back loop of round 6

Round 8 :

Working in BLO of round 6, that were left behind from round 7: SC (36)

Round 9-10 :

SC (36)

Round 11 :

Grab your legs and tail, this is the round you will SC your pieces into. You place your pieces in front of the stitches of the body, pushing your hook through the leg/tail first then through the body stitch. 4SC. Grab the first front (big) leg, attach using 3SC (refer to photo for placement, the curve of the leg should be on your right). 5SC. Grab the first back (small) leg, attach using 2SC (refer to photo above for placement, the curve of the leg should be on your right). 3SC. Grab your tail and using 3SC attach the tail (see photo for placement). 3SC. Grab the second back (small) leg, attach using 2SC (refer to photo below for placement, the curve of the leg should be on your left). 5SC. Grab the second front (big) leg, attach using 3SC (refer to photo above for placement, the curve of the leg should be on your left). 3SC (36)

Round 12 :

Working in BLO: 4SC, Dec (30)

Round 13 :

3SC, Dec (24)

Info :

Stuff the body to your desired firmness.

Round 14 :

SC, Dec (16)

Round 15 :

Dec (8)

Info :

SS, cut yarn leaving a short tail to sew the hole closed. Weave the yarn tail back and forth into the stitches around then pull tight to close. Tie to secure and weave the rest of the yarn tail into the body.

β€” Finishing Details :

Info :

Sew the head onto the body. I sew mine mostly over the bottom part of the body, around rounds 6-10 of the body. Eye Detail: If you would like the white detail on the eye, grab your white yarn and embroider a line up the side of the eye. Insert your needle at the middle bottom of the safety eye and bring it up to the top middle of the safety eye, it will tend to curve around the safety eye when you pull it tighter.

Assembly Instructions

  • Sew the head onto the body around rounds 6-10 of the body, positioning the face centered and securing with a whipstitch or ladder stitch.
  • Attach the legs and tail into round 11 of the body by placing each piece in front of the corresponding body stitch, inserting your hook through the leg/tail first then through the body stitch and SC to secure as instructed.
  • When attaching legs, ensure the curve of the big front legs is oriented to the right for the first front leg and left for the second front leg for natural positioning.
  • Stuff the head and body before closing: stuff to your desired firmness after round 13 and before continuing to rounds 14-15 to shape the body smoothly.
  • Weave in all ends securely after assembly and embroider the white eye detail by inserting your needle at the middle bottom of the safety eye and bringing it up to the top middle to create a curved highlight.

Important Notes

  • πŸ’‘Use stitch markers to mark the first front loop of each round when working BLO and FLO sections so you can easily find your starting point for the succulent.
  • πŸ’‘Stuff gradually and test shape as you add stuffing; overstuffing can distort the shell and under-stuffing can make assembly difficult.
  • πŸ’‘You do not need to leave long tails for sewing when making legs and tail; these pieces are crocheted to be SCed directly into the body round.
  • πŸ’‘Drop the working yarn before making the succulent top and complete the succulent first in the front loops, then rejoin the body yarn to finish the shell.
  • πŸ’‘Place safety eyes before stuffing the head, around rounds 5-6 and about 8 stitches apart for correct facial placement.

This succulent turtle pattern combines cuddly chenille plush with a show-stopping layered succulent shell. Its soft texture and charming details make it a perfect handmade gift or shelf companion. Crochet one in different colors to make a whole garden of tiny turtles! 🧢🌡

You ask,

we answer.

FAQs

What size will the finished piece be?

The finished amigurumi measures approximately 7 inches long, 9 inches wide, and 4.5 inches tall using the recommended size 6 super-bulky yarn and a 6mm hook.

Can I use different yarn weights for this pattern?

Yes, you can use different yarn weights, but the final size and stitch definition will change; choose an appropriate hook size for your yarn and be aware the succulent detail will scale differently.

Do I need prior crochet experience for this pattern?

This pattern is rated intermediate; familiarity with basic stitches (SC, HDC, DC, TC), working in BLO/FLO, and simple increases and decreases is recommended.

How long does this project typically take to complete?

Most crocheters complete this project in 5-7 hours, though time may vary based on experience level and how much time you spend on assembly and shaping.