About This Bonnie Amigurumi Pattern
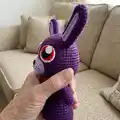
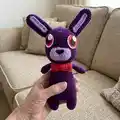
This pattern creates a purple bunny amigurumi inspired by Bonnie with a separate bow tie, ears, and felt anime-style eyes. You will work the head, body, legs, arms, inner and outer ears, nose and eyes with clear round-by-round instructions. Techniques used include magic ring, single crochet increases and decreases, and simple shaping for a polished finish. Felt pieces are used for the eye details to achieve crisp, bold facial expressions.

The pattern is written in rounds with stitch counts included for each step to help you track progress. Photos and diagrams show join placement and finishing tips so assembly is straightforward.
Why You'll Love This Bonnie Amigurumi Pattern
I absolutely love this pattern because it transforms simple stitches into a character full of personality. I enjoy how the felt eye pieces give the face such expressive detail without complicated embroidery. I also love that the pattern is modular — each piece (ears, bow tie, nose) is quick to make and easy to attach. The shaping is satisfying to crochet and the finished bunny stands out as a unique handmade gift.
Switch Things Up
I love switching up the colors to create different characters — try pastel shades for a softer, cuter bunny or neon colors for a playful version.
You can change the finished size by using a different yarn weight and hook: bulky yarn with a larger hook creates a larger cuddly plush, while fingering yarn makes a tiny keychain version.
I often replace felt eyes with safety eyes for a more three-dimensional look, but felt eyes keep the face flat and stylized if you prefer that anime aesthetic.
Try embroidering different mouths or adding freckles to alter the character's expression; small changes in placement can make a big personality shift.
Swap the bow tie for a crocheted scarf, tiny shirt, or collar to customize seasonally or for gifting — I like to make holiday-themed accessories.
For posability, insert thin craft wire into the arms before stuffing to allow gentle posing of the limbs.
If you want a sturdier toy for kids, use tighter tension, smaller hook and secure felt pieces with stitching rather than glue.
I sometimes add a small loop at the top of the head to turn the bunny into an ornament or keychain — perfect for gifts and stocking stuffers.
Experiment with different yarn textures such as plush or boucle for a fuzzy effect, but be mindful that fuzzy yarn can hide your stitches and change stuffing needs.
I recommend trying a quick prototype in scrap yarn first to test eye placement, stuffing levels, and final scale before committing to your chosen colors.
Common Mistakes & How to Fix Them
✗ Leaving gaps between stitches during rounds will let stuffing show through; keep your tension tight and consistent and choose a hook that creates dense stitches so stuffing does not escape.
✗ Forgetting to stuff gradually leads to lumps and uneven shapes; stuff small amounts frequently and shape as you go for smooth contours.
✗ Miscounting increases or decreases will change the piece's shape; count your stitches after each round and use a stitch marker to mark the start of the round.
✗ Placing eyes without checking spacing can make the face look off-center; pin or mark eye placement between rounds 13 and 14 and measure about two inches apart before attaching.
✗ Cutting felt pieces too early or roughly can result in uneven edges; use sharp scissors or a cutting machine and test-fit the pieces on the face before gluing or sewing.