🧢 Beautiful ✨ Detailed πŸ’ Adorable

Succulent Potted Plant Pattern

Succulent Potted Plant Pattern
4.1β˜… Rating
2-4 Hours Time Needed
3.2K Made This
βœ‚οΈ

Beginner Friendly Level

Perfect for those just starting their crochet journey, with clear instructions and simple techniques

⏱️

Bite-Sized Project

Finishes in 2-4 hoursβ€”perfect for an afternoon of creative relaxation.

🏑

Cozy Accent

A warm touch for your space that transforms ordinary corners into inviting nooks filled with handmade charm.

About This Succulent Potted Plant Pattern

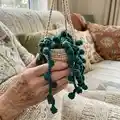
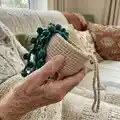
This pattern teaches you to crochet a tiny hanging succulent planter complete with a stitched pot, green circle base, and several puff-stitch succulent ropes. It uses superfine yarn and a small hook to create a delicate, realistic look. The finished piece is decorative, lightweight, and perfect for shelves, desks, or as a gift.

Succulent Potted Plant Pattern crochet pattern - detailed view of completed project

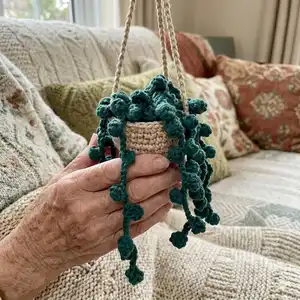
You will make the pot, a circle base, and 7–9 succulent ropes before sewing everything together and adding a hanging rope. Simple stitches and clear photos guide you through each step.

Why You'll Love This Succulent Potted Plant Pattern

I absolutely love this pattern because it captures the charm of trailing succulents in a tiny, handmade form. I enjoy how quick it is to make a full hanging planter in just a couple of hours. The puff stitch gives the succulents a lovely texture that feels satisfying to crochet and looks striking once assembled. I also love that you can customize lengths and quantities to create different looks and groupings for your space.

Succulent Potted Plant Pattern step 1 - construction progress Succulent Potted Plant Pattern step 2 - assembly progress Succulent Potted Plant Pattern step 3 - details and accessories Succulent Potted Plant Pattern step 4 - final assembly and finishing

Switch Things Up

I love customizing this pattern by changing yarn colors and the number of succulent ropes to create different looks for each planter.

I sometimes use a lighter green combined with a darker green for more depth on the succulent ropes.

To make a larger hanging plant, I switch to sport or DK weight yarn and a larger hook, then increase the pot rounds proportionally.

For a petite keychain or ornament version, I use thinner yarn and shorter succulent ropes so it stays compact and portable.

I often add small beads or French knot embroidery to imitate soil specks or tiny flowers for a whimsical touch.

I also experiment with different stitch textures for the base, like alternating hdc and sc rows to change the pot edge finish.

Try varying the length of the hanging chains and group several pots at different heights for a layered display.

When making multiple planters, I mix yarn fibersβ€”cotton for a crisp look or acrylic for brighter colors and easy care.

I sometimes line the inside with a small felt circle glued in place before stuffing to help the pot keep its shape over time.

For a more natural hanging rope look, I braid three chains together or use a thicker jute-style yarn instead of a single chain to create a rustic hanger.

Common Mistakes & How to Fix Them

βœ— Skipping the chain-1 at the beginning of each row will misalign your stitches; always start rows with the indicated chain to maintain row height and stitch placement. βœ— Forgetting to make an even number of increases can make the pot lopsided; count increases carefully and verify stitch totals after each round. βœ— Not stuffing the pot before sewing the circle base will make shaping difficult; stuff the pot gradually and firmly before closing the base. βœ— Sewing succulent ropes without pinning leads to uneven placement; pin or temporarily tack pieces in place before final stitching. βœ— Pulling yarn too tight on the puff stitches will flatten them; keep a looser tension when making puff stitches so they remain puffy and textured.

Succulent Potted Plant Pattern

Create a charming mini hanging succulent with this easy-to-follow crochet pattern. You will make a small pot, a green circle base, and multiple puff-stitch succulent ropes before assembling into a hanging planter. Perfect for gifting or adding a handmade touch to any shelf or window. Clear photos and step-by-step guidance help you complete the project with confidence.

Beginner Friendly 2-4 Hours

Materials Needed for Succulent Potted Plant Pattern

β€” Main Fabric

  • 01
    Super fine yarn (supper fine) approximately 1.8 oz (50 g) per skein
  • 02
    Color A: beige brown - small amount for pot (approx 50 g total recommended)
  • 03
    Color B: pine green - small amount for succulents and circle base (approx 50 g total recommended)
  • 04
    Small amounts of contrast yarn for hanging rope if desired

β€” Tools Required

  • 01
    Crochet hook size 2.5-3.0 mm
  • 02
    Stitch marker
  • 03
    Sewing needle / yarn needle for sewing pieces
  • 04
    Scissors
  • 05
    Cotton filling / polyester stuffing
  • 06
    Pins for assembly (optional)

Progress Tracker

0% Complete

β€” Pots :

Info :

*chain-1 at beginning of row, slip stitch in every time the end of the row*

Row 1 :

Magic ring, chain 1, 10 Single Crochet.

Row 2 :

chain 1, (1 Single Crochet, 1 increase ) 5 times (15 stitches)

Row 3 :

chain 1 (2 Single Crochet, 1 increase) 5 times. (20 stitches)

Row 4 :

chain 1 (3 Single Crochet, 1 increase) 5 times. (25 stitches)

Row 5 :

chain 1 (4 Single Crochet, 1 increase) 5 times. (30 stitches)

Row 6 :

chain 1 (5 Single Crochet, 1 increase) 5 times. (35 stitches)

Row 7-10 :

chain 1, 35 Single Crochet (35 stitches)

β€” Circle Base :

Row 1 :

Magic Ring, chain 1, 10 half double crochet (10 stitch)

Row 2 :

10 half double crochet increase (20 stitch)

Row 3 :

chain 1, (1 half double Crochet, 1 increase ) 10 times (30 stitch)

Row 4 :

chain 1 (5 Single Crochet, 1 increase) 5 times. (35 stitches)

β€” Succulent (make 7-9) :

Succulent Rope 1 :

Chain 4, 1 Puff stitch in 3rd sts, 1 slip stitch in next sts

Succulent Rope (long) :

Chain 8, 1 Puff stitch in 3rd sts, 1 slip stitch in next sts *this step crochet (8ch, 1PS in 3rd,1 SL ST) until the length you want*

β€” Sewing / Assembly :

Info :

Sew the circle inside the pot and dont forget stuffing ^_^

Info :

Next step is sew every succulent rope on the middle of pots

Hanging rope :

chain 60 in the sides of the pots

Assembly Instructions

  • Sew the green circle base into the bottom of the beige pot and add stuffing before closing the base to maintain shape.
  • Arrange the succulent ropes across the top edge of the pot and sew each rope securely into the middle/top of the pot so they dangle evenly.
  • Attach the hanging rope by chaining 60 and securing each end to opposite sides of the pot; knot and weave ends internally to hide tails.
  • Pin succulent ropes in place before sewing to ensure even spacing and a natural drape, then hand-stitch each rope with secure overcast stitches.

Important Notes

  • πŸ’‘Start each row with the specified chain-1 and finish with a slip stitch where indicated to keep edges even.
  • πŸ’‘Use stitch markers to mark the beginning of each round to avoid losing count during increases.
  • πŸ’‘Stuff the pot firmly but not overfilled so the pot keeps its rounded shape without distorting stitches.
  • πŸ’‘Pin all succulent ropes in place before sewing to achieve balanced, natural placement and even hanging lengths.

This tiny hanging succulent brings handmade green charm to any small space. It is compact, lightweight, and makes a lovely gift or shelf companion. Make several in different greens for a cascading display and enjoy the cozy vibes they create. πŸͺ΄βœ¨

You ask,

we answer.

FAQs

What size will the finished piece be?

The finished hanging succulent measures approximately 8-12 cm tall excluding the hanging rope, depending on succulent rope lengths and yarn tension.

Can I use a different yarn weight for this pattern?

Yes, you can use different yarn weights but the final size will change; adjust hook size accordingly and make fewer or more succulent ropes to match proportions.

Do I need prior crochet experience for this pattern?

This pattern is rated beginner friendly; basic knowledge of single crochet, chain, half double crochet, and working puff stitches is recommended for best results.

How long does this project typically take to complete?

Most crocheters finish this project in 2-4 hours, depending on how many succulent ropes you make and your assembly pace.