🧶 Beautiful ✨ Detailed 💝 Adorable

Slice Handbag Crochet Pattern

Slice Handbag Crochet Pattern
4.5★ Rating
5-7 Hours Time Needed
1.3K Made This
✂️

Intermediate Level

Ideal for those with basic crochet experience, featuring slightly more advanced stitches and techniques to expand your skills.

⏱️

Weekend Treat

Takes 5-7 hours, making it an enjoyable project to finish over a couple of days.

Stylish Touch

An elegant detail to elevate any look, combining traditional techniques with contemporary design sensibilities.

About This Slice Handbag Crochet Pattern

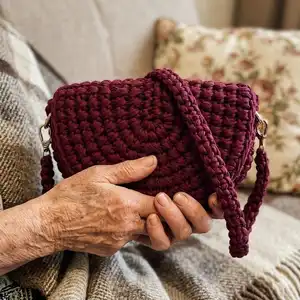
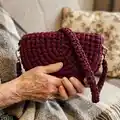
This pattern creates a structured slice-shaped handbag crocheted from polypropylene macrame cord. It uses basic stitches worked in loops and back loop rounds to build a sturdy oval base and a shaped side wall. The project emphasizes marker placement and back-loop slip stitches to achieve clean edges and consistent shaping. It is illustrated with step-by-step photos and exact stitch counts for each round.

Slice Handbag Crochet Pattern crochet pattern - detailed view of completed project

Perfect for crafters who like durable accessories, this pattern uses a sturdy 4 mm cord and a 5.5 mm hook for a firm, wearable bag. You can customize size by changing cord thickness or hook size for a larger or smaller bag.

Why You'll Love This Slice Handbag Crochet Pattern

I absolutely love this pattern because it transforms simple macrame cord into a refined, wearable handbag with a beautifully textured surface. The methodical use of markers and back-loop slip stitches gives a professional finish that holds its shape. I enjoy how the pattern balances straightforward single crochet rounds with shaping increases so you can see the bag take form quickly. The design is highly adaptable — I often make color variations and experiment with hardware for a different look.

Slice Handbag Crochet Pattern step 1 - construction progress Slice Handbag Crochet Pattern step 2 - assembly progress Slice Handbag Crochet Pattern step 3 - details and accessories Slice Handbag Crochet Pattern step 4 - final assembly and finishing

Switch Things Up

I love how easily this pattern adapts to different sizes and styles — you can change the cord thickness and hook size to make a mini keychain purse or a large market bag.

Try pastel shades or variegated cords for a softer, more playful look, or choose neutral tones and antique hardware for a classic, sophisticated style.

I often substitute thinner cord and a finer hook to create a compact clutch, or use bulky cord and a larger hook to make a roomy tote that's perfect for shopping.

Experiment with different hardware: swap the snap hooks and rings for wooden rings, metal chains, or sewn-in leather straps to change the bag's personality.

I sometimes add an inner lining for extra stability — cut fabric to the oval shape and sew it into the bag before attaching hardware for a polished interior finish.

Embroidery or crocheted appliques on the front add a unique signature; I like simple floral motifs or initials to personalize each bag I make.

To create a crossbody version, lengthen the strap by adding additional chain or crocheted cords and adjust the attachment points for balance; test the strap length on your body before finalizing hardware.

If you want a firmer base, add a lightweight plastic or cardboard oval inside a stitched fabric lining to help the bag keep its shape while maintaining the handmade look.

I recommend trying contrasting topstitch rows or a decorative edge row (like reverse single crochet) to frame the flap and give the finished piece an elegant border.

Don't be afraid to mix cord materials — combining cotton cord for the body with a synthetic decorative trim can create an interesting texture contrast that's both attractive and durable.

Common Mistakes & How to Fix Them

✗ Skipping marker placement at the oval ends will make it hard to shape the bag correctly; place markers exactly as instructed and rearrange them each odd row to maintain symmetry. ✗ Crocheting slip stitches too tightly makes the oval edges pucker and the side difficult to join; keep slip stitches loose and pull the working loop to the hook level about 20 mm when instructed. ✗ Forgetting to work into the specified loop (front, back or specified loop number) causes miscounts and irregular shaping; always insert the hook in the exact loop described and use markers to help find it. ✗ Not securing and finishing the ends properly can cause the bag to unravel later; strengthen the end used to close rows as recommended and carefully weave and melt or process synthetic cord ends as described.

Slice Handbag Crochet Pattern

Make a stylish slice-shaped handbag using sturdy macrame cord and simple crochet stitches. This pattern guides you step-by-step from crocheting the oval base to forming the side wall and finishing details. You will love the textured finish and durable construction — perfect for everyday use or gifting. Includes clear photos, stitch counts, and marker placement tips to help you follow along.

Intermediate 5-7 Hours

Materials Needed for Slice Handbag Crochet Pattern

— Main Fabric

  • 01
    Any polypropylene/polyester cord, 4 mm, approximately 185 yards (165 meters) per skein; example used: PP Macrame Medium cord, burgundy color (2 skeins / 91 yards (82 m) each used in example)
  • 02
    Cord color: Burgundy - 2 skeins (approx 182 yards / 164 m total) for the bag body
  • 03
    Extra small amount of contrasting cord or yarn for decorative details (optional)

— Tools Required

  • 01
    Crochet hook size 5.5 mm
  • 02
    Magnetic sewing button, 18 mm
  • 03
    2 snap hook rings, 20 mm
  • 04
    2 snap hooks, 30 mm
  • 05
    Stitch markers (at least 4-6)
  • 06
    Sewing needle and thread for attaching hardware and finishing
  • 07
    Scissors
  • 08
    Lighter or small flame tool to secure synthetic cord ends (process with fire)
  • 09
    Measuring ruler (to check loop height and gauge)

Progress Tracker

0% Complete

— Crochet the Oval :

Info :

The diagram for crocheting the oval is in the appendix 1. The diagram shows odd rows. Leave the end of the thread about 80 inches (2 meters) long for closing the rows. Make the slip knot. Crochet the chain of 13 CH with two threads. To do this, make a yarn over, crochet 2 loops together. Repeat 13 times. Crochet the loops loosely, do not tighten.

1 row :

Crochet from the 2nd loop from the hook: 11 SC, 3 SC in 1, 11 SC to the other side, crochet the last SC with the end. Pull out the end, close the row with the end of the thread (=26). Insert the hook on both loops of the chain.

Info :

When crocheting SC, pull the working loop to the hook level by 20 mm.

Info :

There are 10 loops between the side ones (3 SC in 1). Place 4 markers in the 1st and 10th loops. Place markers on the front loop only. Rearrange the markers into these loops of each odd row.

2 row :

Insert the hook in the 2nd loop right behind the marker. Pull the loop. Crochet 25 SlSt to the other side on the back loop only. Crochet the last SlSt with the end of the thread. Close the row with the end (=26).

Info :

Don't tighten SlSt, crochet loosely.

3 row :

Insert the hook in the 2nd loop, left of the marker. Pull the loop. Crochet 8 SC, next crochet 3 Inc, 10 SC, 3 Inc, 1 SC. Crochet the last SC with the end. Close the row with the end (=32).

4 row :

Insert the hook into the 3rd loop, left of the marker. Pull the loop. Crochet 31 SlSt to the other side on the back loop only. Crochet the last SlSt with the end. Close the row with the end (=32).

5 row :

Insert the hook in the 5th loop, left of the marker. Pull the loop. Crochet 5 SC, (SC, Inc)*3, 10 SC, (SC, Inc)*3, 4 SC. Crochet the last SC with the end. Close the row with the end (=38).

6 row :

Insert the hook in the 5th loop, left of the marker. Pull the loop. Crochet 37 SlSt to the other side on the back loop only. Crochet the last SlSt with the end. Close the row with the end (=38).

7 row :

Insert the hook in the 5th loop, left of the marker. Pull the loop. Crochet 5 SC, (2 SC, Inc)*3, 10 SC, (2 SC, Inc)*3, 4 SC. Crochet the last SC with the end. Close the row with the end (=44).

8 row :

Insert the hook in the 5th loop, left of the marker. Pull the loop. Crochet 43 SlSt to the other side on the back loop only. Crochet the last SlSt with the end. Close the row with the end (=44).

9 row :

Insert the hook in the 5th loop, left of the marker. Pull the loop. Crochet 5 SC, (Inc, 3 SC)*3, 10 SC, (Inc, 3 SC)*3, 4 SC. Crochet the last SC with the end. Close the row with the end (=50).

10 row :

Insert the hook in the 5th loop, left of the marker. Pull the loop. Crochet 49 SlSt to the other side on the back loop only. Crochet the last SlSt with the end. Close the row with the end (=50).

11 row :

Insert the hook in the 5th loop, left of the marker. Pull the loop. Crochet 5 SC, (4 SC, Inc)*3, 10 SC, (4 SC, Inc)*3, 4 SC. Crochet the last SC with the end. Close the row with the end (=56).

12 row :

Insert the hook in the 5th loop, left of the marker. Pull the loop. Crochet 55 SlSt to the other side on the back loop only. Crochet the last SlSt with the end. Close the row with the end (=56).

13 row :

Insert the hook in the 5th loop, left of the marker. Pull the loop. Crochet 5 SC, 2 SC, Inc, (5 SC, Inc)*2, 3 SC, 10 SC, 2 SC, Inc, (5 SC, Inc)*2, 3 SC, 4 SC. Crochet the last SC with the end. Close the row with the end (=62).

14 row :

Insert the hook in the 5th loop, left of the marker. Pull the loop. Crochet 61 SlSt to the other side on the back loop only. Crochet the last SlSt with the end. Close the row with the end (=62).

15 row :

Insert the hook in the 5th loop, left of the marker. Pull the loop. Crochet 5 SC, (6 SC, Inc)*3, 10 SC, (6 SC, Inc)*3, 4 SC. Crochet the last SC with the end. Close the row with the end (=68).

Info :

Oval dimensions: ~13x9 inches (32x23 cm).

— Crochet the Side Part :

Info :

Put the oval with the seam facing up. Remove 2 markers on the left. Rearrange the markers to the right 5 stitches to the left.

16 row :

Insert hook in the loop with marker. Pull the loop, crochet 32 SlSt to the other side on the back loop only to the 2nd marker.

17 row :

32 SC, CH.

Info :

Strengthen the end with which we closed the rows. Process with fire. Remove the markers, rearrange them into the 5th loops from the sides.

18 row :

27 SlSt to the other side on the back loop only to the 2nd marker.

19 row :

22 SC to the 1st marker, CH.

Info :

Count 5 more loops from the sides and place 2 more markers.

20 row :

17 SlSt to the other side on the back loop only to the 3rd marker.

21 row :

12 SC to the 2nd marker, CH.

22 row :

17 SlSt to the other side on the back loop only to the last marker.

23 row :

Remove the 2nd and 3rd markers, 22 SC to the 1st marker, CH.

24 row :

Remove the last marker, 27 SlSt to the other side on the back loop only.

25 row :

Remove the 1st marker, 32 SC, CH.

26 row :

32 SlSt to the other side on the back loop only.

Assembly Instructions

  • Place the oval with the seam facing up, align the side piece and use the markers as guides to join the side to the oval with slip stitches or whipstitch evenly along the marked loops.
  • After joining the side, remove the remaining markers and reinforce the starting/ending cord tail by melting or processing with a small flame on synthetic cord, then weave the tail into the inner rows securely.
  • Attach the snap hook rings and snap hooks to the crocheted strap loops or to the assembled side ends using strong thread and the sewing needle; use two rings (20 mm) and two snap hooks (30 mm) as shown.
  • Sew the magnetic sewing button (18 mm) to the flap area: mark the placement on the front and back, stitch through the cord securely with thread, and test alignment before final stitching.
  • Reinforce all hardware attachment points by sewing several passes with strong thread and knotting securely; weave and trim ends and treat synthetic tails with flame if necessary for a neat finish.

Important Notes

  • 💡Use stitch markers to mark the 1st and 10th loops and rearrange them into the correct loops on each odd row for accurate shaping.
  • 💡When crocheting SlSt on the back loop only, keep the stitches loose to avoid puckering; do not tighten these slip stitches.
  • 💡Pull the working loop to the hook level by about 20 mm when working SC in loops to maintain the textured look and even tension.
  • 💡Strengthen and secure the tail used to close rows by processing the synthetic cord end with a small flame and then weaving it into the piece for durability.

This Slice Handbag pattern gives you a chic, structured bag made from macrame cord with a textured finish and durable construction. It includes full stitch counts, marker placement tips, and photo guidance to help you build a professional-looking accessory. Perfect for gifting or personal use — make it in your favorite color and hardware for a custom touch. 🧶✨
You ask,

we answer.

FAQs

What size will the finished piece be?

The finished bag measures approximately 9 inches long x 7 inches high x 4 inches wide (23-24 cm x 17-18 cm x 10 cm) using the specified cord and hook size; the oval base is about 13x9 inches (32x23 cm).

Can I use a different cord or yarn weight for this pattern?

Yes, you can substitute cord or yarn, but the size and stitch tension will change; if you use thicker cord increase the hook size, and for thinner cord use a smaller hook to keep the structure similar.

Do I need any special skills to follow this pattern?

This pattern is rated intermediate — you should be comfortable with basic single crochet, slip stitch, increases, and working into front/back loops. Marker placement and working loosely on SlSt rounds are important.

How long does this project typically take to complete?

Most crocheters finish this bag in 5-7 hours, depending on experience and whether you add decorative hardware or custom finishing steps.

How do I finish and secure synthetic cord ends safely?

After weaving in ends, carefully process the synthetic cord tail with a small flame to slightly melt and secure it, then press or hide the melted end inside the stitches for a neat finish.