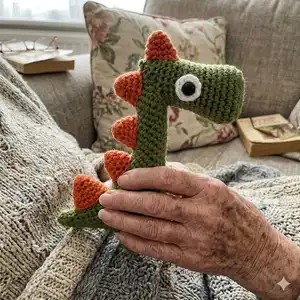
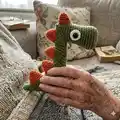
Make a charming little dinosaur keychain with this detailed amigurumi pattern. You will enjoy step-by-step instructions, clear rounds and helpful assembly notes to create a pocket-sized Dino. The pattern includes spikes, eyes, tummy and full finishing tips so your toy looks polished. Perfect for gifts, bags or as a beginner-friendly introduction to toy crochet.
Progress Tracker
0% Complete
— Tail :
Round 4 :
inc, 4 sc, inc (8)
Round 6 :
inc, 6 sc , inc (10)
Round 8 :
inc, 8 sc, inc (12)
Round 9 :
inc, 4 sc, inc, 5 sc, inc (15), sl st
Info :
Cut the yarn, fasten off. Add fiberfill Photo 1.
— Head :
Round 1 :
ch8, from the second chain on the hook: inc, 5 sc, inc, on the other side of the chain: inc, 5 sc, inc (18) - photo 2
Round 2 :
(sc, inc, 5 sc, inc, sc)*2 (22) - photo 3
Round 3-5 :
3 rounds of 22 sc (22)
Info :
Further decreases should go from one side - this will be the bottom.
Round 10 :
dec, 18 sc (19)
Round 12 :
dec, 17 sc (18)
Round 13-14 :
2 rounds of 18 sc (18), sl st
Info :
Cut the yarn, fasten off. Add fiberfill. Photo 4.
— Legs :
Info :
Make 2. Photo 1. Stuff if desired.
Round 2-3 :
2 rounds of 6 sc (6)
Info :
On the first leg make sl st. Fasten off and cut the yarn. Continue crocheting the body from the second leg, join the first leg and tail.
— Body :
Round 1 :
ch4, (from the next sc mark the new beginning of the round), on the first leg 3 sc, starting from any stitch (photo 2), on the tail, starting from sl st on it (photo 3): 7 sc, inc, 7 sc, on the first leg 3 sc, along the chain 4 sc, on the second leg 6 sc, on the other side of the chain 4 sc (36) - photo 4
Info :
Further, the increases should be centered on the back, and the decreases on the sides and from round 12 in the front in the center. If you have a strong shifting, move the marker of the beginning of the round. Stuff as you go.
Round 2 :
2 sc, dec, 14 sc, dec, 16 sc (34)
Round 3 :
2 sc, dec, 6 sc, inc, 5 sc, dec, 16 sc (33)
Round 4 :
dec*2, 5 sc, inc, 5 sc, dec*2, 14 sc (30)
Round 5 :
dec, 6 sc, inc, 5 sc, dec, 14 sc (29)
Round 6 :
dec, 5 sc, inc, 5 sc, dec*2, 10 sc, dec (26)
Round 7 :
dec, 5 sc, inc, 4 sc, dec*2, 8 sc, dec (23)
Round 8 :
dec, 4 sc, inc, 4 sc, dec, 10 sc (22)
Round 9 :
dec, 4 sc, inc, 3 sc, dec, 10 sc (21)
Round 10 :
dec, 3 sc, inc*2, 2 sc, dec*2, 6 sc, dec (19)
Round 11 :
dec, 3 sc, inc*2, 3 sc, dec, 7 sc (19) - photo 1
Round 12 :
dec, 4 sc, inc, 3 sc, dec, 3 sc, dec, 2 sc (17)
Round 13 :
5 sc, inc, 6 sc, dec*2, sc (16)
Round 14 :
6 sc, inc, 6 sc, dec, sc (16)
Round 15 :
7 sc, inc, 6 sc, dec (16)
Round 16 :
dec, 5 sc, inc*2, 5 sc, dec (16)
Round 18 :
dec, 5 sc, inc*2, 5 sc, dec (16)
Round 19 :
dec, 6 sc, inc, 5 sc, dec (15)
Round 21 :
dec, 5 sc, inc*2, 3 sc, short round - photo 2
Info :
Finish the round so that when you fold your neck in half, there are 3 sc left to the front fold, since we will crochet the head in front in the center (markers mark six central stitches in front - photos 3-4). We also fold the head in half and mark 3 stitches to the sides from the bottom fold (where the end of the round is) - photos 5-6.
— Head (continued) :
Round 22 :
6 sc with the head (starting from the stitch with the blue marker - photos 1-3), next mark the beginning of the round from the first dec - on the neck: dec, 6 sc, dec, on the head 12 sc (20) - photo 4
Round 23 :
dec, 2 sc, inc, sc, dec*2, 8 sc, dec (17)
Round 24 :
dec, 3 sc, dec, 10 sc (15)
Round 25 :
(3 sc, dec)*3 (12)
Info :
Tighten the hole through front loops. Fasten off, weave in the ends.
— Eyes :
Info :
Make 2 circles in white color. Photo 1.
Round 1 :
9 sc in MR (9), fasten off with sl st
Info :
Leave the yarn tail for sewing.
— Spikes :
Info :
Make 4 spikes of smaller size and 1 tail spike larger. Photo 2.
Item Name (BIGGER SPIKES) :
1r. 4 sc in MR (4)
Round 3 :
(inc, 2 sc)*2 (8)
Round 4 :
(inc, 3 sc)*2 (10)
Round 5 :
(inc, 4 sc)*2 (12)
Round 6 :
(inc, 5 sc)*2 (14), sl st
Info :
BIGGER SPIKES (1 pcs.) - Leave the yarn tail for sewing.
Item Name (SMALLER SPIKES) :
1r. 4 sc in MR (4)
Round 3 :
(inc, 2 sc)*2 (8)
Round 4 :
(inc, 3 sc)*2 (10)
Round 5 :
(inc, 4 sc)*2 (12)
Round 6 :
(inc, 5 sc)*2 (14), sl st
Info :
SMALLER SPIKES (4 pcs.) - Leave the yarn tail for sewing.
— Tummy :
Round 2 :
((3 sc inc)*2, sc)*2 (14)
Round 3 :
(2 sc, inc*2, 3 sc)*2 (18), sl st
Info :
Leave the yarn tail for sewing. To make the end of the round less noticeable, bring the thread to the wrong side under the loops of the next stitch. Photos 3-4.
— Assembly :
Info :
Sew the eyes on the sides slightly shifting down - on the one side, I sewed after round 7, on the other side - after round 8 to maintain symmetry: before sewing, fix with pins and check from above and in front.
Info :
Insert the needle under both loops (photo 1), then grab the thread on the head (photo 2) and again under both loops of the same stitch in the opposite direction (photo 3), etc. sew in a circle.
Info :
Glue the pupils in the center.
Info :
Sew the spikes through the front loops with "over the edge" stitches (photo 1).
Info :
After round 4, sew the largest spike on the tail. Further along the back, after round 1, sew 3 spikes and the last one on the top of the head at the very edge.
Info :
Sew the tummy immediately above the front leg in the center in the same way as the eyes were sewn.
Info :
Attach a keychain fastener (loop, carabiner, cord) between the upper spikes, and your little Dino is ready!
Thank you for choosing this Dino's Family pattern — I hope you enjoyed making your little dinosaur companion. This pattern is perfect for quick handmade gifts and stylish bag charms. Have fun stitching and personalizing your Dino creations! 🧶🦖