🧢 Beautiful ✨ Detailed πŸ’ Adorable

Santa Keychain Amigurumi Pattern

Santa Keychain Amigurumi Pattern
4.4β˜… Rating
2-3 Hours Time Needed
2.3K Made This
βœ‚οΈ

Intermediate Level

Ideal for those with basic crochet experience, featuring slightly more advanced stitches and techniques to expand your skills.

⏱️

Bite-Sized Project

Finishes in 2-4 hoursβ€”perfect for an afternoon of creative relaxation.

🧸

Cute Companion

An adorable friend to cherish, handcrafted with love to bring comfort and joy for years to come.

About This Santa Keychain Amigurumi Pattern

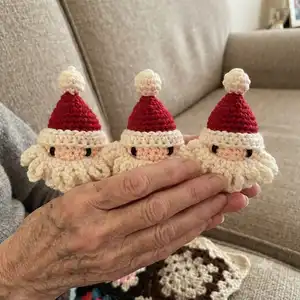
This pattern creates a small Santa head keychain with a textured loopy beard, a tiny bobble and a snug hat band. It uses UK crochet terms and works up quickly using DK weight yarn and a 3mm hook. The design features looped beard stitches, front-post detailing for texture, and simple sewing to finish.

Santa Keychain Amigurumi Pattern crochet pattern - detailed view of completed project

Perfect for using up yarn scraps and making multiple gifts fast. Includes diagrams referenced in the instructions to help with tricky steps.

Why You'll Love This Santa Keychain Amigurumi Pattern

I absolutely love this pattern because it packs a lot of charming detail into a tiny, gift-ready piece. I enjoy the loopy beard technique β€” it gives each Santa so much personality with minimal effort. The hat shaping and bobble assembly are small finishing touches that make the keychain feel handmade and special. I also love that you can make several in an afternoon and customize colors for different looks.

Santa Keychain Amigurumi Pattern step 1 - construction progress Santa Keychain Amigurumi Pattern step 2 - assembly progress Santa Keychain Amigurumi Pattern step 3 - details and accessories Santa Keychain Amigurumi Pattern step 4 - final assembly and finishing

Switch Things Up

I love how easy this pattern is to customize, and I often change colours to create unique Santas β€” try pale pinks or greys for non-traditional looks.

You can make the keychain larger by using aran or bulky yarn and a bigger hook; conversely, use thinner yarn and a smaller hook to create tiny charms for bracelets.

I sometimes swap the DK yarn for a fuzzy yarn for the beard to give a more realistic fluffy look; just be mindful when sewing so the fibres do not get trapped in stitches.

If you want a hanging ornament instead of a keychain, use ribbon instead of a metal key ring or stitch a loop at the top of the bobble for hanging.

Try embroidering a small smile or rosy cheeks on the face with peach or pink yarn to add personality to each Santa.

For a more posable charm, consider adding a tiny wire inside the bobble or the hat seam, but be careful with sharp edges around kids toys.

I sometimes add small felt accessories like glasses or a tiny holly leaf to the hat band for seasonal variations and personalisation.

To create a family set, vary hat colours and beard styles β€” shorter loops for a tidy beard or longer loops for an exaggerated, whimsical look.

Use safety eyes or beads if you prefer that look, but ensure they are securely attached for items intended for sale or for children.

When making multiples, I assemble all the hats, then all the beards, then finish with eyes and bobbles β€” this production approach saves time and keeps work neat.

Common Mistakes & How to Fix Them

βœ— Skipping the stitch marker when working in continuous rounds causes row confusion; place a stitch marker at the last stitch of each row before proceeding to the next row so you always know your starting point. βœ— Overstuffing the head and bobble will distort the shape and show through; stuff gradually and test by gently pinching to ensure the piece can be squeezed slightly without bulging. βœ— Not checking stitch counts after increases or decreases leads to uneven shaping; count your stitches at the end of each round, especially after shaping rows, to maintain the correct total. βœ— Pulling loops for the beard too tightly will reduce the loopy texture and make the beard short; pull consistent, gentle loops and secure ends before trimming so the curls remain full and fluffy.

Santa Keychain Amigurumi Pattern

Make a tiny, festive Santa keychain perfect for gifts, tree decorations, or bag charms. This compact pattern walks you through crocheting the head, hat, beard and bobble with clear UK-term instructions and helpful diagrams. Youll love the textured beard and tiny bobble detail that bring Santa to life. Ideal for using small yarn scraps and finishing in a single afternoon.

Intermediate 2-3 Hours

Materials Needed for Santa Keychain Amigurumi Pattern

β€” Main Fabric

  • 01
    Hayfield Bonus (DK) White 0961 - 4g
  • 02
    Hayfield Bonus (DK) Peaches 0888 - 3g
  • 03
    Hayfield Bonus (DK) Ladybird 0698 - 3g
  • 04
    Hayfield Bonus (DK) Black 0965 - oddment for eyes

β€” Tools Required

  • 01
    Keychain
  • 02
    Hi-Loft quality toy stuffing
  • 03
    3mm crochet hook
  • 04
    Wool needle (for sewing)
  • 05
    Scissors
  • 06
    Stitch markers

Progress Tracker

0% Complete

β€” Materials :

Info :

Hayfield Bonus (DK) White 0961 – 4g. Hayfield Bonus (DK) Peaches 0888 – 3g. Hayfield Bonus (DK) Ladybird 0698 – 3g. Hayfield Bonus (DK) Black 0965 – Oddment for Eyes. Keychain. Hi-Loft Quality Toy Stuffing. 3mm Crochet Hook. Wool Needle (for sewing).

β€” Abbreviations :

Infos :

ch – chain. dc – double crochet. htr – half treble crochet. inc – 2 stitches into next stitch. dec – decrease over next two stitches in front loops only. FLO – front loops only. sl st – slip stitch. f/o – fasten off by slip stitch in next stitch. y/o – yarn over. cl – (y/o, pick up st) x3, y/o, take each stitch individually over last y/o to form single cluster stitch. FP(tr) – front post (treble) worked through the front, right to left.

Info :

Note: Unless stated work in continuous rounds marking last stitch of each row with a stitch marker before proceeding with the next. When stuffing parts make sure that you don't overstuff them as you don't want the stuffing to show through when complete. Each part should be filled just enough that it can be easily squeezed when pinched firmly.

β€” Head :

Row 1 :

Using Peaches - ch2, dc 6 into 2nd st from hook (alternatively dc 6sts into magic ring) (6)

Row 2 :

inc x6 (12)

Row 3 :

(dc into next st, inc) x6 (18)

Row 4 :

(dc into the next 2sts, inc) x6 (24)

Rows 5 – 7 :

dc (24) (3 rows)

Row 8 :

dc into the next 5sts, FPtr into the dc 2 rows below, dc into next 5sts, cl, dc into the next 5sts, FPtr into the dc 2 rows below, dc into next 6sts (24) (Diagrams 1 – 7)

Row 9 :

dc into the next 5sts, FPtr into the previous tr, dc into next 11sts, FPtr into the previous tr, dc into next 6sts (24) (Diagrams 8 – 9)

Row 10 :

dc (24) sl st to join

Info :

F/O leaving a short end

β€” Hair and Beard :

Row 1 :

Using White - sl st into F/O st, sl st into next 6sts, (you should be just in front of the ear, adjust if not), slip st at an angle down the face for the next 3sts, moving 1 row and a st down the face each time, sl st straight across for the next 6sts (the 3rd and 4th st should be central to the base of the nose), slip st at an angle up the face for the next 3sts, moving 1 row and a st up the face each time, (you should be just in front of the 2nd ear), sl st into the next 6sts (24) sl st to join (Diagrams 10 – 11)

Row 2 :

(ch7, sl st through the next sl st from the previous row) x5, (ch9, sl st through the next sl st on beard shaping) x12, (ch7, sl st through the next sl st from the previous row) x7 (12 loops Beard, 12 loops Hair) (Diagrams 12 – 13)

Info :

F/O leaving a short end

β€” Hat :

Row 1 :

Using Ladybird - sl st into F/O st on peaches row at top of head, dc into next 24sts (24) (Diagrams 14 – 16)

Rows 2 – 3 :

dc (24) (3 rows)

Row 4 :

(dc into the next 6sts, dec) x3 (21)

Row 5 :

(dc into the next 5sts, dec) x3 (18)

Row 6 :

(dc into the next 4sts, dec) x3 (15)

Row 7 :

(dc into the next 3sts, dec) x3 (12)

Row 8 :

(dc into the next 2sts, dec) x3 (9)

Info :

Stuff head and hat

Row 9 :

(dc into next st, dec) x3 (6)

Info :

F/O leaving a short end.

β€” Bobble :

Row 10 :

Using White - leaving a 20cm end, sl st into st to right of F/O st, (Diagram 17) (dc into next st, inc) x3 making sure that the end is to the outside sl st to join (End will be used to shape bobble) (9)

Rows 11 – 12 :

dc (9) (2 rows)

Info :

Stuff bobble

Row 13 :

(dc into next st, dec) x3 (6)

Info :

F/O leaving a 20cm end. (Diagram 18)

Info :

Thread F/O end through the front loops of the last 6sts and pull tight to gather. (Diagram 19) Secure end with a couple of small sts. Using small back sts attach the keychain to the top of the bobble. Secure with a couple of small sts. Weave end through bobble and cut flush. Using 20cm end from start of babble thread through the base of the 1st row of white sts and pull tight to gather. (Diagram 20) Secure end with a couple of small sts. (Diagram 21) Weave end through Head and cut flush.

β€” Hat Band :

Row 1 :

Using White - leaving a 25cm end, ch24(24) sl st to join

Row 2 :

ch1, htr into the next 23ch (24) sl st to join

Info :

F/O leaving a 25cm end (Diagram 22)

Info :

Place hat band on head so that the base is touching the top of the hair. Using each 25cm end in turn, attach both sides of the band to the head using small back sts. (Diagrams 23 – 24) Secure ends with a couple of small sts before threading through head and cutting flush.

β€” Eyes :

Info :

Using black oddment thread through to front of face, 1 row up from top of nose and 2sts to outside. Sew 3 small back sts 1 row in length to form 1st eye. Thread through to opposite side of face and repeat for 2nd eye. (Diagrams 25 – 26) Weave end through head and cut flush.

β€” Additional Abbreviations (alternate page) :

Infos :

sc – single crochet. hdc – half double crochet. FP(dc) – front post (double) worked through the front, right to left. (These appear on an alternate abbreviation page; include for reference.)

Assembly Instructions

  • Place hat band on head so that the base is touching the top of the hair and attach both sides of the band to the head using small back stitches with the 25cm ends, then secure ends with a couple of small stitches and thread through head and cut flush.
  • Using small back stitches attach the keychain to the top of the bobble, secure with a couple of small stitches and weave the end through the bobble and cut flush.
  • Position and sew the loopy beard/hair across the face as described: sl st into F/O st, sl st into next 6sts, work angled sl sts down and up across the face to form beard base, then form loops with ch7/ch9 row and fasten off leaving ends for sewing if needed.
  • Sew eyes using black oddment thread through to front of face, 1 row up from top of nose and 2sts to outside, sew 3 small back sts 1 row in length for each eye, then weave ends through head and cut flush.

Important Notes

  • πŸ’‘Unless stated work in continuous rounds marking last stitch of each row with a stitch marker before proceeding with the next.
  • πŸ’‘When stuffing parts make sure that you don't overstuff them as you don't want the stuffing to show through when complete.
  • πŸ’‘Each part should be filled just enough that it can be easily squeezed when pinched firmly.
  • πŸ’‘Secure ends with a couple of small stitches before trimming so the seams and attachments remain stable.

This tiny Santa keychain pattern is perfect for quick handmade gifts and festive decorations. Make a whole set in minutes and give them as cheerful stocking fillers or bag charms. Each Santa has a textured loopy beard, a snug hat band and a cute bobble for finishing touches. 🧢🎁

You ask,

we answer.

FAQs

What size will the finished piece be?

The finished keychain measures approximately 5-7 cm tall including the bobble when using DK yarn and a 3mm hook.

Can I use different yarn weights for this pattern?

Yes, you can use different yarn weights but this will change the finished size; adjust your hook accordingly and expect a chunkier or smaller Santa depending on yarn weight.

Do I need prior crochet experience for this pattern?

This pattern is rated intermediate and uses techniques like front post stitches and looped/beard stitches; basic knowledge of UK terms and shaping is recommended.

How long does this project typically take to complete?

Most crafters can finish a single keychain in 2-3 hours, though time may vary depending on experience and finishing details.