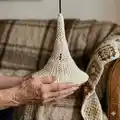
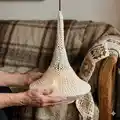
About This Rustic Lamp Pattern
This pattern creates a rustic hanging lamp shade using rope-like stitches worked in the round around two metal rings. It features a wide skirt and a tapered top with a handmade, breathable texture that lets the light glow through. The instructions include how to work around metal rings and finish the lamp ready for electrical fitting. You will need basic crochet skills and some simple electrical assembly tools.

The design uses Katia Capri yarn and a 3 mm hook to give a natural, neutral finish. The pattern includes full round-by-round instructions, finishing tips, and guidance for attaching the cord and lamp fitting.
Why You'll Love This Rustic Lamp Pattern
I absolutely love this pattern because it turns simple yarn into a stunning statement piece that brightens any room. I love the way the rope stitch creates texture and allows a warm glow to peek through the fabric. I appreciate that the pattern uses just a few materials but results in a sophisticated finished lamp. I enjoy making multiples in different sizes and heights to create a dramatic cluster of lights.
Switch Things Up
I love how easy it is to customize this lamp by changing yarn color or weight; try soft pastels for a lighter look or dark neutrals for contrast.
To make the lamp larger or smaller, adjust the metal ring diameters or change the yarn weight and hook size — bulkier yarn with a larger hook makes a chunkier shade.
I sometimes mix two yarns held together for a textured, thicker fabric that creates a cozier light diffusion.
Add pops of color by crocheting a contrasting edge around the ring or by switching color for a few rounds before attaching the ring.
Try experiment with different ring materials: wooden hoops give a warmer finish while metallic rings keep a more industrial feel.
For a cluster effect, make multiple lamps in different sizes and hang at uneven heights to create a dramatic focal point.
If you want a firmer shade, use a fabric stiffener spray after finishing and shaping to retain the silhouette.
Replace the E27 bulb with a low-heat LED globe to keep the lamp safe and bright while minimizing heat inside the shade.
I also like to add small crocheted details like a fringe or hanging beads around the lower ring for extra personality.
Don’t be afraid to alter the spacing of chains in the pattern to create more openwork for stronger light diffusion or a more solid fabric for softer glow.
Common Mistakes & How to Fix Them
✗ Working with inconsistent tension will cause an uneven lamp shape; maintain steady tension and practice the rope stitch on a sample before starting the final lamp.
✗ Forgetting to join rounds with a slip stitch at the end will misalign your stitch rows; always end each round with 1 sl st in the first stitch of the round as instructed.
✗ Not testing the hook size can make the fabric too loose or too stiff; try the recommended 3 mm hook and switch sizes to get the right drape first.
✗ Failing to weave in ends immediately makes them hard to reach later; weave ends with the wool needle as soon as you finish sections as the pattern suggests.
✗ Attaching electrical parts without disconnecting power or using correct strain relief risks safety issues; follow electrical assembly guidance and use the recommended fittings and strain relief.