🧶 Beautiful ✨ Detailed 💝 Adorable

Heart Cat and Bunny Amigurumi Pattern

Heart Cat and Bunny Amigurumi Pattern
4.3★ Rating
5-7 Hours Time Needed
1.7K Made This
✂️

Intermediate Level

I deal with this pattern as an intermediate-level project. Ideal for those with basic crochet experience, featuring slightly more advanced stitches and techniques to expand your skills.

⏱️

Weekend Treat

Takes 5-7 hours, making it an enjoyable project to finish over a couple of days.

🧸

Cute Companion

An adorable friend to cherish, handcrafted with love to bring comfort and joy for years to come.

About This Heart Cat and Bunny Amigurumi Pattern

This pattern creates two heart-shaped plushies with interchangeable faces: a sweet cat and a playful bunny. You will crochet a heart body, then add a muzzle, ears and a tail to create each character. The design uses plush super-bulky yarn for a soft, huggable finish.

Heart Cat and Bunny Amigurumi Pattern crochet pattern - detailed view of completed project

Clear round-by-round instructions and photos help guide you through shaping and assembly. Small parts like safety eyes and noses give each toy personality and charm.

Why You'll Love This Heart Cat and Bunny Amigurumi Pattern

I absolutely love this pattern because it transforms a simple heart shape into two completely different characters with just a few small additions. I enjoy how quickly the heart body works up using continuous rounds and super-bulky plush yarn — it feels instant and rewarding. I also love that you can personalize each toy by changing ear styles, tail stripes, or eye sizes. The pattern photographs helped me position features with confidence and I am excited to see how others will make these characters their own.

Heart Cat and Bunny Amigurumi Pattern step 1 - construction progress Heart Cat and Bunny Amigurumi Pattern step 2 - assembly progress Heart Cat and Bunny Amigurumi Pattern step 3 - details and accessories Heart Cat and Bunny Amigurumi Pattern step 4 - final assembly and finishing

Switch Things Up

I love how easy it is to customize this pattern — you can change colors to create many different characters and moods.

Try pastel tones for a soft nursery toy or bright contrasting stripes on the tail for a playful look.

If you want a larger cuddle buddy, use a bulkier plush yarn and a larger hook; you'll need more stuffing and stronger eyes for scale.

To make a smaller keychain version, switch to a DK yarn and a smaller hook, and replace safety eyes with embroidered eyes.

I often add embroidered eyebrows or blush with yarn scraps to give a different expression and personality to each toy.

Swap the muzzle shape — a rounder muzzle gives a chubbier face while a flatter one creates a sleeker look.

For a tactile variation, use loop or textured yarn for the ears or tail tip to add visual interest.

Consider making matching accessories like tiny scarves, bows, or a little crocheted heart to tuck under the arm.

To make the toy poseable, and only if you’re comfortable, add a short piece of wire into the tail or inside the ears to bend them gently.

I always recommend trying the placement of eyes and muzzle with pins before permanently sewing — a small shift dramatically changes the character, so experiment until you find the perfect look.

Common Mistakes & How to Fix Them

✗ Skipping the stitch marker when working in continuous rounds makes it hard to track the beginning; place a stitch marker in the first stitch of every round to avoid losing your place. ✗ Not stuffing gradually causes lumps or uneven shape in the heart; add small amounts of fiberfill while shaping and spread stuffing evenly for a smooth surface. ✗ Pulling decreases too tight will distort the shape and create visible holes; perform invisible decreases gently and keep tension consistent to maintain smooth shaping. ✗ Forgetting to leave a long yarn tail when joining the two halves makes sewing difficult; cut one tail about 8 inches long on the first piece to use for attaching and closing the seam. ✗ Attaching safety eyes too late or without checking placement can result in incorrect facial spacing; mark eye placement between the indicated rounds first, then insert safety eyes and secure before heavy stuffing. ✗ Using the main plush yarn to sew delicate pieces like ears or the tail can be bulky and hard to hide; use strong thread as recommended for sewing these small parts for neater assembly.

Heart Cat and Bunny Amigurumi Pattern

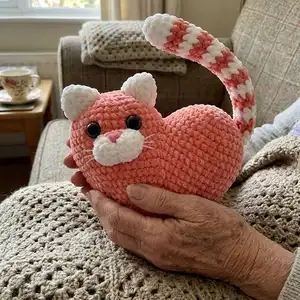
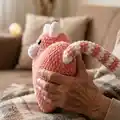
Make two adorable heart-shaped plushies — a cat and a bunny — using soft plush yarn. This pattern guides you step-by-step through crocheting the heart body and all facial features, ears and tails so you can personalize each character. Perfect for gift-making or home decor, the finished toys are cuddly, expressive, and full of charm.

Intermediate 5-7 Hours

Materials Needed for Heart Cat and Bunny Amigurumi Pattern

— Main Fabric

  • 01
    Plush yarn Himalaya Dolphin Baby 100 g/120 m (131 yards) or any analogue (Premier Parfait Chunky) - Weight: 6 Super Bulky (main color approx 100 g)
  • 02
    White plush yarn (small amount for muzzle, ears, tail tip and details, approx 25-50 g)
  • 03
    Contrast plush yarn (pink or chosen second color) for stripes and details (small amount, approx 25-50 g)
  • 04
    Safety eyes 16 mm (1 pair) recommended for cat and bunny
  • 05
    Safety nose: Cat 16 mm, Bunny 8 mm

— Tools Required

  • 01
    Crochet hook size 4.5 mm (US 7)
  • 02
    Safety eyes 16 mm (2 pieces)
  • 03
    Safety nose 16 mm (for cat)
  • 04
    Safety nose 8 mm (for bunny)
  • 05
    Scissors
  • 06
    Darning needle
  • 07
    Polyester fiberfill (stuffing)
  • 08
    Stitch markers
  • 09
    Strong thread for sewing small parts (recommended)

Progress Tracker

0% Complete

— Heart :

Info :

Crochet in main color. Hook size 4.5 mm.

Info :

**Pro-Tip: Work in continuous rounds. Do not join or turn unless otherwise instructed. It would be wise to use a stitch marker and place it in the first stitch of each round to mark the beginning of it.

Round 1 :

MR 6 [6]

Round 2 :

6 Inc [12]

Round 3 :

(Inc, 1 SC)×6 [18]

Round 4 :

(Inc, 2 SC)×6 [24]

Round 5 :

(Inc, 3 SC)×6 [30]

Round 6 :

(Inc, 4 SC)×6 [36]

Round 7 :

5 SC, (Inc, 11 SC)×2, Inc, 6 SC [39]

Round 8 :

(Inc, 12 SC)×3 [42]

Round 9 :

6 SC, (Inc, 13 SC)×2, Inc, 7 SC [45]

Round 10 :

SC around [45]

Round 11 :

(Inc, 14 SC)×3 [48]

Info :

Remove the loop from the hook. Cut the yarn with 8” yarn tail.

Info :

Make another piece just like the previous one by repeating rounds 1-11. Do not cut the yarn as we will continue using the yarn of the second piece.

Round 12 :

Attach the pieces to each other, put the open loop of the first piece on the hook. [82]

Info :

Continue crocheting around the circle of the first piece and crochet 41 SC, go back to the second piece, skip 7 St and crochet on the second piece 41 SC.

Info :

Sew the hole between the pieces with the left tail of the thread from the first piece.

Round 13 :

13 SC, (Dec, 25 SC)×2, Dec, 13 SC [79]

Round 14 :

Dec, 24 SC, Dec, 25 SC, Dec, 24 SC [76]

Round 15 :

12 SC, (Dec, 23 SC)×2, Dec, 12 SC [73]

Round 16 :

(Dec, 22 SC)×3, 1 SC [70]

Round 17 :

11 SC, (Dec, 21 SC)×2, Dec, 11 SC [67]

Round 18 :

21 SC, (Dec, 20 SC)×2, Dec [64]

Round 19 :

7 SC, Dec, (14 SC, Dec)×3, 7 SC [60]

Round 20 :

(13 SC, Dec)×4 [56]

Round 21 :

6 SC, (Dec, 12 SC)×3, Dec, 6 SC [52]

Round 22 :

(11 SC, Dec)×4 [48]

Round 23 :

5 SC, Dec, (10 SC, Dec)×3, 5 SC [44]

Round 24 :

(9 SC, Dec)×4 [40]

Round 25 :

5 SC, (Dec, 8 SC)×3, Dec, 3 SC [36]

Round 26 :

(4 SC, Dec)×6 [30]

Round 27 :

(3 SC, Dec)×6 [24]

Round 28 :

2 SC, (Dec, 4 SC)×3, Dec, 2 SC [20]

Round 29 :

(3 SC, Dec)×4 [16]

Round 30 :

(2 SC, Dec)×4 [12]

Round 31 :

(1 SC, Dec)×4 [8]

Round 32 :

(2 SC, Dec)×2 [6]

Info :

Fasten off, hide the end.

— Heart Bunny :

Bunny muzzle (P1) :

Crochet in white color. Hook size 4.5 mm. Make an oval, work on both sides of the chain.

Round 1 :

Ch 5, start in the 2nd Ch from hook, 1 Inc, 2 SC, in last loop 3 SC, 3 SC. [10]

Round 2 :

2 Inc, 2 SC, 3 Inc, 2 SC, Inc [16]

Info :

Sl St and fasten off.

Info :

Attach the safety nose (8 mm) on round 1/2.

Bunny ears (make 2) :

Crochet in white color. Hook size 4.5 mm.

Round 1 :

MR 6 [6]

Round 2 :

6 Inc [12]

Round 3 :

(1 SC, Inc)×6 [18]

Round 4 :

(8 SC, Inc)×2 [20]

Round 5-6 :

SC around (2 rounds) [20]

Round 7 :

(Dec, 8 SC)×2 [18]

Round 8 :

SC around [18]

Round 9 :

(Dec, 7 SC)×2 [16]

Round 10-11 :

SC around (2 rounds) [16]

Round 12 :

(Dec, 6 SC)×2 [14]

Round 13-14 :

SC around (2 rounds) [14]

Info :

Don’t stuff.

Round 15 :

Fold the piece in half and crochet them both sides at once 7 SC [7]

Info :

Fasten off, hide the end. Make 2 ears.

Bunny tail (P1) :

Crochet in white color. Hook size 4.5 mm.

Round 1 :

MR 6 [6]

Round 2 :

6 Inc [12]

Round 3-4 :

SC around (2 rounds) [12]

Info :

Stuff with fiberfill.

Round 4 :

6 Dec [6]

Info :

Fasten off, hide the end.

— Heart Cat :

Cat tail (P1) :

Start to crochet in white color. Hook size 4.5 mm.

Round 1 :

MR 6 [6]

Round 2 :

6 Inc [12]

Round 3-5 :

SC around (3 rounds) [12]

Round 6 :

Change color to pink. 12 SC [12]

Round 7 :

SC around [12]

Round 8 :

Change color to white. 12 SC [12]

Round 9 :

SC around [12]

Round 10 :

Change color to pink. 12 SC. [12]

Round 11 :

(4 SC, Dec)×2 [10]

Info :

Stuff with fiberfill. Next part of the tail don’t stuff.

Round 12 :

Change color to white. 10 SC [10]

Round 13 :

SC around [10]

Round 14 :

Change color to pink. 10 SC. [10]

Round 15 :

(3 SC, Dec)×2 [8]

Round 16 :

Change color to white. 8 SC [8]

Round 17 :

SC around [8]

Round 18 :

Change color to pink. 8 SC. [8]

Round 19 :

SC around [8]

Round 20 :

Change color to white. 8 SC [8]

Round 21 :

SC around [8]

Round 22 :

Change color to pink. 8 SC. [8]

Round 23 :

SC around [8]

Round 24 :

Change color to white. 8 SC [8]

Round 25 :

SC around [8]

Round 26 :

Change color to pink. 8 SC. [8]

Round 27 :

SC around [8]

Round 28 :

Change color to white. 8 SC [8]

Round 29 :

SC around [8]

Round 30 :

Fold the piece in half and crochet them both sides at once 4 SC [4]

Info :

Fasten off, hide the end.

Cat ears (make 2) :

Crochet in white color. Hook size 4.5 mm.

Round 1 :

MR 6 [6]

Round 2 :

(1 SC, Inc)×3 [9]

Round 3 :

(2 SC, Inc)×3 [12]

Round 4 :

(3 SC, Inc)×3 [15]

Round 5 :

Short row. 6 SC, Sl St. [7]

Info :

Fasten off, hide the end. Make 2 ears.

Cat muzzle (P1) :

Crochet in white color. Hook size 4.5 mm. Make an oval, work on both sides of the chain.

Round 1 :

Ch 6, start in the 2nd Ch from hook, 1 Inc, 3 SC, in last loop 3 SC, 4 SC. [12]

Round 2 :

2 Inc, 3 SC, 3 Inc, 3 SC, Inc [18]

Round 3 :

17 SC, Sl St [18]

Info :

Fasten off, hide the end. Attach the safety nose (16 mm) on round 2/3.

— Assembly :

Step 1 :

Sew the muzzle to the heart. Cat muzzle sew at the level of 12-15 rows, lightly stuff with fiberfil. Embroider a mustache. You can pull the muzzle in the middle. Insert the needle under the nose and bring it out below the muzzle, pull off and hide the ends of the thread inside. Bunny muzzle sew at the level of 11-14 rows.

Step 2 :

Sew the ears, the place is depending on your preference. In the photo on page 16, it is indicated where the front side and where the back side of the cat's ear. Fold the bottom of the ear in half for the bunny, then sew it on.

Step 3 :

Sew the tail to the heart. Cat tail at the level of 7-8 rows. Bunny tail at the level of 1-2 rows.

Info :

Attach the safety eyes (16 mm) on round 10/11 with 6 SC distance. Stuff with fiberfill all the way.

Final :

Your cute toy is ready! Enjoy)))

Assembly Instructions

  • Sew the muzzle to the heart: Cat muzzle at the level of rows 12-15 (lightly stuff with fiberfill) and Bunny muzzle at the level of rows 11-14; hide thread ends inside after sewing.
  • Attach safety eyes on rounds 10/11 leaving a distance of 6 SC between them; secure backs firmly before final stuffing.
  • Sew ears in place by choosing the preferred placement shown in photos; for bunny ears fold the bottom in half and stitch both layers together before attaching.
  • Sew the tail to the heart: attach the cat tail at the level of rows 7-8 and the bunny tail at the level of rows 1-2 ensuring secure stitching so the tail sits firmly.
  • Close and sew the seam between the two heart halves while stuffing: use the left yarn tail from the first piece to sew the hole and hide ends neatly inside.

Important Notes

  • 💡Work in continuous rounds; use a stitch marker in the first stitch of each round for accurate counting and shaping.
  • 💡Stuff gradually and evenly for smooth surfaces—overstuffing can distort the heart shape and under-stuffing will collapse the shape.
  • 💡Use strong thread for sewing small parts like ears and tail tips instead of bulky plush yarn for neater finishes and secure attachment.

This sweet Heart Cat & Bunny pattern brings handmade joy to any room with soft plush yarn and lovable details.🧶 Each character is designed to be cuddly and customizable so you can add your own color or expression.🎀 Make one for a friend or keep it as a cozy companion—either way, it will bring smiles for years to come.😊

You ask,

we answer.

FAQs

What size will the finished piece be?

The finished heart measures approximately 6.3 x 7 x 3.5 inches for the basic Heart; the Cat is about 7.5 x 7.9 x 3.5 inches and the Bunny about 9.8 x 7 x 3.5 inches when made with the recommended yarn and hook size.

Can I use different yarn weights for this pattern?

Yes, but the final size will change. Using a thicker yarn and larger hook will create a chunkier toy, while thinner yarn will make a smaller, more detailed version — adjust stuffing and eye sizes accordingly.

Do I need prior crochet experience for this pattern?

This pattern is rated intermediate — you should be comfortable working magic rings, increases, decreases (invisible decrease), and crocheting in continuous rounds.

How long does this project typically take to complete?

Most crocheters finish this project in 5-7 hours, depending on experience level, detail work, and assembly time.

Where should I place the safety eyes and nose?

Attach the safety eyes on rounds 10/11 with 6 SC distance between them; the cat nose is attached on round 2/3 of the muzzle and the bunny nose on round 1/2 of its muzzle.