🧢 Beautiful ✨ Detailed πŸ’ Adorable

Round Bag Pattern

Round Bag Pattern
4.2β˜… Rating
5-7 Hours Time Needed
2.8K Made This
βœ‚οΈ

Intermediate Level

Ideal for those with basic crochet experience, featuring slightly more advanced stitches and techniques to expand your skills.

⏱️

Weekend Treat

Takes 5-7 hours, making it an enjoyable project to finish over a couple of days.

✨

Stylish Touch

An elegant detail to elevate any look, combining traditional techniques with contemporary design sensibilities.

About This Round Bag Pattern

This pattern creates a round crochet bag worked in two circular panels and a rectangular side strip, then joined together with slip stitches. It uses cord or chunky yarn for structure and a 5 mm hook for a dense fabric. Photo references show placement and finishing steps so you can follow along visually.

Round Bag Pattern crochet pattern - detailed view of completed project

You will make two identical round pieces, a long side strip worked in rows, then assemble the parts with slip stitches. Finish by attaching handles for an on-trend, wearable bag.

Why You'll Love This Round Bag Pattern

I absolutely love this pattern because it transforms simple single crochet into a chic, structured bag that looks much more complex than it is. I enjoy how fast the rounds grow and the satisfying progression from center to large circle. The assembly step is tactile and rewarding β€” joining the pieces creates a true handcrafted object. I also love that you can customize cord thickness and handle style to make each bag uniquely yours.

Round Bag Pattern step 1 - construction progress Round Bag Pattern step 2 - assembly progress Round Bag Pattern step 3 - details and accessories Round Bag Pattern step 4 - final assembly and finishing

Switch Things Up

I love to change up this pattern by using different cord thicknesses; swapping to a bulkier cord and larger hook makes a chunky tote that is great for market trips.

I often use two contrasting colors and alternate every few rounds to create stripes that give the bag more personality and visual interest.

I sometimes add a fabric lining for extra structure and to protect small items; sewing a cotton lining with a zipper turns this into a fully functional everyday bag.

I will swap leather handles for braided cord handles when I want a softer, fully crochet lookβ€”experiment with length for shoulder or crossbody wear.

I like to embroider initials or small motifs on one round before joining for a personalized touch that makes the bag a great gift.

I occasionally add a tassel or pompom to the handle attachment to make a playful accent that is easy to change seasonally.

I recommend testing a small swatch to see how your chosen cord behaves; it helps me decide whether to tighten tension or change hook size before committing to the full bag.

I sometimes stitch a row of decorative openwork near the edge of the round (by substituting chains and skipped stitches) for a lacy variation that still joins well to the side strip.

I encourage swapping handle placement and style to change the bag silhouette; placing handles closer together makes a top-handle bag, while wider placement is better for shoulder carry.

I often make a matching coin purse or spectacles case using the same rounds at smaller scale so the set feels cohesive and makes a lovely gift.

Common Mistakes & How to Fix Them

βœ— Crocheting too loosely will make the bag floppy and lose shape; maintain a firmer tension or use a slightly smaller hook to create a dense fabric. βœ— Forgetting to place a stitch marker at the first stitch of each round will make counting rounds difficult; put a marker at the start of every round and move it up as you work. βœ— Not hiding and securing the cord ends properly will cause them to show or come loose over time; leave about 20 cm to pull out and close the round with a needle, then hide the tail on the wrong side. βœ— Skipping the note about crocheting the last 8th sc a bit to the side when making the strip causes the join to pucker; crochet that stitch slightly to the side as instructed to ensure an even seam. βœ— Cutting the cord too short when finishing will not leave enough tail to close the round securely; always cut leaving about 20 cm as instructed to weave and hide ends properly.

Round Bag Pattern

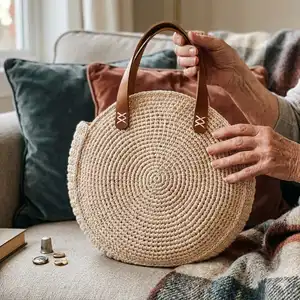
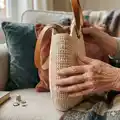
Make a stylish round crochet bag using cord and simple single crochet rounds. This pattern walks you through creating two circular panels, a long rectangular side, and stitching them together into a neat, wearable bag. Clear step-by-step rounds, photo references, and assembly instructions help you create a professional-looking finished piece. Perfect for crafters who love functional accessories with a handmade touch.

Intermediate 5-7 Hours

Materials Needed for Round Bag Pattern

β€” Main Fabric

  • 01
    3-4 mm cotton, acrylic or polyester cord, 300-350 meters total
  • 02
    Sample used: 3 mm polyester cord (sample bag) - approximately amount listed above
  • 03
    Neutral/beige (or your chosen color) for main body - approx 300-350 m depending on thickness
  • 04
    Optional contrast cord for decorative stitches or trims - small amount

β€” Tools Required

  • 01
    Crochet hook 5 mm
  • 02
    Scissors
  • 03
    Stitch markers
  • 04
    Yarn needle for sewing and hiding ends
  • 05
    Handles for bag with buttons or sewn ones (leather or fabric)
  • 06
    Measuring tape (to check finished diameter)

Progress Tracker

0% Complete

β€” Round :

Info :

6 sc in MR (Magic Ring) (pic. 1-2). Step by step guide for making a Magic Ring (MR) can be found on page 10. Tightly pull the ring. Work in a spiral. When you make the first stitch in each round, place a marker (for counting rounds). Try to crochet tighter.

Round 1 :

6 inc (12) hide the end inside the stitches then cut it off

Round 2 :

[ inc, sc ]*6 (18)

Round 3 :

[ 2 sc, inc ]*6 (24)

Round 4 :

[ inc, 3 sc ]*6 (30)

Round 5 :

2 sc, [ inc, 4 sc ]*5, inc, 2 sc (36)

Round 6 :

4 sc, [ inc, 5 sc ]*5, inc, sc (42)

Round 7 :

[ 6 sc, inc ]*6 (48)

Round 8 :

[ inc, 7 sc ]*6 (54)

Round 9 :

2 sc, [ inc, 8 sc ]*5, inc, 6 sc (60)

Round 10 :

4 sc, [ inc, 9 sc ]*5, inc, 5 sc (66)

Round 11 :

6 sc, [ inc, 10 sc ]*5, inc, 4 sc (72)

Round 12 :

8 sc, [ inc, 11 sc ]*5, inc, 3 sc (78)

Round 13 :

10 sc, [ inc, 12 sc ]*5, inc, 2 sc (84)

Round 14 :

12 sc, [ inc, 13 sc ]*5, inc, 1 sc (90)

Round 15 :

[ 14 sc, inc ]*6 (96)

Round 16 :

[ inc, 15 sc ]*6 (102)

Round 17 :

2 sc, [ inc, 16 sc ]*5, inc, 14 sc (108)

Round 18 :

4 sc, [ inc, 17 sc ]*5, inc, 13 sc (114)

Round 19 :

6 sc, [ inc, 18 sc ]*5, inc, 12 sc (120)

Round 20 :

8 sc, [ inc, 19 sc ]*5, inc, 11 sc (126)

Info :

Cut off the cord, leaving the end about 20 cm. Pull the cord out as shown on pic. 10. Using a needle close the round as it is shown on pic. 11-13. Hide the end on wrong side and cut it off (pic. 14). Crochet a second round using rounds 1-20 (pic. 15).

β€” Side of the Bag :

Info :

ch9 (pic 16)

Row 1 :

start from the second ch from the hook: 8 sc, ch1, turn (8) (pic 17)

Row 2 :

skip 1 stitch: 6 sc, inc, ch1, turn (8) (pic 18-21)

Rows 3 - 88 :

skip 1 stitch, 8 sc, ch1, turn (8) (pic 22-24). Take note, the last 8th sc in each rounds must be crocheted a little on the side (pic. 22)

Info :

Do not cut the end of the cord

β€” Assembly :

Step 1 :

Steam the parts. Follow the recommendations for your cord or yarn.

Step 2 :

Put the round and side parts next to each other, as shown in pic. 25.

Step 3 :

Begin to join the parts with sl st to the end of the rectangular part (pic. 26-30).

Step 4 :

Make sl st around the perimeter of the round all the way (pic. 31-32).

Step 5 :

Cut off the cord, leaving the end about 20 cm. Pull the cord out as shown on pic. 38. Using a needle close the round as it is shown on pic. 39-41. Hide the end on wrong side and cut it off (pic. 42).

Step 6 :

Take new crochet cord, the second round piece and attach it to the side piece with sl st (pic. 43-46).

Step 7 :

Make sl st around the perimeter of the round all the way (pic. 47).

Step 8 :

Cut off the cord, leaving the end about 20 cm. Pull the cord out as shown on pic. 38. Using a needle close the round as it is shown on pic. 39-41. Hide the end on wrong side and cut it off.

Step 9 :

Sew leather handles to the bag (pic. 48).

Assembly Instructions

  • Steam the parts and block them slightly if necessary to help alignment and shaping before joining.
  • Place one round and the rectangular side strip next to each other as shown in pic. 25, aligning outer edges so the slip stitch join is even.
  • Join the round to the side strip with slip stitches working to the end of the rectangular piece (see pic. 26-30) to create a neat seam.
  • After joining the first round, repeat the join with the second round piece using a new cord, then work slip stitches all the way around to close the bag (see pic. 43-47).
  • Pull the cord tail out and close the final opening using a large needle as shown in pic. 38-41, then hide the tail on the wrong side and trim.
  • Sew the leather or chosen handles to the top of the bag at the positions shown in pic. 48 and reinforce stitching for durability.

Important Notes

  • πŸ’‘Use stitch markers to mark the first stitch of each round to keep track of rounds and increases accurately.
  • πŸ’‘Maintain consistent, slightly tighter tension so the bag fabric remains dense and sturdy for structure.
  • πŸ’‘Leave about 20 cm tail when cutting the cord to allow pulling and closing the round securely with a needle.

You did it β€” a beautiful handmade round bag to wear or gift! This pattern brings simple crochet techniques together to create a polished, modern accessory you can customize. Try different cord colors or handle styles to make each bag uniquely yours. 🧢✨

You ask,

we answer.

FAQs

What size will the finished piece be?

The finished round panel measures approximately 13" (33 cm) wide for the sample made with 3 mm cord and a 5 mm hook; final size may vary with cord thickness and tension.

Can I use different yarn or cord weights for this pattern?

Yes, you can use different cord or yarn weights, but the bag size and density will change; thicker cord will make a larger, firmer bag while thinner cord yields a smaller, softer bagβ€”adjust hook size accordingly.

Do I need advanced crochet skills to make this bag?

This pattern is rated intermediate because it involves working in continuous rounds, shaping, a long rectangular strip, and careful assembly, but the stitches used are basic single crochet and increases.

How long does this project typically take to complete?

Most makers finish this bag in about 5-7 hours, depending on experience and how quickly you work through joining and finishing steps.