🧢 Beautiful ✨ Detailed πŸ’ Adorable

Ragdoll Pocket Whale Amigurumi Pattern

Ragdoll Pocket Whale Amigurumi Pattern
4.6β˜… Rating
2-3 Hours Time Needed
1.2K Made This
βœ‚οΈ

Beginner Friendly Level

Perfect for those just starting their crochet journey, with clear instructions and simple techniques

⏱️

Bite-Sized Project

Finishes in 2-4 hoursβ€”perfect for an afternoon of creative relaxation.

🎁

Tiny Treasure

Small, sweet, and gift-worthy creations that fit perfectly in the palm of your hand with detailed charm.

About This Ragdoll Pocket Whale Amigurumi Pattern

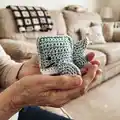
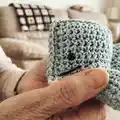
This pattern creates a small, square-bodied pocket whale with a white belly, tiny flippers and a split tail. It is written in US terms and designed to be printer-friendly with photos at the end. The construction uses simple rows and small circular pieces, making it great for quick makes and gifts. You will sew pieces together and add minimal stuffing for a cuddly, flat finish.

Ragdoll Pocket Whale Amigurumi Pattern crochet pattern - detailed view of completed project

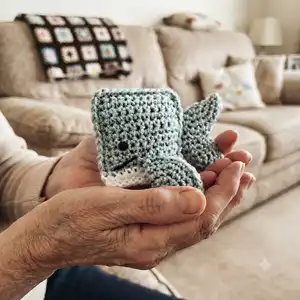
Two body panels are worked flat and joined, with flippers and a tail worked in rounds. The pattern uses DK yarn and a 3.5mm hook for a compact, palm-sized whale.

Why You'll Love This Ragdoll Pocket Whale Amigurumi Pattern

I absolutely love this pattern because it turns simple stitches into an irresistibly cute little whale you can finish in an afternoon. I enjoy how portable the project is β€” you can make multiples quickly for gifts or keyrings. The construction is satisfying: flat panels that become a tiny 3D friend with just a little sewing and stuffing. Every time I stitch the white belly and add the tiny eyes it feels like the whale comes to life.

Ragdoll Pocket Whale Amigurumi Pattern step 1 - construction progress Ragdoll Pocket Whale Amigurumi Pattern step 2 - assembly progress Ragdoll Pocket Whale Amigurumi Pattern step 3 - details and accessories Ragdoll Pocket Whale Amigurumi Pattern step 4 - final assembly and finishing

Switch Things Up

I love customizing this pattern by changing colours β€” try pastel shades for a softer look or bold tones for a playful set.

I sometimes make the whale larger by using worsted weight yarn and a 4.5mm hook for a chunkier result.

I also experiment by swapping DK for cotton yarn to give a firmer finish that is great for keyrings.

Try embroidering small cheeks or freckles with embroidery thread to add personality to each whale.

I often replace safety eyes with French knots for a softer, fully handmade face for baby-safe gifts.

To make a keychain, attach a small keyring through a reinforced loop at the top of the whale during assembly.

I sometimes add a tiny bell inside the body or a small ribbon collar to make a themed gift.

For a more 3D look, add a little extra stuffing in the head area only and keep the body flatter to keep the pocket shape.

You can change the belly colour pattern β€” try a striped belly by alternating rows of white and a contrast colour before joining sides.

I enjoy creating a family of whales in graduated sizes by adjusting yarn weight and hook size for a coordinated gift set.

Common Mistakes & How to Fix Them

βœ— Not counting the foundation chain accurately will change the width of the body; recount your starting CH and ensure you work in the correct stitch (2nd CH from hook) to match the pattern. βœ— Forgetting to insert the safety eyes before closing the body will make placement difficult; mark and insert the eyes while the opening is still large enough, before sewing the sides together. βœ— Stuffing too much will distort the flat pocket shape of the whale; add a small amount of polyester fill gradually and check shape often to avoid overstuffing. βœ— Leaving yarn tails unsecured causes parts to come loose later; fasten off securely, weave in ends and tuck tails inside pieces before final assembly. βœ— Skipping the instruction to do 2 SC at corner stitches will make corners too tight; always do 2 SC at each corner ST when joining sides to give a neat square finish.

Ragdoll Pocket Whale Amigurumi Pattern

Make a tiny, squishy Ragdoll Pocket Whale you can tuck in your pocket or pop on a keyring. This friendly amigurumi uses simple single crochet rows and minimal sewing so you can finish quickly. The pattern includes materials, abbreviations, clear row-by-row instructions and step-by-step assembly tips. Perfect for gifts, keyrings, or a cute little desk buddy.

Beginner Friendly 2-3 Hours

Materials Needed for Ragdoll Pocket Whale Amigurumi Pattern

β€” Main Fabric

  • 01
    DK acrylic yarn (or cotton alternative) - main colour, small amount (approx. 20-30g)
  • 02
    White DK yarn - small amount for belly detailing and joining (approx. 5-10g)

β€” Tools Required

  • 01
    Crochet hook size 3.5mm
  • 02
    Black embroidery thread for mouth detail
  • 03
    2mm safety eyes (2 pieces)
  • 04
    Stitch markers
  • 05
    Scissors
  • 06
    Metal yarn needle for sewing and weaving ends
  • 07
    Polyester fibrefill or scraps of yarn for stuffing
  • 08
    Keyring (optional) for making a keychain

Progress Tracker

0% Complete

β€” Body :

Info :

BODY (MAKE 2): - slipknot, CH 12 and turn – this is the foundation row

Round 1 :

R1 – SC in the 2nd CH from hook and then SC until the end of row, CH 1, turn

Round 2 :

R2 – SC in each ST of the row, CH 1, turn

Round 3-9 :

R3 to R9 – SC in each ST of the row, CH 1, turn

Round 10 :

R10 – SC in each ST of the row, at the last ST pull up a loop and join the white yarn with a SC, then CH 1 and turn

Round 11 :

R11 – now working with the white yarn, SC in each ST of the row, CH 1, turn

Round 12 :

R12 – SC in each ST of the row, fasten and cut yarn

Infos :

Bring the 2 sides together. Starting from the right side of your main colour, join new yarn in the same colour and start to SC along all 3 sides. At every corner ST you will need to do 2 SC. Before reaching the white part, you need to insert the safety eyes. Join the white yarn and continue to SC the last side – here you can tuck all the yarn ends inside and use some extra stuffing as well, but not much is needed. Fasten yarn and weave in ends.

β€” Flippers and Tail :

Info :

FLIPPERS and TAIL (MAKE 4): - Slipknot, CH 2

Round 1 :

R1 – SC 6 times in the 2nd CH from hook

Round 2 :

R2 – SC 2 times in each ST around (12 sts total)

Round 3 :

R3 – SC 1, INC – all around (18 sts total)

Round 4 :

R4 – SC 2, INC - all around (24 sts total), don’t fasten

Info :

Fold circle, turn it with the rounded part to face your left hand and start to SC the sides together. Tuck inside the starting yarn tail. Fasten and leave length of yarn for attaching to the body.

Info :

For the tail you need to sew the bottom edges, overlapping, with rounded sides facing each other.

β€” Assembly :

Infos :

Attach tail to the middle of the back side. Attach flippers to either side right above the white stitches. You can either sew on a mouth or not. If you do add a mouth make sure to knot the ends, tuck in and cut remaining yarn.

Assembly Instructions

  • Attach the tail to the middle of the back side by sewing the overlapped bottom edges to the body securely using the yarn tail left from the tail piece.
  • Position and attach the two flippers on either side of the body right above the white belly stitches and sew with secure whipstitches so they sit symmetrically.
  • Insert the 2mm safety eyes before closing the final side of the body, placing them evenly and checking spacing on both body panels.
  • Close the three open sides of the body by single crocheting around as instructed, doing 2 SC at each corner and tucking ends inside as you reach the white belly.
  • Optionally embroider a mouth with black embroidery thread; knot thread ends well, tuck and trim any excess yarn after stitching.

Important Notes

  • πŸ’‘Insert safety eyes before completing the final seam so eye placement is easy and secure.
  • πŸ’‘Use minimal stuffing for a flat pocket whale shape β€” add small amounts and shape as you go.
  • πŸ’‘Tuck and weave in yarn tails before final assembly to keep the inside neat and avoid loose ends.

This tiny Ragdoll Pocket Whale is designed to be quick, sweet, and adorably pocket-sized β€” a perfect handmade gift or keyring friend. πŸ‹πŸ§Ά Make a set in different colours and give them as little treasures to loved ones. Keep one in your bag or hook it to your keys for a little smile anytime! ✨

You ask,

we answer.

FAQs

What size will the finished piece be?

The finished amigurumi measures approximately palm-sized (about 6-8 cm wide) when using DK yarn and a 3.5mm hook.

Can I use different yarn weights for this pattern?

Yes, you can use different yarn weights, but this will change the final size; use an appropriate hook for your yarn and expect a larger or smaller whale.

Do I need prior crochet experience for this pattern?

This pattern is beginner friendly, but you should be comfortable working single crochet rows, simple increases, and basic sewing to complete the assembly.

How long does this project typically take to complete?

Most crocheters complete this pocket whale in 2-3 hours depending on experience and whether you make multiple pieces.

Where should I place the safety eyes?

Place the safety eyes before closing the body; position them on the main colour panel just above the white belly area and check spacing against the second panel before fastening.