🧢 Beautiful ✨ Detailed πŸ’ Adorable

Ragdoll Pocket Jellyfish Amigurumi Pattern

Ragdoll Pocket Jellyfish Amigurumi Pattern
4.0β˜… Rating
2-4 Hours Time Needed
2.0K Made This
βœ‚οΈ

Beginner Friendly Level

Perfect for those just starting their crochet journey, with clear instructions and simple techniques

⏱️

Bite-Sized Project

Finishes in 2-4 hoursβ€”perfect for an afternoon of creative relaxation.

🎁

Tiny Treasure

Small, sweet, and gift-worthy creations that fit perfectly in the palm of your hand with detailed charm.

About This Ragdoll Pocket Jellyfish Amigurumi Pattern

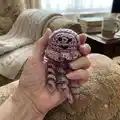
This pattern creates a tiny pocket jellyfish amigurumi with a domed head and lots of curly tentacles. You will work two identical body halves, join them, add safety eyes and embroidered features, and make spiral tentacles for a playful finish. Techniques include working flat rows, joining edges with single crochet, and working in loops to create curled tentacles.

Ragdoll Pocket Jellyfish Amigurumi Pattern crochet pattern - detailed view of completed project

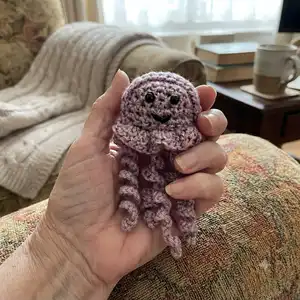
Perfect for using up DK scraps, it makes a lovely keyring or pocket buddy. Step-by-step photos are included to guide you through assembly and finishing.

Why You'll Love This Ragdoll Pocket Jellyfish Amigurumi Pattern

I absolutely love this pattern because it turns a few simple stitches into a joyful little companion. I enjoy how quickly the jellyfish comes together β€” it is satisfying to make and finishes in an afternoon. The curly tentacles are a playful detail that adds personality with very little extra time. I also love that it is a great scrap buster and can be customized with different yarns and eye sizes to create varied looks.

Ragdoll Pocket Jellyfish Amigurumi Pattern step 1 - construction progress Ragdoll Pocket Jellyfish Amigurumi Pattern step 2 - assembly progress Ragdoll Pocket Jellyfish Amigurumi Pattern step 3 - details and accessories Ragdoll Pocket Jellyfish Amigurumi Pattern step 4 - final assembly and finishing

Switch Things Up

I love customizing this pocket jellyfish by changing yarn weight and hook size to make different scales of friends.

I often use pastel DK yarn for a soft baby-friendly look or a bright acrylic for a playful keyring version.

Try swapping the safety eyes for French knots or embroidered eyes if you prefer a fully soft toy without plastic components.

You can vary tentacle length and number: fewer longer spirals for a flowing look or many short spirals for a dense, playful skirt.

I sometimes add tiny beads to the ends of tentacles or stitch sequins into the ruffle for a sparkly effect.

If I want it extra sturdy as a keyring I use a metal keyring and reinforce the top with several stitches and a bit of glue on the knot.

To make a mini set, I use fingering weight yarn and a 2.5mm hook, which creates adorable tiny pocket pals perfect for gifts.

I also enjoy embroidering different mouth expressions to change the jellyfish personality β€” a straight smile, an open O, or a little tongue can all be fun.

For a beachy theme I crochet in variegated yarns or use a cotton blend that gives a crisp stitch definition to the ruffles.

Lastly, I recommend experimenting with stuffing levels: a softer stuffing makes a squishier jellyfish, while firmer stuffing gives more structure and a pronounced dome.

Common Mistakes & How to Fix Them

βœ— Not placing safety eyes before joining can make placement difficult later; place and test eyes on the second body piece before joining and stuffing. βœ— Overstuffing the body makes the finished shape stiff and bulky; stuff gradually and evenly until you reach a soft, firm shape. βœ— Skipping counting stitches during row increases leads to uneven edges; count your stitches after each increase row to maintain correct totals. βœ— Working into both loops instead of the specified inside or outside loops can change how the tentacle row behaves; follow the instruction to work in inside loops only for the straight part and exterior loops for the DC round.

Ragdoll Pocket Jellyfish Amigurumi Pattern

Make a tiny, squishy pocket jellyfish that fits in the palm of your hand. This sweet amigurumi pattern walks you through simple shaping, joining, and creating curly tentacles so you can finish a cute gift-ready toy. Friendly step-by-step instructions and full assembly notes make this a relaxing, satisfying project you will enjoy making again and again.

Beginner Friendly 2-4 Hours

Materials Needed for Ragdoll Pocket Jellyfish Amigurumi Pattern

β€” Main Fabric

  • 01
    DK acrylic yarn (recommended) - quantity depends on color and number of jellyfish (small amount per jellyfish)
  • 02
    Alternatively cotton yarn in DK weight may be used
  • 03
    Black embroidery thread for mouth details
  • 04
    Polyester fibrefill or scraps of yarn for stuffing

β€” Tools Required

  • 01
    Crochet hook size 3.5mm
  • 02
    1mm safety eyes (2 pieces)
  • 03
    Scissors
  • 04
    Metal yarn needle
  • 05
    Stitch markers (optional)
  • 06
    Black embroidery thread and small needle
  • 07
    Polyester fibrefill or scraps for stuffing
  • 08
    Keyring (optional)

Progress Tracker

0% Complete

β€” Body :

Start :

slipknot, CH 2, SC 3 times in the 2nd CH from hook

R1 :

SC 2 times in each ST (6 sts total) CH 1, turn

R2 :

INC, SC 1, repeat until end of row (9 sts total), CH 1, turn

R3 :

INC, SC 2, repeat until end of row (13 sts total) CH 1

R4 :

starting from where the row ended and working on the bottom (the straight side) SC in 8 ST spaces to form a straight row (picture is marked to show which ST spaces)

R5 :

SC in each ST – CH 1, turn

R6 :

SC in each ST, fasten and cut yarn

Info :

*on the second body part don’t fasten yarn, add the safety eyes on each side of the starting centre point (the row above the straight row)

Info :

*bring both sides together and start to SC along the edges

Info :

*stuff as you go

Info :

*when reaching the straight part, SC only in the inside loops until closed

Info :

*when that row is finished CH 1 and start working in the loops on the exterior

Round 7 :

DC 3 times in each loop around (39 sts in total), SLST in the CH from the beginning of this row

Infos :

*working in the middle row (the one in between the DC sts) make: SLST in first ST. SLST in next ST, CH 21, starting form 2nd CH SC 2 times in each CH, SLST back in the same ST. SLST in next ST, CH 28, starting form 2nd CH SLST in each CH, SLST back in the same ST. SLST in next ST. SLST in next ST, CH 21, starting form 2nd CH SC 2 times in each CH, SLST back in the same ST. SLST in next ST, CH 28, starting form 2nd CH SLST in each CH, SLST back in the same ST. SLST in next ST. SLST in next ST, CH 21, starting form 2nd CH SC 2 times in each CH, SLST back in the same ST, fasten, cut and weave in yarn tail.

Info :

*with black thread add a mouth in V shape working through the back, make a knot and tuck in ends.

Assembly Instructions

  • Place safety eyes on the second body piece on each side of the starting centre point (the row above the straight row) before joining the two body halves.
  • Bring both body halves together and SC along the edges to join, stuffing as you go to build a soft domed head.
  • When you reach the straight part, SC only in the inside loops until closed, then CH 1 and work DC 3 times in each exterior loop to form the ruffled edge.
  • Work tentacles into the middle row between the DCs using SLST placement: make chains (CH 21 and CH 28), work SC into those chains as instructed, SLST back into the same middle-row stitch, fasten, cut and weave in tails.
  • Embroider a small V-shaped mouth with black embroidery thread through the back and knot/tuck the ends securely.
  • Trim any long yarn ends and optionally attach a keyring through the top if making a keychain.

Important Notes

  • πŸ’‘Use a stitch marker to mark the start of the DC round so you can easily find where to SLST at the end of the round.
  • πŸ’‘Stuff gradually and check the shape while joining the two body halves to maintain an even, rounded head.
  • πŸ’‘Work the straight row in only the inside loops to create a flat edge for joining and to ensure the exterior loops form a ruffle.

This tiny Ragdoll Pocket Jellyfish is a quick and delightful make that fits perfectly in your pocket or on a keyring. It uses small amounts of DK yarn and simple stitches to create a cuddly, curly-tailed friend you can finish in an afternoon. Perfect as a handmade gift or a charming addition to your amigurumi collection. 🧢✨

You ask,

we answer.

FAQs

What size will the finished piece be?

The finished jellyfish measures roughly palm-sized (approximately 6-8 cm tall) when using DK yarn and a 3.5mm hook; exact size will vary with yarn and tension.

Can I use different yarn weights for this pattern?

Yes, you can substitute yarn weights, but the size will change β€” use a larger hook with bulky yarn for a chunkier jellyfish or a smaller hook with fingering yarn for a mini version.

Do I need prior crochet experience for this pattern?

This pattern is beginner friendly, but you should be comfortable with basic stitches (CH, SC, DC) and working into loop rows for the ruffled edge.

How long does this project typically take to complete?

Most crafters complete this project in 2-4 hours, depending on experience and whether you add many tentacles or extra detailing.