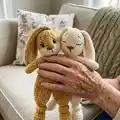
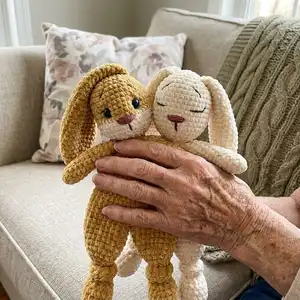
About This Plush snuggler BUNNY Amigurumi Pattern
This pattern creates a cuddly plush snuggler bunny approximately 41 cm / 16" tall using plush chenille-style yarn. You will crochet legs, body, arms, head, ears and tail, then assemble and embroider the face for a charming finish. The pattern uses continuous rounds and includes clear stitch counts for every round to make shaping predictable. Suitable for crocheters who know single crochet, increases and decreases.
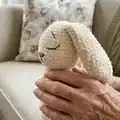
Detailed photos and shaping notes help you place the eyes and embroidery accurately. The pattern also lists yarn analogues and alternatives so you can choose a similar plush yarn.
Why You'll Love This Plush snuggler BUNNY Amigurumi Pattern
I absolutely love this pattern because the plush yarn gives the bunny a wonderfully soft, tactile finish that kids and adults both adore. I enjoy how the shape is simple but expressive — a few rounds and some embroidery bring the face to life. The construction is clever: the legs join to form a stable body base which makes assembly straightforward. I also love that it is easy to customize the colors and embroidery to create unique personalities for each bunny.
Switch Things Up
I love how easy it is to customize this pattern by changing yarn colors; try pastel combinations for a baby-friendly bunny or deep jewel tones for a grown-up gift.
To make a mini keychain version, swap to a DK or sport weight yarn and use a smaller hook; this will shrink the pattern and create a sweet pocket pal.
If you want a chunkier, cuddlier buddy, use a bulky plush yarn and a larger hook to produce a larger, softer toy that is great for toddlers.
I often swap safety eyes for embroidered eyes when the toy is for very young children to make it safer and add a handmade look.
Try different facial expressions by moving the eyebrow and mouth embroidery a few stitches — a small change in placement can make the bunny sleepy, surprised, or happy.
For a seasonal twist, crochet a tiny scarf or a miniature hat in a contrasting yarn and stitch it on so it can be removed for washing or swapped out.
Make the ears poseable by stitching a little fabric-covered wire into them for playtime flexibility, or keep them soft and floppy for a more snuggly feel.
Add small felt or crocheted accessories like a bow, heart, or carrot for extra personality and gift-ready presentation.
I like to experiment with different stuffing amounts and types (polyester fill, fabric scraps, or cotton) to adjust the firmness and drape of the toy.
Consider making a family of bunnies in matching or complementary colors and slightly varying sizes to display together or gift as a set.
Common Mistakes & How to Fix Them
✗ Not counting stitches after increases and decreases can cause uneven shaping; always count at the end of each round to match the stitch totals provided.
✗ Using a different yarn weight without adjusting the hook changes the finished size unpredictably; if you change yarn weight, pick an appropriate hook and make a test piece to check gauge.
✗ Overstuffing the head or limbs creates a distorted shape and makes sewing difficult; stuff gradually and lightly, adding small amounts to keep the shape smooth.
✗ Skipping placement checks for safety eyes or embroidery leads to misaligned facial features; mark placement and check symmetry before securing eyes or beginning embroidery.
✗ Pulling yarn too tight when tightening the muzzle can flatten details or pucker the face; tighten gradually and test the look before finishing off the thread.