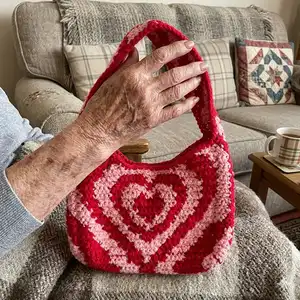
Make a stylish tapestry crochet shoulder bag featuring a bold heart motif and a long woven strap. This pattern guides you through color changes, charts and written row-by-row instructions so you can follow whichever method you prefer. Perfect for makers who enjoy colorwork and a little sewing to finish. The finished bag is a unique, handmade accessory that is great for gifting or everyday use.
Progress Tracker
0% Complete
— Materials :
Info :
Three colours of yarn are recommended (C1 and C2 are the two main colours referenced). I used standard milk cotton yarn (thick weight 3) with a 4mm hook; you can use weight 4 if you want a slightly larger bag. Optional: stitch markers, tape measure.
— Dimensions :
Info :
Approximate finished dimensions (vary by yarn and tension): Width: 26cm. Height: 20cm. Strap length: 45cm.
— A note on the instructions :
Info :
The pattern includes tapestry charts for the main body, the base of the bag, and the strap. The bag is constructed entirely of single crochets, so you can follow the chart making 1 single crochet in every stitch indicated. Written, step-by-step instructions are also included. The two colours are referenced as C1 (Colour 1 - the darker colour) and C2 (Colour 2 - the lighter colour).
— Changing colour :
Infos :
To change colour from C1 to C2: make your last sc in C1 by inserting your hook through the stitch and pulling up a loop in C1, but do not yarn over to finish the sc in C1; yarn over with C2 and pull through to complete the sc in C2. From the next sc onwards, work in C2. If instructions say to change colour and ch1 and turn, complete the last sc of the row in the old colour and end it by pulling through in the new colour, then chain 1 in the new colour.
— Tips and notes :
Info :
When working in one colour hold the other colour's strand in line with your row and place scs over the carried strand to hide it. Pull the carried strand relatively tight to avoid it showing through. If you fasten off a row holding two strands, tie a quick knot then chain one and cut both strands for security.
— Abbreviations used :
Info :
Ch = chain. Sc = single crochet. St = stitch. Ss = slip stitch. Sk = skip. Pattern uses US crochet terminology.
— Part 1: Creating the main body of the bag :
Info :
Part 1A: Creating the rectangular portion of the main body. Tapestry chart: P1A (chart legend: black = C1, grey = C2). Begin by chaining 37 in C1. Do NOT fasten off once you finish - move onto part 1B (written instructions).
Round 1 :
Begin by chaining 37 in C1. [note - place the first sc in the second ch from your hook] 7 scs in C1, change colour, 5 scs in C2, change colour, 4 scs in C1, change colour, 4 scs in C2, change colour, 4 scs in C1, change colour, 5 scs in C2, change colour, 7 scs in C1. Ch1 and turn your work.
Round 2 :
6 scs in C1, change colour, 5 scs in C2, change colour, 4 scs in C1, change colour, 6 scs in C2, change colour, 4 scs in C1, change colour, 5 scs in C2, change colour, 6 scs in C1. Ch1 and turn your work.
Round 3 :
5 scs in C1, change colour, 5 scs in C2, change colour, 4 scs in C1, change colour, 8 scs in C2, change colour, 4 scs in C1, change colour, 5 scs in C2, change colour, 5 scs in C1. Ch1 and turn your work.
Round 4 :
4 scs in C1, change colour, 5 scs in C2, change colour, 4 scs in C1, change colour, 4 scs in C2, change colour, 2 scs in C1, change colour, 4 scs in C2, change colour, 4 scs in C1, change colour, 5 scs in C2, change colour, 4 scs in C1. Ch1 and turn your work.
Round 5 :
3 scs in C1, change colour, 5 scs in C2, change colour, 4 scs in C1, change colour, 4 scs in C2, change colour, 4 scs in C1, change colour, 5 scs in C2, change colour, 3 scs in C1. Ch1 and turn your work.
Round 6 :
3 scs in C1, change colour, 4 scs in C2, change colour, 4 scs in C1, change colour, 3 scs in C2, change colour, 8 scs in C1, change colour, 3 scs in C2, change colour, 4 scs in C1, change colour, 4 scs in C2, change colour, 3 scs in C1. Ch1 and turn your work.
Round 7 :
2 scs in C1, change colour, 4 scs in C2, change colour, 4 scs in C1, change colour, 3 scs in C2, change colour, 4 scs in C1, change colour, 2 scs in C2, change colour, 4 scs in C1, change colour, 3 scs in C2, change colour, 4 scs in C1, change colour, 2 scs in C1. Ch1 and turn your work.
Round 8 :
1 sc in C1, change colour, 4 scs in C2, change colour, 4 scs in C1, change colour, 3 scs in C2, change colour, 3 scs in C1, change colour, 6 scs in C2, change colour, 3 scs in C1, change colour, 3 scs in C2, change colour, 4 scs in C1, change colour, 4 scs in C2, change colour, 1 sc in C1. Change colour, ch1 and turn your work.
Round 9 :
4 scs in C2, change colour, 4 scs in C1, change colour, 3 scs in C2, change colour, 3 scs in C1, change colour, 3 scs in C2, change colour, 2 scs in C1, change colour, 3 scs in C2, change colour, 3 scs in C1, change colour, 3 scs in C2, change colour, 4 scs in C1, change colour, 4 scs in C2. Ch1 and turn your work.
Round 10 :
3 scs in C2, change colour, 4 scs in C1, change colour, 4 scs in C2, change colour, 2 scs in C1, change colour, 3 scs in C2, change colour, 4 scs in C1, change colour, 3 scs in C2, change colour, 2 scs in C1, change colour, 4 scs in C2, change colour, 4 scs in C1, change colour, 3 scs in C2. Ch1 and turn your work.
Round 11 :
3 scs in C2, change colour, 3 scs in C1, change colour, 4 scs in C2, change colour, 3 scs in C1, change colour, 2 scs in C2, change colour, 6 scs in C1, change colour, 2 scs in C2, change colour, 3 scs in C1, change colour, 4 scs in C2, change colour, 3 scs in C1, change colour, 3 scs in C2. Ch1 and turn your work.
Round 12 :
2 scs in C2, change colour, 4 scs in C1, change colour, 3 scs in C2, change colour, 3 scs in C1, change colour, 2 scs in C2, change colour, 8 scs in C1, change colour, 2 scs in C2, change colour, 3 scs in C1, change colour, 3 scs in C2, change colour, 4 scs in C1, change colour, 2 scs in C2. Ch1 and turn your work.
Round 13 :
2 scs in C2, change colour, 3 scs in C1, change colour, 4 scs in C2, change colour, 2 scs in C1, change colour, 3 scs in C2, change colour, 8 scs in C1, change colour, 3 scs in C2, change colour, 2 scs in C1, change colour, 4 scs in C2, change colour, 3 scs in C1, change colour, 2 scs in C2. Ch1 and turn your work.
Round 14 :
1 sc in C2, change colour, 4 scs in C1, change colour, 3 scs in C2, change colour, 3 scs in C1, change colour, 3 scs in C2, change colour, 8 scs in C1, change colour, 3 scs in C2, change colour, 3 scs in C1, change colour, 3 scs in C2, change colour, 4 scs in C1, change colour, 1 sc in C2. Ch1 and turn your work.
Round 15 :
1 sc in C2, change colour, 3 scs in C1, change colour, 4 scs in C2, change colour, 3 scs in C1, change colour, 4 scs in C2, change colour, 2 scs in C1, change colour, 2 scs in C2, change colour, 2 scs in C1, change colour, 4 scs in C2, change colour, 3 scs in C1, change colour, 4 scs in C2, change colour, 3 scs in C1, change colour, 1 sc in C2. Change colour, ch1 and turn your work.
Round 16 :
4 scs in C1, change colour, 4 scs in C2, change colour, 3 scs in C1, change colour, 14 scs in C2, change colour, 3 scs in C1, change colour, 4 scs in C2, change colour, 4 scs in C1. Ch1 and turn your work.
Round 17 :
4 scs in C1, change colour, 4 scs in C2, change colour, 4 scs in C1, change colour, 5 scs in C2, change colour, 2 scs in C1, change colour, 5 scs in C2, change colour, 4 scs in C1, change colour, 4 scs in C2, change colour, 4 scs in C1. Ch1 and turn your work.
Round 18 :
4 scs in C1, change colour, 5 scs in C2, change colour, 5 scs in C1, change colour, 2 scs in C2, change colour, 5 scs in C1, change colour, 2 scs in C2, change colour, 4 scs in C1, change colour, 5 scs in C2, change colour, 4 scs in C1. Ch1 and turn your work.
Round 19 :
4 scs in C1, change colour, 5 scs in C2, change colour, 8 scs in C1, change colour, 2 scs in C2, change colour, 8 scs in C1, change colour, 5 scs in C2, change colour, 4 scs in C1. Ch1 and turn your work.
Round 20 :
5 scs in C1, change colour, 5 scs in C2, change colour, 6 scs in C1, change colour, 4 scs in C2, change colour, 6 scs in C1, change colour, 5 scs in C2, change colour, 5 scs in C1. Ch1 and turn your work.
Round 21 :
6 scs in C1, change colour, 24 scs in C2, change colour, 6 scs in C1. Ch1 and turn your work - move onto part 1B.
— Part 1B: Making decreasing top section on first side :
Round 22 :
6 scs in C1, change colour, 6 scs in C2. Ch1 and turn your work.
Round 23 :
Sk 1 st, 3 scs in C2, change colour, 7 scs in C1, change colour, 1 sc in C2. Ch1 and turn your work.
Round 24 :
1 sc in C2, change colour, 7 scs in C1, sk 2 sts, 1 sc in C1. Ch1 and turn your work.
Round 25 :
Sk 1 st, 6 scs in C1, change colour, 2 scs in C2. Ch1 and turn your work.
Round 26 :
3 scs in C2, change colour, 2 scs in C1, sk 2 sts, 1 sc in C1. Change colour, ch1 and turn your work.
Round 27 :
Sk 1 st, 5 scs in C2. Ch1 and fasten off.
— Part 1C: Making decreasing top section on other side :
Info :
Attach your yarn in C1 to the other corner of your main body, ch1 and repeat ROW 22 - ROW 27 from part 1B to create the second side of the main body.
— Part 2: Creating the base/bottom of the bag :
Info :
Tapestry chart: P2 (chart legend: black = C1, grey = C2). Begin by chaining 37 in C2, then follow the chart. Once finished, ch1 and fasten off.
Round 1 :
Begin by chaining 37 in C2. [note - place the first sc in the second ch from your hook] 1 sc in C2, change colour, 7 sc in C1, change colour, 5 sc in C2, change colour, 4 sc in C1, change colour, 2 sc in C2, change colour, 4 sc in C1, change colour, 5 sc in C2, change colour, 7 sc in C1, change colour, 1 sc in C2. Ch1 and turn your work.
Round 2 :
2 sc in C2, change colour, 8 sc in C1, change colour, 5 sc in C2, change colour, 6 sc in C1, change colour, 5 sc in C2, change colour, 8 sc in C1, change colour, 2 sc in C2. Ch1 and turn your work.
Round 3 :
3 sc in C2, change colour, 8 sc in C1, change colour, 5 sc in C2, change colour, 4 sc in C1, change colour, 5 sc in C2, change colour, 8 sc in C1, change colour, 3 sc in C2. Ch1 and turn your work.
Round 4 :
3 sc in C2, change colour, 8 sc in C1, change colour, 5 sc in C2, change colour, 4 sc in C1, change colour, 5 sc in C2, change colour, 8 sc in C1, change colour, 3 sc in C2. Ch1 and turn your work.
Round 5 :
2 sc in C2, change colour, 8 sc in C1, change colour, 5 sc in C2, change colour, 6 sc in C1, change colour, 5 sc in C2, change colour, 8 sc in C1, change colour, 2 sc in C2. Ch1 and turn your work.
Round 6 :
1 sc in C2, change colour, 7 sc in C1, change colour, 5 sc in C2, change colour, 4 sc in C1, change colour, 2 sc in C2, change colour, 4 sc in C1, change colour, 5 sc in C2, change colour, 7 sc in C1, change colour, 1 sc in C2. Ch1 and fasten off - the base of your bag is now complete.
— Part 3: Creating the strap of the bag :
Info :
The strap instructions are split into three parts: the first 27 rows (P3A), the middle 57 (or more) rows (P3B), and the last 27 rows (P3C). Charts are provided for each section.
Info :
Part 3A: The first 27 rows of the strap. Tapestry chart: P3A (legend: black = C1, grey = C2). Begin by chaining 9 in C1, and then follow the chart. Do NOT fasten off once you finish - move onto part 3B.
Round 1 :
Begin by chaining 9 in C1. ROW 1 - ROW 2: [note - place the first sc of ROW 1 in the second ch from your hook] 1 sc in C1, change colour, 6 scs in C2, change colour, 1 sc in C1. Ch1 and turn your work.
Round 3 :
ROW 3 - ROW 4: 2 scs in C1, change colour, 4 scs in C2, change colour, 2 scs in C1. Ch1 and turn your work.
Round 5 :
ROW 5 - ROW 7: 3 scs in C1, change colour, 2 scs in C2, change colour, 3 scs in C1. Ch1 and turn your work.
Round 8 :
ROW 8: 3 scs in C1, change colour, 2 scs in C2, change colour, 3 scs in C1. Change colour, ch1 and turn your work.
Round 9 :
ROW 9: 1 sc in C2, change colour, 6 scs in C1, change colour, 1 sc in C2. Ch1 and turn your work.
Round 10 :
ROW 10: 2 scs in C2, change colour, 4 scs in C1, change colour, 2 scs in C2. Ch1 and turn your work.
Round 11 :
ROW 11 - 25: 3 scs in C2, change colour, 2 scs in C1, change colour, 3 scs in C2. Ch1 and turn your work.
Round 26 :
ROW 26: 2 scs in C2, change colour, 4 scs in C1, change colour, 2 scs in C2. Ch1 and turn your work.
Round 27 :
ROW 27: 1 sc in C2, change colour, 6 scs in C1, change colour, 1 sc in C2. Change colour, ch1 and turn your work (do NOT fasten off - move onto part 3B). If you'd like, add a stitch marker to mark this row - this may make it easier when attaching the strap to the main body, however it's not absolutely compulsory.
Info :
Part 3B: The middle 57 (or more) rows of the strap. Tapestry chart: P3B. Repeat rows 1-8 a total of 7 times (or as many times as you'd like for a longer strap) - ensure you repeat a full set of the 8 rows. After this, repeat the pattern for the first row one more time but change colour at the end of the row. Do NOT fasten off yet - move onto part 3C.
Round 28 :
Written instructions: P3B - ROW 1: 2 scs in C1, change colour, 4 scs in C2, change colour, 2 scs in C1. Ch1 and turn your work.
Round 29 :
ROW 2: 3 scs in C1, change colour, 4 scs in C2, change colour, 1 sc in C1. Change colour, ch1 and turn your work.
Round 30 :
ROW 3: 4 scs in C2, change colour, 4 scs in C1. Change colour, ch1 and turn your work.
Round 31 :
ROW 4: 1 sc in C2, change colour, 4 scs in C1, change colour, 3 scs in C2. Ch1 and turn your work.
Round 32 :
ROW 5: 2 scs in C2, change colour, 4 scs in C1, change colour, 2 scs in C2. Ch1 and turn your work.
Round 33 :
ROW 6: 3 scs in C2, change colour, 4 scs in C1, change colour, 1 sc in C2. Change colour, ch1 and turn your work.
Round 34 :
ROW 7: 4 scs in C1, change colour, 4 scs in C2. Change colour, ch1 and turn your work.
Round 35 :
ROW 8: 1 sc in C1, change colour, 4 scs in C2, change colour, 3 scs in C1. Ch1 and turn your work.
Round 36 :
ROW 9 - ROW 56: Repeat ROW 1 - ROW 8 six more times, for a total of 7 sets. If you'd like a longer strap, repeat these rows as many times as you'd like, just make sure to repeat all 8 rows.
Round 37 :
ROW 57: 2 scs in C1, change colour, 4 scs in C2, change colour, 2 scs in C1. Change colour, ch1 and turn your work.
Info :
Part 3C: The last 27 rows of the strap. Tapestry chart: P3C (chart legend: black = C1, grey = C2). Work chart from part 3A in reverse. Once you finish, ch1 and fasten off - your strap is now complete.
Round 38 :
Written instructions: P3C - ROW 1: 1 sc in C2, change colour, 6 scs in C1, change colour, 1 sc in C2. Ch1 and turn your work. If you'd like, add a stitch marker to mark this row - this may make it easier when attaching the strap to the main body, however it's not absolutely compulsory.
Round 39 :
ROW 2: 2 scs in C2, change colour, 4 scs in C1, change colour, 2 scs in C2. Ch1 and turn your work.
Round 40 :
ROW 3 - ROW 17: 3 scs in C2, change colour, 2 scs in C1, change colour, 3 scs in C2. Ch1 and turn your work.
Round 41 :
ROW 18: 2 scs in C2, change colour, 4 scs in C1, change colour, 2 scs in C2. Ch1 and turn your work.
Round 42 :
ROW 19: 1 sc in C2, change colour, 6 scs in C1, change colour, 1 sc in C2. Change colour, ch1 and turn your work.
Round 43 :
ROW 20 - ROW 23: 3 scs in C1, change colour, 2 scs in C2, change colour, 3 scs in C1. Ch1 and turn your work.
Round 44 :
ROW 24 - ROW 25: 2 scs in C1, change colour, 4 scs in C2, change colour, 2 scs in C1. Ch1 and turn your work.
Round 45 :
ROW 26 - ROW 27: 1 sc in C1, change colour, 6 scs in C2, change colour, 1 sc in C1. Ch1 and fasten off - your strap is now complete.
— Part 4: Attaching the pieces of the bag together :
Info :
Now that all 4 pieces of your bag are ready - the two sides of the main body, the base, and the strap - we can begin to attach them together. First attach the two sides of the bag to the base.
Info :
Align the base and one side of the main body. Attach yarn in C1 through the corner of both pieces and ch1. Place scs through both layers to attach the two pieces. You may place scs all in C1 as you go or change colours in line with the way the colours change along the first row of the base. Once you've placed scs all the way along the two pieces, ch1 and fasten off.
Info :
Repeat to attach the other side of the main body to the base. Once both sides are attached, attach the base of the strap to the base of the bag by attaching yarn in C2 through both corners of the base and the strap and ch1. Place scs in C2 through both layers as you go; there won't be exact stitches to go through, so place scs wherever you find a space and keep it straight and aligned. Once you reach the end, ch1 and fasten off.
Info :
Now attach one side of the strap to one side of the main body: attach yarn in C1 by going through both the bottom corner of the strap and the bag and place scs through both layers. As you go along, align the top of your bag to the 27th row of the strap (where you may have placed a stitch marker). Once you reach the top, ch1 and fasten off. Repeat to attach the other side of the strap to the other side of the bag.
Info :
When joining pieces you can choose to place scs only in C1 or change colours to match the pattern; either approach will work. Sew in ends as you go to make assembly easier and neater.
This Powerpuff Heart Shoulder Bag pattern combines playful tapestry colourwork with practical construction to create a bag you will love to wear. The heart motif is worked row-by-row so you can watch the design appear as you crochet. With clear charts, written rows, and step-by-step assembly, you have everything needed to finish a polished accessory. 🧶✨❤️