🧢 Beautiful ✨ Detailed πŸ’ Adorable

Cinnamon Swirl Hat and Scarf Set Pattern

Cinnamon Swirl Hat and Scarf Set Pattern
4.4β˜… Rating
5-7 Hours Time Needed
2.4K Made This
βœ‚οΈ

Intermediate Level

Ideal for those with basic crochet experience, featuring slightly more advanced stitches and techniques to expand your skills.

⏱️

Weekend Treat

Takes 5-7 hours, making it an enjoyable project to finish over a couple of days.

🧣

Snug Essential

Everyday comfort with practical charm, designed for both functionality and style through changing seasons.

About This Cinnamon Swirl Hat and Scarf Set Pattern

This pattern creates a coordinated hat and scarf set featuring a textured cable stitch that layers beautifully. The hat has a ribbed cable band and shaping for a comfortable fit, while the scarf is long and warm at nearly 200cm. The design uses a 10-stitch cable motif repeat that is worked in rounds for the hat and rows for the scarf. A medium pom pom finishes the hat for playful style.

Cinnamon Swirl Hat and Scarf Set Pattern crochet pattern - detailed view of completed project

Youll work the cable pattern across 10 stitches and 2 rows/rounds to create the swirled texture. The scarf finishes approximately 78 3/4in/200cm and the hat fits a standard adult head at 8 1/4in/21cm before shaping.

Why You'll Love This Cinnamon Swirl Hat and Scarf Set Pattern

I absolutely love this pattern because the cable texture feels much more complex than it actually is, giving a high-end look with repeatable steps. I enjoy how the ribbed band on the hat frames the face while the slouchy crown adds modern style. The long scarf is incredibly satisfying to work up and becomes wonderfully cozy when wrapped multiple times. I always appreciate patterns that let me practice new techniques, and these cables are a perfect next step. Making the pom pom at the end is a fun flourish that really personalizes the finished set.

Cinnamon Swirl Hat and Scarf Set Pattern step 1 - construction progress Cinnamon Swirl Hat and Scarf Set Pattern step 2 - assembly progress Cinnamon Swirl Hat and Scarf Set Pattern step 3 - details and accessories Cinnamon Swirl Hat and Scarf Set Pattern step 4 - final assembly and finishing

Switch Things Up

I love experimenting with color when making this set; try using a variegated or marl yarn for a different cable effect.

I often switch yarn weight and hook size to create different finished sizes β€” thicker yarn and a larger hook gives a chunkier, quicker version.

I sometimes make the scarf shorter or longer by adjusting the number of pattern repeats until the length suits me.

I like adding contrast at the rib band by working the rib in a different colour for a bold finish.

I have used metallic or speckled yarn for a festive version that looks great as a holiday gift.

I also experiment with ombre or gradient cakes to create a flowing colour change through the scarf and hat.

I recommend practising the cable crosses on a small swatch first to get comfortable with front and back post stitches.

I sometimes replace the pom pom with a tassel or a small crocheted flower for a more subtle finish.

I like to block the scarf lightly to open up the cable texture and even out the rows for a polished look.

I occasionally add a simple embroidered initial or a small label near the scarf end to personalize my makes.

Common Mistakes & How to Fix Them

βœ— Skipping the initial setup chain count causes the stitch count to be off and the pattern to shift; always count chains and remember missed chains do not count as stitches. βœ— Not practicing the cable crosses on a swatch leads to confusion during the pattern; make a small sample to identify the posts you need to stitch around before starting the main pieces. βœ— Pulling post stitches too tightly results in flattened cables that lose definition; maintain even tension and gently block cables if needed to open the texture. βœ— Forgetting to join rounds with slip stitch or misplacing the turning chain creates mismatch in rib placement; follow the join and Ch instructions exactly each round to keep band alignment consistent. βœ— Failing to secure and weave in ends as you go can leave loose tails that show through textured stitches; weave in ends neatly and trim excess to maintain cable clarity.

Cinnamon Swirl Hat and Scarf Set Pattern

Crochet a cozy Cinnamon Swirl hat and matching scarf with a beautiful cable texture that adds warmth and style. This pattern guides you through a ribbed cable hat and a long, snuggly scarf perfect for layering. Youll enjoy the repeatable cable motif that looks intricate but is delightful to make. Ideal for gifting or treating yourself to a handcrafted winter set.

Intermediate 5-7 Hours

Materials Needed for Cinnamon Swirl Hat and Scarf Set Pattern

β€” Main Fabric

  • 01
    Paintbox Yarns Simply Aran (Aran/Worsted weight #4) - Teal (colour shown)
  • 02
    Approximate yarn requirements: Scarf 500g (approximately 5 x 100g balls) to reach 78 3/4in / 200cm
  • 03
    Approximate yarn requirement: Hat 100g (approximately 1 x 100g ball) for a standard adult size
  • 04
    Total suggested yarn: approx 600g (adjust according to tension and exact yarn selection)

β€” Tools Required

  • 01
    Crochet hook size US 8 (5mm)
  • 02
    Scissors
  • 03
    Yarn needle for sewing and weaving in ends
  • 04
    Stitch markers
  • 05
    Pom pom maker or cardboard template (optional) for medium pom pom
  • 06
    Tape measure

Progress Tracker

0% Complete

β€” Scarf Cable Pattern :

Info :

Worked across 10 sts and 2 rows.

Row 1 (right side) :

C4F, 2 hdc (htr), C2F, 2 hdc (htr).

Row 2 (wrong side) :

2 hdc (htr), 2 bpdc (bptr), 2 hdc (htr), 4 bpdc (bptr).

β€” Scarf :

Setup :

Make 42 ch using a US 8 (5mm) crochet hook.

Set up row :

1 hdc (htr) in third ch from hook and in each rem ch to end (missed 2 ch do not count as a st), turn. | 40 sts.

1st patt row (right side) :

Ch 2 (does not count as st throughout), 4 hdc (htr), C2F, 2 hdc (htr), work 1st row of Cable Pattern three times to last 2 sts, 2 hdc (htr), turn.

2nd patt row :

Ch 2, 2 hdc (htr), work 2nd row of Cable Pattern three times to last 8 sts, 2 hdc (htr), 2bpdc (bpdtr), 4hdc (htr), turn.

Info :

These 2 rows set patt.

Continue :

Cont in patt to 78ΒΎin/200cm ending with a wrong side row.

Finish :

Cut yarn and secure last st. Weave in any loose ends.

β€” Hat Cable Pattern :

Info :

Worked across 10 sts and 2 rnds.

Round 1 (right side) :

2 hdc (htr), C4F, 2 hdc (htr), C2F.

Round 2 (right side) :

2 hdc (htr), 4 fpdc (fptr), 2 hdc (htr), 2 fpdc (fptr).

β€” Hat :

Setup :

Make 70 ch using a US 8 (5mm) crochet hook, join round with a sl st.

Set up round :

Ch 2 (does not count as a st throughout) 1 hdc (htr) in each st around. | 70 sts.

Rib round :

Ch 2, [1 fpdc (fptr), 1 bpdc (bptr)] around, sl st to join. This round sets rib, work a further 2 rounds in rib.

1st patt round :

Ch 2, work 1st round of Cable Pattern 7 times around, sl st to join.

2nd patt round :

Ch 2, work 2nd round of Cable Pattern 7 times around, sl st to join.

Info :

These 2 rounds set patt. Cont in patt to 8ΒΌin/21cm ending with 2nd patt round.

Shape crown - Next round :

Ch 2 [hdc2tog (htr2tog), C4F, hdc2tog (htr2tog), C2F] around, sl st to join. | 56 sts.

Next round :

Ch 2, *1 hdc (htr), [fpdc2tog (fptr2tog)] twice, 1 hdc (htr), 2 fpdc (fptr); rep from * around, sl st to join. | 42 sts.

Next round :

Ch 2, [1 hdc (htr), C2F] around, sl st to join.

Next round :

Ch 2, [1 hdc (htr), fpdc2tog (fptr2tog)] around, sl st to join. | 28 sts.

Next round :

Ch 2, [hdc2tog (htr2tog)] around, sl st to join. | 14 sts.

Finish :

Cut yarn and secure last st. Thread yarn through each of rem sts, and pull tight to close.

β€” To Finish :

Pom pom :

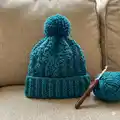
Make a medium size pom pom and attach to top of hat.

Ends :

Weave in any loose ends.

Assembly Instructions

  • Join the hat foundation chain into a round with a slip stitch, then work the set up round to establish 70 sts for the hat.
  • Work the rib round and a further 2 rounds in rib to set the rib before starting the cable pattern for a neat band.
  • For the crown, follow the Shape crown rounds carefully, then thread yarn through remaining sts and pull tight to close the top securely.
  • Make a medium-size pom pom and attach to the top of the hat, knotting and sewing firmly to ensure it stays in place.
  • Cut yarn and secure last stitch on both pieces and weave in any loose ends to finish neatly and prevent unraveling.

Important Notes

  • πŸ’‘Top Tip: If this is your first time crocheting cables it is definitely best to do a little swatch to try out the technique as it can be tricky to see the posts you need to stitch around, but as soon as you have your eye in youll be well on the way to loving a new technique.
  • πŸ’‘These 2 rows set the cable pattern both for the scarf and the hat; work the pair of pattern rows as written to maintain the cable motif.
  • πŸ’‘When working post stitches (fpdc, bpdc) keep your tension consistent so the cables sit neatly and do not become distorted.
  • πŸ’‘Measure as you go: the scarf should continue to 78ΒΎin/200cm and the hat to 8ΒΌin/21cm before shaping the crown.

This Cinnamon Swirl Hat and Scarf set brings cozy cable texture to your winter wardrobe with a playful pom pom on the hat. The long, snuggly scarf wraps warmly while the ribbed cable band gives the hat a flattering fit. Make it in bold or soft hues to create a beautiful handmade gift or a stylish treat for yourself. 🧢🧡

You ask,

we answer.

FAQs

What size will the finished scarf and hat be?

The scarf finishes approximately 78 3/4in/200cm and the hat is worked to 8 1/4in/21cm before crown shaping, fitting a standard adult head.

What hook size and yarn are recommended?

The pattern uses a US 8 (5mm) crochet hook and is shown worked in Paintbox Yarns Simply Aran (aran/worsted weight). Yarn quantities will vary by tension.

Do I need to practise cables before starting?

Yes, the pattern suggests making a small swatch if youre new to cables to practise identifying posts and stitch placement.

How is the hat crown closed?

After the decrease rounds, cut the yarn and thread it through the remaining stitches, then pull tight to close the top securely.