🧢 Beautiful ✨ Detailed πŸ’ Adorable

Plush Backpack Bunny Amigurumi Pattern

Plush Backpack Bunny Amigurumi Pattern
4.4β˜… Rating
5-7 Hours Time Needed
3.5K Made This
βœ‚οΈ

Intermediate Level

Ideal for those with basic crochet experience, featuring slightly more advanced stitches and techniques to expand your skills.

⏱️

Weekend Treat

Takes 5-7 hours, making it an enjoyable project to finish over a couple of days.

🧸

Cute Companion

An adorable friend to cherish, handcrafted with love to bring comfort and joy for years to come.

About This Plush Backpack Bunny Amigurumi Pattern

This pattern creates a plush velvet backpack with a sweet bunny face flap, complete with straps, handle and cord. You will work mainly in chenille super-bulky yarn for a soft, plush texture and a sport weight yarn for facial details. The instructions include the backpack body, flap, straps, handle, cord and the bunny head and ears with clear stitch counts and assembly notes.

Plush Backpack Bunny Amigurumi Pattern crochet pattern - detailed view of completed project

The design is intermediate level and uses continuous rounds, rows and simple shaping techniques. Photos and placement notes help with assembly and finishing for a professional look.

Why You'll Love This Plush Backpack Bunny Amigurumi Pattern

I absolutely love this pattern because the plush chenille yarn creates an irresistibly soft texture that children adore. I enjoy how the bunny face flap turns a functional backpack into a playful character that can be customized with color choices. I love that the pattern is modular β€” you can make the backpack and then add the bunny details or change colors easily. I find the assembly steps satisfying because the finished piece looks polished and durable when sewn together carefully.

Plush Backpack Bunny Amigurumi Pattern step 1 - construction progress Plush Backpack Bunny Amigurumi Pattern step 2 - assembly progress Plush Backpack Bunny Amigurumi Pattern step 3 - details and accessories Plush Backpack Bunny Amigurumi Pattern step 4 - final assembly and finishing

Switch Things Up

I love experimenting with colors: try pastel shades for a softer look or bold contrasting colors for a playful backpack that pops.

I often change yarn weight and hook size to create different sizes β€” using bulky yarn with a larger hook will give you a chunkier backpack and plush bunny.

I sometimes add embroidered patches or small pockets inside to make the backpack more functional for kids.

I like to replace the wooden button with a decorative button or a magnetic snap for an easier closure option.

For a more durable strap, I braid multiple thinner yarns together or sew a fabric lining inside the straps for reinforcement.

I enjoy adding small accessories like a crocheted bow, scarf or tiny flower to the bunny flap to personalize the character.

Try faux leather or cotton cord instead of the crocheted cord for a different look and firmer ties.

To make a mini keychain version, use thinner yarn and a smaller hook, reduce chain length for straps, and attach a keyring before finishing.

I sometimes add a tiny pocket inside the backpack to hold a note or small toy β€” it makes the gift extra-special.

Switch facial features by embroidering different expressions or using colored safety noses to change the bunny's personality.

Common Mistakes & How to Fix Them

βœ— Skipping a stitch marker at the beginning of rounds can make it hard to find the start of the round; use a marker or contrast thread at the start of every round to stay aligned. βœ— Not counting stitches after increases and decreases may cause the shape to become uneven; count your stitches at the end of each round to catch errors early. βœ— Overstuffing the bunny head will distort its shape and make it look lumpy; stuff gradually and evenly, checking shape as you go for a smooth finish. βœ— Pulling your tension too tight with chenille yarn can make the fabric stiff and harder to sew; keep a relaxed consistent tension for soft, flexible fabric. βœ— Attaching straps without pinning leads to uneven placement; pin or mark the strap positions between the indicated rounds before sewing them on securely.

Plush Backpack Bunny Amigurumi Pattern

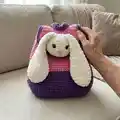
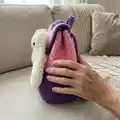
Make a delightful plush backpack with a cuddly bunny face β€” a perfect handmade gift for kids. This pattern uses soft chenille velvet yarn for a plush finish and clear step-by-step instructions so you can crochet the backpack, straps, handle and adorable bunny head and ears. It combines simple shaping and assembly for a fun intermediate project you will enjoy creating.

Intermediate 5-7 Hours

Materials Needed for Plush Backpack Bunny Amigurumi Pattern

β€” Main Fabric

  • 01
    HIMALAYA DOLPHIN BABY - Super Bulky / Super Chunky / 14ply velvet chenille yarn, approximately 2 skeins in different colors (purple and pink used in sample)
  • 02
    Chenille 'milk' color (white/cream) yarn - 1 skein for bunny head and ears (same super-bulky velvet type)
  • 03
    Sport weight/4ply yarn YarnArt JEANS or Alize Cotton Gold - small amount in black for face decoration and detail stitching
  • 04
    Small amount of pink embroidery thread for mouth detailing (approximately 30 cm)

β€” Tools Required

  • 01
    Crochet hook 3.75 mm (for general work with chenille sample tension)
  • 02
    Crochet hook 5 mm (for head/ears as indicated, or to match your tension with chenille)
  • 03
    Sewing needle
  • 04
    Yarn needle for sewing and weaving ends
  • 05
    Scissors
  • 06
    Wooden button (for flap closure)
  • 07
    Safety eyes 8-10 mm (2 pieces)
  • 08
    Safety nose 10 mm (1 piece)
  • 09
    Polyester stuffing (toy stuffing)
  • 10
    Stitch markers
  • 11
    30 cm black thread for face decoration (or thin yarn for embroidery)

Progress Tracker

0% Complete

β€” Flap :

Round 1 :

ch2, crochet 5 sc into the 2nd ch from the hook. Do not pull the ring. Turn. (5)

Round 2 :

t-ch, 1 sc, inc * 4, turn (9)

Round 3 :

t-ch, (sc, inc) * 4, 1 sc, turn (13)

Round 4 :

t-ch, (2 sc, inc) * 4, 1 sc, turn (17)

Round 5 :

t-ch, (3 sc, inc) * 4, 1 sc, turn (21)

Round 6 :

t-ch, (4 sc, inc) * 4, 1 sc, turn (25)

Round 7 :

t-ch, (5 sc, inc) * 4, 1 sc, turn (29)

Round 8 :

t-ch, (7 sc, inc) * 3, 5 sc, turn (32)

Round 9 :

t-ch, (8 sc, inc) * 3, 5 sc (35)

Info :

Do not turn. Work along the top of the flap.

Round 10 :

t-ch, 19 sc, turn (19)

Round 11-15 :

t-ch, 19 sc, turn (5 rows)

Round 16 :

t-ch, 19 sc (19)

Info :

Do not turn.

Info :

Change color to purple. Cut the pink yarn. Then work in rounds.

Round 17 :

t-ch, 22 sc, 3 ch, skip 3 stitches, 22 sc, turn (47)

Round 18 :

t-ch, 47 reverse sc (47), sl st

β€” Backpack :

Info :

Begin to crochet with purple yarn. Ch20. Start on the second chain from the hook.

Round 1 :

18 sc, 3 sc in the last chain, on the other side of the chain: 17 sc, inc, inc into t-ch (42)

Info :

Place a marker.

Round 2 :

16 sc, (inc, 1 sc) * 2, inc, 15 sc, (inc, 1 sc) * 3 (48)

Round 3 :

inc, 15 sc, (inc, 1 sc) * 4, inc, 14 sc, (inc, 1 sc) * 4, 1 sc (58)

Round 4 :

inc, 15 sc, (inc, 3 sc) * 3, inc, 17 sc, (inc, 3 sc) * 3 (66)

Round 5 :

inc, 18 sc, (inc, 4 sc) * 3, inc, 16 sc (inc, 4 sc) * 3 (74)

Round 6 :

74 sc (74)

Round 7 :

BLO 74 sc (74)

Round 8-16 :

74 sc (9 rounds)

Round 17 :

26 sc, dec, 34 sc, dec, 10 sc (72)

Info :

Change color to pink. Cut the purple yarn.

Round 18-35 :

72 sc (18 rounds)

Info :

Join the flap in the next rounds.

Round 36 :

71 sc, 1 sc with the flap (72)

Round 37 :

20 sc with the flap, 52 sc (72), sl st.

β€” Straps :

Info :

Crochet with purple yarn. Work in rows.

Round 1 :

ch71, start from the second chain on the hook: 70 sc, turn (70)

Round 2-4 :

t-ch, 70 sc (3 rows)

Info :

You can make the straps longer or shorter. Make more or less chains. My straps are 50 cm long.

Info :

Cut the yarn. Leave the end for sewing pieces. If chenille yarn crumbles a lot, it is better to sew on the straps with a cotton thread that matches the color.

Info :

Sew the straps at the bottom of the backpack between rounds 7 and 11, at the top of the backpack between rounds 32 and 36. Distance between straps 12 sc.

β€” Handle :

Info :

Crochet with purple yarn. Work in rows.

Round 1 :

ch21, start from the second chain on the hook: 20 sc, turn (20)

Round 2-3 :

t-ch, 20 sc (20 rows)

Info :

Cut the yarn. Leave the end for sewing pieces. If chenille yarn crumbles a lot, it is better to sew on the handle with a cotton thread that matches the color.

Info :

Sew on the handle.

β€” Cord :

Info :

Ch150. Step back at the top of the backpack 2 rounds and stretch the cord between the stitches, after folding the backpack, as shown in the photo. Make knots at the ends.

Info :

Sew a button between rounds 23 and 27.

β€” Bunny :

Info :

HEAD Crochet with milk yarn.

Round 1 :

ch2, crochet 6 sc into the 2nd ch from the hook (6)

Round 2 :

inc *6 (12)

Round 3 :

(1 sc, inc) * 6 (18)

Round 4 :

1 sc, inc (2 sc, inc) * 5, 1 sc (24)

Round 5 :

(3 sc, inc) * 6 (30)

Round 6 :

(4 sc, inc) * 6 (36)

Round 7-10 :

36 sc (4 rounds)

Round 11 :

(4 sc, dec) * 6 (30)

Round 12 :

(3 sc, dec) * 3 (24)

Info :

Cut the yarn. Leave the end for sewing pieces. If chenille yarn crumbles a lot, it is better to sew on the head with a cotton thread that matches the color.

Info :

Insert safety eyes between rounds 4 and 5. Distance between eyes 6-7 sc. Insert the safety nose into the middle of the amigurumi ring. Before you secure it with a washer, embroider the mouth with a pink thread.

Info :

Stuff the head. Sew the head to the flap of the backpack. Sew through walls of stitches from above, not through, so that there are no stitches on the wrong side of the cover.

Item Name (Ears) :

EARS (make 2) Crochet with milk yarn. Crochet with hook 5 mm

Round 1 :

ch2, crochet 6 sc into the 2nd ch from the hook (6)

Round 2 :

hdcinc * 6 (12)

Round 3 :

(hdc, hdcinc) * 6 (18)

Round 4 :

(5 hdc, hdcinc) * 3 (21)

Round 5-6 :

21 hdc (2 rounds)

Round 7 :

(5 hdc, hdc2tog) * 3 (18)

Round 8 :

18 hdc (18)

Round 9 :

(4 hdc, hdc2tog) * 3 (15)

Round 10-11 :

15 hdc (2 rounds)

Round 12 :

(3 hdc, hdc2tog) * 3 (12)

Round 13-14 :

12 hdc (2 rounds)

Round 15 :

(2 hdc, hdc2tog) * 3 (9)

Round 16-17 :

9 hdc (2 rounds)

Round 18 :

9 sc (9)

Info :

Fold it in half and crochet 4 sc through both sides.

Info :

Leave the end for sewing pieces. If chenille yarn crumbles a lot, it is better to sew on the head with a cotton thread that matches the color of the ears.

Info :

Sew on the ears. Embroider lashes with a black cotton thread.

Assembly Instructions

  • Insert safety eyes between rounds 4 and 5 of the head, spacing them approximately 6-7 single crochet stitches apart; attach the safety nose in the center of the amigurumi ring and embroider the mouth with pink thread before securing the nose washer.
  • Sew the bunny head to the flap by stitching through the walls of stitches from above so that no stitches show on the wrong side; ensure the head is centered on the flap.
  • Sew the straps at the bottom of the backpack between rounds 7 and 11 and at the top between rounds 32 and 36, keeping a distance of 12 sc between the two strap attachment points.
  • Sew the handle securely on top of the backpack after folding and positioning; leave yarn ends for sewing and use cotton thread if chenille crumbles.
  • Sew a wooden button between rounds 23 and 27 to fasten the flap and add the cord through the top stitches, knotting ends as shown.

Important Notes

  • πŸ’‘Work in continuous rounds, in rows and in a spiral as noted in each section of the pattern.
  • πŸ’‘The size of the backpack is approximately 21 cm wide and 24 cm high when using the recommended yarn and hook sizes.
  • πŸ’‘At the beginning of each round use a marker or a thread of a different color so that you can easily see where the beginning of the round is.
  • πŸ’‘Leave ends long for sewing pieces; if chenille yarn crumbles, sew parts with a matching cotton thread for stronger attachment.

Thank you for choosing this pattern β€” I hope it brings a smile to the maker and the lucky child who carries it. This plush bunny backpack is soft, cuddly and fully customizable β€” pick colors to match your style or a gift recipient. Happy crocheting and enjoy every stitch on this sweet little project! 🧢🐰

You ask,

we answer.

FAQs

What size will the finished piece be?

The finished backpack measures approximately 21 cm wide and 24 cm high when using the recommended super-bulky chenille yarn and hooks.

Can I use different yarn weights for this pattern?

Yes, you can substitute yarn weights but it will change the finished size; adjust hook size accordingly and expect denser or looser fabric depending on yarn choice.

Do I need prior crochet experience for this pattern?

This pattern is rated intermediate, so basic knowledge of single crochet, increases and decreases, and working in rounds and rows is recommended.

How long does this project typically take to complete?

Most crocheters finish this project in about 5-7 hours, depending on experience, assembly time and any customizations you make.