🧢 Beautiful ✨ Detailed πŸ’ Adorable

Mr. Buckwheat Amigurumi Pattern

Mr. Buckwheat Amigurumi Pattern
4.2β˜… Rating
5-7 Hours Time Needed
2.6K Made This
βœ‚οΈ

Intermediate Level

Ideal for those with basic crochet experience, featuring slightly more advanced stitches and techniques to expand your skills.

⏱️

Weekend Treat

Takes 5-7 hours, making it an enjoyable project to finish over a couple of days.

🧸

Cute Companion

An adorable friend to cherish, handcrafted with love to bring comfort and joy for years to come.

About This Mr. Buckwheat Amigurumi Pattern

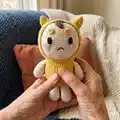
This pattern guides you through making a sweet Mr. Buckwheat amigurumi with a removable hood and charming facial details. You will crochet the head, body, arms, legs, hood, horns, hair, cheeks and eyebrows using round-by-round instructions. The design features clear shaping and placement notes so your finished toy looks just like the photos. Great for personal gifts and collectors of handmade plushies.
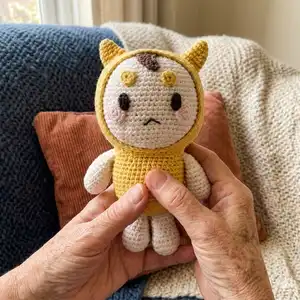
Mr. Buckwheat Amigurumi Pattern crochet pattern - detailed view of completed project

Includes instructions for felt eyes and sewn facial features to make finishing quick and clean. Detailed sections and sewing placement guidance make assembly straightforward and enjoyable.

Why You'll Love This Mr. Buckwheat Amigurumi Pattern

I absolutely love this pattern because it captures a gentle, expressive character with a few simple shapes. I enjoy how the removable hood adds personality and a little engineering challenge that is still very approachable. The construction is modular so you can easily customize colors or accessory placement to create different personalities. Seeing the finished face come together from simple crocheted pieces and felt details always makes me smile.

Mr. Buckwheat Amigurumi Pattern step 1 - construction progress Mr. Buckwheat Amigurumi Pattern step 2 - assembly progress Mr. Buckwheat Amigurumi Pattern step 3 - details and accessories Mr. Buckwheat Amigurumi Pattern step 4 - final assembly and finishing

Switch Things Up

I love changing color palettes to create different personalities; try pastel hues for a soft nursery friend or bold colors for a playful look.

You can enlarge or shrink the doll by switching yarn weight and hook size; bulky yarn with a larger hook makes a chunky version, while finer yarn with a smaller hook creates a tiny keychain size.

I often add embroidered eyebrows or different mouth expressions to change the mood of the faceβ€”experiment before finishing the face permanently.

Swap felt eyes for safety eyes (if making for an adult or display doll) or use embroidery for a fully washable option for babies.

Try mixing textured yarns for the hood or body to add visual interestβ€”just be mindful of gauge changes when combining fibers.

Make a sibling set by changing accent colors and slight size variations so they look related but unique.

I sometimes add a small crocheted scarf or tiny props like a leaf or tiny toy to give Mr. Buckwheat a story and extra charm.

If you like posable limbs, consider inserting thin wire inside the arms before stuffing to make them poseable; secure ends so they do not poke out.

Experiment with placing the horns slightly differently or making them longer for a fantasy creature lookβ€”the hood pattern is flexible to customization.

For a unique finish, add blush to the cheeks with a soft pastel pencil or dye-based blush and then seal lightly, or use variegated yarn for subtle color changes across the body.

Common Mistakes & How to Fix Them

βœ— Skipping stuffing while crocheting the head creates lumps and mis-shaping; stuff gradually as you work and keep stuffing even between rounds. βœ— Not marking the start of rounds results in lost stitch counts and uneven shaping; place a stitch marker at the first stitch of each round and move it as you go. βœ— Pulling increases too tight makes ruffled edges and distorted shaping; maintain consistent tension and avoid over-tightening increases. βœ— Forgetting to leave long tails for sewing causes frustration at assembly; always fasten off with a long tail when the pattern instructs to sew pieces in place. βœ— Gluing felt eyes without testing position can misplace facial balance; pin or lightly tack the felt first to check placement before final glue. βœ— Skipping the invisible fasten off leaves a visible knot at the join; finish final rounds with an invisible fasten off when instructed.
Mr. Buckwheat Amigurumi Pattern

Create your own adorable Mr. Buckwheat amigurumi with this detailed crochet pattern. You will work a shaped head, removable hood with horns, cute facial features, and a cuddly body β€” all explained step by step. The pattern uses simple amigurumi techniques and clear round-by-round instructions so you can follow along with confidence. Perfect for gifting or keeping as a handmade companion.

Intermediate 5-7 Hours

Materials Needed for Mr. Buckwheat Amigurumi Pattern

β€” Main Fabric

  • 01
    Cotton yarn 12 ply (main body cream/off-white) - amount per doll varies by size (approx. 100-150g total yarn used across colors)
  • 02
    Mustard / yellow cotton yarn (hood and accents) - small skein (~50g)
  • 03
    Light pink cotton yarn (cheeks) - small scrap (~10g)
  • 04
    Dark brown cotton yarn (hair tuft and detail) - small scrap (~10g)
  • 05
    Black felt for eyes - small piece (~5x5 cm)

β€” Tools Required

  • 01
    Crochet hook US C/2 UK 11 (3.00 mm)
  • 02
    Fiberfill stuffing (polyester)
  • 03
    Yarn needle for sewing
  • 04
    Scissors
  • 05
    Pins for assembly
  • 06
    Glue for felt eyes
  • 07
    Black felt (for the eyes)
  • 08
    Stitch markers

Progress Tracker

0% Complete

β€” Head :

Info :

Make sure to stuff the head as you crochet.

Round 1 :

6 sc in mr (6)

Round 2 :

1 inc in each st around (12)

Round 3 :

*1 sc, 1 inc* (18)

Round 4 :

*2 sc, 1 inc* (24)

Round 5 :

*3 sc, 1 inc* (30)

Round 6 :

*4 sc, 1 inc* (36)

Round 7 :

*5 sc, 1 inc* (42)

Round 8 :

*6 sc, 1 inc* (48)

Round 9 :

*7 sc, 1 inc* (54)

Round 10 :

4 sc, 1 inc, (8 sc, 1 inc) x 5, 4 sc (60)

Round 11 :

*9 sc, 1 inc* (66)

Round 12-25 :

1 sc in each st around (66)

Round 26 :

*9 sc, 1 dec* (60)

Round 27 :

*8 sc, 1 dec* (54)

Round 28 :

1 sc in each st around (54)

Round 29 :

*7 sc, 1 dec* (45)

Round 30 :

*6 sc, 1 dec* (42)

Round 31 :

*5 sc, 1 dec* (36)

Round 32 :

2 sc, 1 dec, (4 sc, 1 dec) x 5, 2 sc (30)

Round 33 :

*3 sc, 1 dec* (24)

Round 34 :

*2 sc, 1 dec* (18)

Round 35 :

*1 sc, 1 dec* (12)

Round 36 :

6 dec (6)

Info :

Finish off.

β€” Hair :

Round 1 :

Ch 10. Start from the 2nd ch from hook: 9 sc. On the other side of the ch: 3 slst, 2 sc, 2 hdc, 2 dc (9)

Info :

Fasten off and leave a long tail for sewing the hair to the head.

Info :

Sew the hair between round 5 and 12 of the head.

β€” Hood :

Round 1 :

6 sc in mr (6)

Round 2 :

1 inc in each st around (12)

Round 3 :

*1 sc, 1 inc* (18)

Round 4 :

*2 sc, 1 inc* (24)

Round 5 :

*3 sc, 1 inc* (30)

Round 6 :

*4 sc, 1 inc* (36)

Round 7 :

*5 sc, 1 inc* (42)

Round 8 :

*6 sc, 1 inc* (48)

Round 9 :

*7 sc, 1 inc* (54)

Round 10 :

*8 sc, 1 inc* (60)

Round 11 :

*9 sc, 1 inc* (66)

Round 12 :

*10 sc, 1 inc* (72)

Round 13-21 :

1 sc in each st around (72)

Round 22 :

*10 sc, 1 dec* (66)

Round 23 :

1 sc in each st around (66)

Round 24 :

*9 sc, 1 dec* (60)

Round 25 :

1 sc in each st around (60)

Info :

Put the head inside the hood and crochet:

Round 26 :

*8 sc, 1 dec* (54)

Info :

Finish with an invisible fasten off.

β€” Eyebrows x 2 :

Round 1 :

6 sc in mr (6)

Info :

Fasten off and leave a long tail to sew the eyebrows to the head.

Info :

Sew between rounds 12 and 15 of the head.

β€” Cheeks x 2 :

Round 1 :

5 sc in mr (5)

Round 2 :

1 inc in each st around (10)

Info :

Fasten off and leave a long tail for sewing the cheeks to the head.

Info :

Sew between rounds 18 and 23 of the head.

β€” Eyes x 2 :

Info :

Cut out two ovals of black felt and glue on between rounds 16 and 20 of the head.

β€” Horns x 2 :

Round 1 :

6 sc in mr (6)

Round 2 :

*1 sc, 1 inc* (9)

Round 3 :

1 sc in each st around (9)

Round 4 :

5 sc, 4 inc (13)

Round 5 :

7 sc, 3 dec (10)

Round 6 :

1 sc, 3 inc, 6 sc (13)

Round 7 :

1 sc in each st around (13)

Info :

Fasten off and leave a long tail to sew the horn to the head.

Info :

Don't stuff.

Info :

Sew the horns in round 17 of the hood with 11 stitches apart.

β€” Body :

Info :

Make sure to stuff the body as you crochet.

Round 1 :

6 sc in mr (6)

Round 2 :

1 inc in each st around (12)

Round 3 :

*1 sc, 1 inc* (18)

Round 4 :

*2 sc, 1 inc* (24)

Round 5 :

*3 sc, 1 inc* (30)

Round 6 :

*4 sc, 1 inc* (36)

Round 7 :

*5 sc, 1 inc* (42)

Round 8 :

1 sc in each st around (42)

Round 9 :

*6 sc, 1 inc* (48)

Round 10-17 :

1 sc in each st around (48)

Round 18 :

*6 sc, 1 dec* (42)

Round 19-20 :

1 sc in each st around (42)

Info :

Sew between rounds 11 and 24 of the Hood.

β€” Arms x 2 :

Round 1 :

6 sc in mr (6)

Round 2 :

1 inc in each st around (12)

Round 3 :

*1 sc, 1 inc* (18)

Round 4-11 :

1 sc in each st around (18)

Round 12 :

*1 sc, 1 dec* (12)

Round 13 :

1 sc in each st around (12)

Info :

Fasten off and leave a long tail to sew the arm to the body.

Info :

Stuff with fiberfill.

Info :

Sew in round 19 of the body.

β€” Legs x 2 :

Round 1 :

6 sc in mr (6)

Round 2 :

1 inc in each st around (12)

Round 3 :

*1 sc, 1 inc* (18)

Round 4 :

*2 sc, 1 inc* (24)

Round 5 :

6 sc, (1 sc, 1 dec) x 4, 6 sc (20)

Round 6 :

1 sc in each st around (20)

Round 7 :

6 sc, 4 dec, 6 sc (16)

Round 8-10 :

1 sc in each st around (16)

Round 11 :

*6 sc, 1 dec* (14)

Info :

Stuff with fiberfill.

Info :

Fasten off and leave a long tail for sewing the leg to the body.

Info :

Sew between rounds 1 and 5 of the body.

Assembly Instructions

  • Put the finished head inside the hood, align and crochet the joining round as instructed, then finish with an invisible fasten off to secure the hood to the head.
  • Sew the hair between rounds 5 and 12 of the head using the long tail left from the hair piece; adjust placement before securing to ensure symmetry.
  • Glue the black felt eye ovals between rounds 16 and 20 of the head, and sew the eyebrows between rounds 12 and 15 using the long tails to stitch them in place.
  • Sew the cheeks between rounds 18 and 23 of the head using the long tails; position them slightly below the felt eyes for a balanced face.
  • Attach the horns to round 17 of the hood spaced 11 stitches apart; do not stuff the horns and use the long tail to sew each horn securely.
  • Sew the arms to round 19 of the body and position the legs so their sewing lines align between rounds 1 and 5 of the body for stability. Pin parts before sewing to check balance.

Important Notes

  • πŸ’‘Make sure to stuff the head and body as you crochet for smoother shaping and fewer gaps.
  • πŸ’‘Leave long tails when you fasten off on small pieces so you can sew them to the head and body with ease.
  • πŸ’‘Use an invisible fasten off at the end of joining rounds to keep seams neat and hidden.
  • πŸ’‘Do not stuff the horns; they are sewn in place unstuffed to keep their shape and reduce bulk.
  • πŸ’‘Pin pieces in position before sewing to ensure correct placement and symmetry.
  • πŸ’‘Glue felt pieces only after checking placement by temporarily pinning or tacking them into position.

This adorable Mr. Buckwheat pattern brings a tiny friend to life with a removable hood, sweet cheeks and expressive eyes. Whether you make one for a gift or a shelf, it’s a cozy, satisfying project to crochet. Enjoy every stitch and personalize colors to match your style. 🧢😊

You ask,

we answer.

FAQs

What size will the finished piece be?

The finished amigurumi measures approximately 7.87 inches (20 cm) tall when made with the recommended yarn and 3.0 mm hook.

Can I use different yarn weights for this pattern?

Yes, you can use different yarn weights, but this will change the final size; adjust your hook accordingly to maintain similar gauge and shape.

Do I need prior crochet experience for this pattern?

This pattern is rated intermediate so basic knowledge of single crochet, increases, decreases, magic ring and simple assembly is recommended for best results.

How long does this project typically take to complete?

Most crocheters complete this project in about 5-7 hours, though time varies with experience, customization and assembly care.

How are the eyes attached?

Cut two ovals of black felt and glue them onto the head between rounds 16 and 20; pin first to check placement before gluing.