🧶 Beautiful ✨ Detailed 💝 Adorable

Crab Granny Square Pattern

Crab Granny Square Pattern
4.9★ Rating
2-4 Hours Time Needed
2.1K Made This
✂️

Intermediate Level

Ideal for those with basic crochet experience, featuring slightly more advanced stitches and techniques to expand your skills.

⏱️

Bite-Sized Project

Finishes in 2-4 hours—perfect for an afternoon of creative relaxation.

🏡

Cozy Accent

A warm touch for your space that transforms ordinary corners into inviting nooks filled with handmade charm.

About This Crab Granny Square Pattern

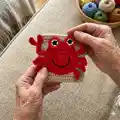
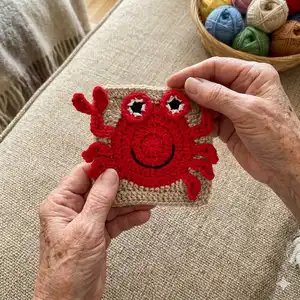
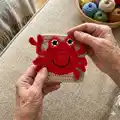
This pattern creates a whimsical crab granny square with a circular crab face, two layered eyes, six flexible legs and two claws. It uses basic to intermediate stitches including dc, hdc and tc with color changes and an optional invisible finish for a clean look. The finished square measures approximately 11 cm x 11 cm using the recommended yarn and hook.

Crab Granny Square Pattern crochet pattern - detailed view of completed project

Follow the step-by-step rounds and photo guidance to make the face components and attach them securely. You can adapt the colors and scale by changing yarn weight and hook size.

Why You'll Love This Crab Granny Square Pattern

I absolutely love this pattern because it turns a simple granny square into a playful character that sparks joy. I enjoyed designing the round-to-square transition so the crab sits proudly on a neat border. The little legs and claws add movement and charm, and the layered eyes give great depth with very little fuss. I find the step-by-step photos and invisible stitch option really help get a professional finish that I am proud to display or gift.

Crab Granny Square Pattern step 1 - construction progress Crab Granny Square Pattern step 2 - assembly progress Crab Granny Square Pattern step 3 - details and accessories Crab Granny Square Pattern step 4 - final assembly and finishing

Switch Things Up

I love how easily you can customize this crab square by changing colors; swap the red for pink or teal to create a different vibe.

To make a miniature keychain version, use fingering weight yarn and a smaller hook; the scale changes instantly and looks adorable.

If you want a softer, chunkier look, use a bulky yarn and a larger hook to make a plush applique for pillows or tote bags.

I often add embroidered eyelashes or tiny felt cheeks to the eyes to give the crab even more personality and charm.

Try mixing variegated yarn for the circular face to get an interesting textured effect without extra colorwork.

Make a whole set of sea creature squares—starfish, octopus, and crab—and join them into a themed blanket for a child or beach house decor.

I sometimes add a small button inside the ch2 corner spaces for a decorative center or to anchor a charm.

For a more secure attachment, stitch the legs and claws with matching thread and reinforce with a second pass of stitches across the base.

I recommend trying both invisible stitch and slip-stitch joins when changing colors to see which finish you prefer; each gives a slightly different edge look.

Finally, embroider different mouth shapes with black yarn to change the crab's expression—smile, surprised O, or even a mischievous grin.

Common Mistakes & How to Fix Them

✗ Skipping the stitch count in each round leads to uneven shaping; count stitches at the end of every round to ensure accuracy. ✗ Not tightening the magic ring enough makes the center hole visible; pull the tail to close the MR tightly before slip stitching. ✗ Changing color incorrectly at the end of a round creates a loose join; carry the new color and pull through on the final yarn over for a tidy color change. ✗ Forgetting to leave long tails on small pieces prevents easy sewing; always leave a long tail for stitching and weave in ends later for a secure finish.

Crab Granny Square Pattern

Make a playful crab granny square that adds ocean charm to blankets, bags, or applique projects. This pattern walks you through a circular crab face, cute eyes, movable legs and claws, and a simple square border. Youll enjoy clear step-by-step photos and tips to help you finish neat edges and secure facial details. Perfect for adding a whimsical touch to any crochet project.

Intermediate 2-4 Hours

Materials Needed for Crab Granny Square Pattern

— Main Fabric

  • 01
    Lightweight acrylic yarn (DK/light) - Red, small amount for crab face and details (approx. 30g)
  • 02
    Lightweight acrylic yarn (DK/light) - Beige, small amount for square border (approx. 40g)
  • 03
    Lightweight acrylic yarn (DK/light) - White, small amount for eye layering (approx. 5g)
  • 04
    Lightweight acrylic yarn (DK/light) - Black, small amount for eye centers and mouth (approx. 5g)

— Tools Required

  • 01
    Crochet hook size 4.0 mm (G/6) or 4 mm hook as recommended
  • 02
    Yarn needle for sewing and weaving in ends
  • 03
    Scissors
  • 04
    Stitch markers (optional for keeping track of rounds)
  • 05
    Tapestry needle

Progress Tracker

0% Complete

— Notes :

Infos :

The ( ) at the end of each round/row indicates the total number of stitches that should be completed for that round/row. When working through the rounds/rows, work through the entire stitch (back loop and front loop); unless stated otherwise. The ch1 or ch2 at the beginning of each round/row do not count as stitches unless stated otherwise. You can use any yarn to make this square; for example if you use a smaller hook and a suitable yarn, the square will be smaller.

— Square :

Round 1 :

MR, ch2, 12dc inside MR (12)

Round 2 :

ch2, *dc inc* all around (24)

Round 3 :

ch2, *dc, dc inc* all around (36)

Round 4 :

ch2, *2dc, dc inc* all around (48)

Info :

Invisible stitch: after you are done with Round 4, cut the yarn, leave a long tail, and pull it all the way through. With your needle, go into the 2nd dc from the back to the front through both loops, and then go through the center of the last dc towards the back. Pull the tail tight enough to create a stitch on top of the 1st dc and then weave in the excess yarn to secure it.

Info :

Color Change: at the end of Round 4, you will need to do a color change. Method 1: change color at the last dc of Round 4. Method 2: finish off with an invisible stitch and then attach the new color. Insert your hook into any stitch and attach the new yarn by pulling it through the stitch.

Round 5 :

ch1, *3sc, 2hdc, 2dc, [2tc + ch2 + 2tc] in the same stitch, 2dc, 2hdc* all around (68)

Info :

The invisible stitch provides a cleaner finish. However both methods work great, so use the one that works best for you.

Round 6 :

ch2, *dc* all around and [2dc + ch2 + 2dc] in the ch2 space (84)

— Eyes :

Round 1 :

Using the black yarn: MR, ch1, 5sc in MR (5)

Info :

Change color to white at the last sc.

Round 2 :

*inc* all around (10)

Info :

Change color to red at the last sc.

Round 3 :

*sc, inc* all around (15)

Info :

At the end of the round, finish off and weave in any excess yarn. You can finish off using the invisible stitch method or sl st in the 1st dc and then yarn over and pull it all the way through. You can use the tail for stitching when attaching the eyes later.

— Legs x6 :

Row 1 :

Using the red yarn: slip knot, ch6, sc in the 2nd ch away from the hook, sc, 2sc in 1 st, 2sc (6)

Info :

Cut the yarn and leave a long tail for stitching.

— Claw (Right) :

Row 1 :

Using the red yarn: slip knot, ch8, sc in the 2nd ch away from the hook, 2sc, inc, 3sc (8).

Row 2 :

Then ch7, sc in the 2nd ch away from the hook, hdc dec, hdc dec, sc (4), sl st in the claw.

Row 3 :

Then ch5, sc in the 2nd ch away from the hook, hdc inc, hdc inc, sc (6)

Info :

Sl st in the claw and finish off while leaving a long tail for stitching.

Info :

To hdc dec: start a hdc in a st (yarn over and insert your hook, then yarn over and pull through), then before finishing the normal hdc, do a second hdc in the following stitch. Then yarn over and pull through the 5 loops on your hook to complete the hdc dec.

— Claw (Left) :

Row 1 :

Using the red yarn: slip knot, ch11, sc in the 2nd ch away from the hook, 2sc, 2dec, 3sc (8)

Row 2 :

Then ch7, sc in the 2nd ch away from the hook, hdc dec, hdc dec, sc (4), sl st in the claw.

Row 3 :

Then ch5, sc in the 2nd ch away from the hook, hdc inc, hdc inc, sc (6)

Info :

Sl st in the claw and finish off while leaving a long tail for stitching.

— Assembly :

Info :

Place the face components on the square and align them similar to the image in the pattern. Use the tail for stitching. You can either stitch the legs/claws completely to the square, or only stitch them at the edge that is closest to the circular base so that they can be moved back and forth. Use the black yarn to stitch a mouth on Round 2.

Assembly Instructions

  • Place the circular crab face in the center of the square and align it so the border corners remain visible; stitch the face to the square using the long tail from the round and a yarn needle with a whipstitch.
  • Position the two layered eyes on top of the crab face and stitch through the center using the long tail left on each eye; secure and weave in ends on the back.
  • Arrange six legs evenly around the lower sides of the circular face and stitch each leg using the long tail; leave claws unattached or stitch only at the base to allow movement.
  • Attach claws to the top sides by aligning the base near the circular edge; either fully stitch them to the square for a fixed position or only stitch the inside edge so they can move.
  • Use black yarn to embroider a curved mouth on Round 2 of the circular face, following the photo guide for placement and expression.

Important Notes

  • 💡Use stitch markers to keep track of the start of each round, especially during increases and color changes.
  • 💡Stuffing is not required for this flat square; maintain even tension to avoid bulging or scalloped edges.
  • 💡Weave in ends as you go to keep the back neat and avoid a large finishing session at the end.

This cheerful Crab Granny Square is a delightful little project that brings seaside whimsy to blankets, bags, or applique pieces. Make a whole collection in different colors for a playful ocean-themed quilt or a single square for a fun accent. Enjoy the process and customize colors to match your home or gift recipient. 🧶🦀
You ask,

we answer.

FAQs

What size will the finished piece be?

The square is approximately 11 cm x 11 cm when using lightweight acrylic yarn and a 4.0 mm hook as recommended in the pattern.

Can I use different yarn weights for this pattern?

Yes, you can change yarn weight and hook size to alter the finished size; using a thicker yarn and larger hook will produce a bigger, chunkier square while thinner yarn will make a smaller one.

Do I need prior crochet experience for this pattern?

This pattern is rated intermediate and uses stitches like dc, hdc, tc and simple increases/decreases; familiarity with those stitches is recommended for the best results.

How long does this project typically take to complete?

Most crocheters complete a single square with all face components in about 2-4 hours depending on experience and pace.

How should I attach the legs and claws?

You can either sew legs and claws fully to the square for a fixed look or stitch only at their inner edge so they remain flexible and can be moved back and forth.