🧢 Beautiful ✨ Detailed πŸ’ Adorable

Mochi-Mouse Loves Cheese Amigurumi Pattern

Mochi-Mouse Loves Cheese Amigurumi Pattern
4.5β˜… Rating
5-7 Hours Time Needed
2.3K Made This
βœ‚οΈ

Intermediate Level

Ideal for those with basic crochet experience, featuring slightly more advanced stitches and techniques to expand your skills.

⏱️

Weekend Treat

Takes 5-7 hours, making it an enjoyable project to finish over a couple of days.

🧸

Cute Companion

An adorable friend to cherish, handcrafted with love to bring comfort and joy for years to come.

About This Mochi-Mouse Loves Cheese Amigurumi Pattern

This pattern makes an adorable mochi-style mouse that fits inside a triangular cheese slide. You will crochet the mouse body, eyes, ears, teeth, feet and a hollow cheese piece to tuck the mouse inside. The design uses small amigurumi shaping and a few color changes to create charming facial features and a wearable cheese home.

Mochi-Mouse Loves Cheese Amigurumi Pattern crochet pattern - detailed view of completed project

Clear round-by-round instructions are provided for every small piece and the cheese slide. Helpful photos and sewing notes guide final assembly so your mochi mouse looks delightful and secure.

Why You'll Love This Mochi-Mouse Loves Cheese Amigurumi Pattern

I absolutely love this pattern because it turns tiny crochet shapes into a playful, character-filled toy with a surprising hiding spot. I enjoy the combination of small amigurumi parts and the clever cheese slide that becomes both scenery and a cozy home. The pattern allows creative color swaps and tiny details like teeth and dents on the cheese that bring personality to each finished piece. It makes a wonderful gift and a fun project to practice precision shaping and finishing.

Mochi-Mouse Loves Cheese Amigurumi Pattern step 1 - construction progress Mochi-Mouse Loves Cheese Amigurumi Pattern step 2 - assembly progress Mochi-Mouse Loves Cheese Amigurumi Pattern step 3 - details and accessories Mochi-Mouse Loves Cheese Amigurumi Pattern step 4 - final assembly and finishing

Switch Things Up

I love customizing this pattern by swapping yarn colors to create seasonal or themed mice β€” try pastel palettes for baby gifts or bold brights for playful versions.

I sometimes change the yarn weight and hook to make a mini keychain version or a chunky cuddle-sized mouse; adjust stuffing and safety eyes accordingly.

I add tiny embroidered details like freckles or whiskers to give each mouse a unique expression that really brings it to life.

For the cheese slide you can experiment with different stitch textures or add a contrasting border to create a rim that looks like a real cheese crust.

Try using safety eyes, embroidered eyes, or tiny buttons depending on the recipient β€” embroidery is safest for baby gifts.

I often replace the tail with a small cord or a loop to hang the mouse as an ornament or bag charm.

To create a sleepy expression, change the placement of the eyes and add a small satin-stitched mouth β€” it makes the character softer and more whimsical.

I sometimes make a set of mice in matching or complementary colors and place them in different cheese slices to create a little family or display.

Consider adding wire in the tail for a posable tail or adding tiny props like a crocheted wedge of cheese or a tiny chef hat for playtime storytelling.

Don't be afraid to combine yarns for marled effects β€” holding two thin yarns together creates interesting texture and slightly larger finished pieces.

Common Mistakes & How to Fix Them

βœ— Skipping stitch markers during rounds can cause you to lose track of the start of each round; place a marker at the first stitch and move it up each round. βœ— Forgetting to stuff gradually results in misshaped pieces and lumps; stuff a little at a time and shape as you go for smooth curves. βœ— Pulling your tension too tight when working small parts, like eyes and feet, makes them stiff and small; relax your tension and practice on a scrap to match the gauge. βœ— Not counting stitches after increases or decreases leads to incorrect shaping later on; count stitches after each shaping round to confirm totals and fix mistakes early. βœ— Joining colors without securing yarn ends can create messy joins that come loose; secure and weave in ends neatly or carry color when possible for clean joins.

Mochi-Mouse Loves Cheese Amigurumi Pattern

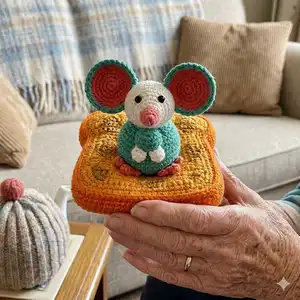
Make a cute mochi-style mouse that nestles inside a slice of crochet cheese. This pattern guides you step-by-step through small amigurumi shaping, color changes and assembly so you can create a playful toy perfect for gifting. Suitable for intermediate crocheters who enjoy small detailed pieces and fun finishing touches.

Intermediate 5-7 Hours

Materials Needed for Mochi-Mouse Loves Cheese Amigurumi Pattern

β€” Main Fabric

  • 01
    Color A: pink Gazzal Baby Cotton 3435 (50g, 165m)
  • 02
    Color B: grey YarnArt Jeans 80 (50g, 160m)
  • 03
    Color C: white YarnArt Jeans 03 (50g, 160m)
  • 04
    Color D: yellow YarnArt Jeans 35 (50g, 160m)
  • 05
    Color E: orange Alize Cotton Gold 550 (100g, 330m)
  • 06
    Additional yarns appearing in other patterns in the booklet: YarnArt Jeans 70 brown (50g,160m); Jeans Bamboo 109 baby pink (50g,160m); Etrofil Jeans 59 brown (50g,160m)

β€” Tools Required

  • 01
    Crochet hook size 2.5mm
  • 02
    1 pair of 5mm safety eyes (use black or colour as desired)
  • 03
    Tapestry needles
  • 04
    Brown thread for embroidery details
  • 05
    Pins for assembly
  • 06
    Stitch markers
  • 07
    Scissors
  • 08
    Polyester fiberfill stuffing
  • 09
    Glue (optional, to secure safety eyes)

Progress Tracker

0% Complete

β€” Body :

Round 1 :

sc 6 into a magic loop (6)

Round 2 :

inc 6 (12)

Round 3-4 :

sc 12 (2 rnds) (12)

Round 5 :

dec 6, stuff slightly, change to yarn B (6)

Round 6 :

sc 2, inc 2, sc 2 (8)

Round 7 :

sc 3, inc 2, sc 3 (10)

Round 8 :

sc 4, inc 2, sc 4 (12)

Round 9 :

sc 5, inc 2, sc 5 (14)

Round 10 :

sc 6, inc 2, sc 6 (16)

Round 11 :

sc 7, inc 2, sc 7 (18)

Round 12 :

sc 3, [sc 1, inc] 6x, sc 3 (24)

Round 13 :

sc 3, [sc 1, inc, sc 1] 6x, sc 3 (30)

Round 14 :

sc 3, [sc 3, inc] 6x, sc 3 (36)

Round 15 :

sc 3, [sc 2, inc, sc 2] 6x, sc 3 (42)

Round 16 :

sc 14, [sc 3, inc, sc 3] 2x, sc 14 (44)

Round 17-30 :

sc 44 (14 rnds) (44)

Round 31 :

[sc 20, dec] 2x (42)

Round 32 :

[sc 5, dec] 6x (36)

Round 33 :

[sc 4, dec] 6x (30)

Round 34 :

[sc 3, dec] 6x, stuff firmly (24)

Round 35 :

[sc 2, dec] 6x (18)

Round 36 :

[sc 1, dec] 6x (12)

Round 37 :

dec 6 (6)

Info :

Break the yarn, weave in the last 6 sts, stuff firmly (pic 1).

β€” Eyes :

Round 1 :

sc 4 into a magic loop (4)

Round 2 :

sc 1, inc 2, sc 1 (6)

Round 3 :

sc 2, inc 2, sc 2 (8)

Round 4 :

sc 3, inc 2, sc 3 (10)

Round 5 :

sc 4, inc 2, sc 4 (12)

Round 6 :

sc 5, inc 2, sc 5 (14)

Round 7-9 :

sc 14 (3 rnds), stuff slightly (14)

Round 10 :

dec 7 (7)

Info :

Break the yarn with a long rest to sew later, weave in the last 7 sts (pic 2). Use a pin to locate 2 pieces together (pic 3), sew 2 pieces together (pic 4&5). Insert 5mm safety eyes like pic 6 (use glue to stick the eyes). Sew the eyes on the body (pic 7).

β€” Tail :

Round 1 :

ch 15, start on the 2nd st, slst 14 (14)

Info :

Break the yarn with a long rest to sew later.

β€” Teeth :

Round 1 :

ch 4, start on the 2nd st, sc 3, ch 1, turn (3)

Round 2 :

sc 3 (3)

Info :

Break the yarn with a long rest to sew later. Sew the teeth under the nose (pic 8&9).

β€” Ears :

Round 1 :

sc 6 into a magic loop (6)

Round 2 :

inc 6 (12)

Round 3 :

[sc 1, inc] 6x (18)

Round 4 :

[sc 1, inc, sc 1] 6x (24)

Round 5 :

[sc 3, inc] 6x (30)

Round 6 :

[sc 2, inc, sc 2] 6x (36)

Info :

Break the yarn for 2 pieces of yarn A, make other 2 pieces with yarn B but do not break the yarn (pic 10). Hold 2 pieces as pic 11 (right side on the front), crochet sc across the edges (pic 12). Fold the ear in half (pic 13), sc 3 across the edges (pic 14), leave a long rest to sew later (pic 15). Sew the ears on the body (pic 16&17).

β€” Feet :

Round 1 :

[ch 5, start on the 2nd st, slst 4] 4x (pic 18), yarn over other 3 small feet (pic 19) and pull through all loops (pic 20) (16)

Info :

Break the yarn with a long rest to sew later, make other 3 feet the same way (pic 21). Sew the feet & the tail on the body (pic 22&23).

β€” Cheese :

Part 1 :

Round 1: Magic loop, sc 2, ch 1, turn (2).

Round 2 :

inc 2, ch 1, turn (4)

Round 3 :

inc, sc 2, inc, ch 1, turn (6)

Round 4 :

sc 6, ch 1, turn (6)

Round 5 :

inc, sc 4, inc, ch 1, turn (8)

Round 6 :

inc, sc 6, inc, ch 1, turn (10)

Round 7 :

sc 10, ch 1, turn (10)

Round 8 :

inc, sc 8, inc, ch 1, turn (12)

Round 9 :

inc, sc 10, inc, ch 1, turn (14)

Round 10 :

sc 14, ch 1, turn (14)

Round 11 :

inc, sc 12, inc, ch 1, turn (16)

Round 12 :

sc 3, ch 1, turn (3)

Round 13 :

dec, inc, ch 1, turn (3)

Round 14 :

sc 1, dec, ch 1, turn (2)

Round 15 :

sc 2, ch 1, turn (2)

Round 16 :

inc, sc 1, ch 1, turn (3)

Round 17 :

sc 3, ch 1, turn (3)

Round 18 :

inc, dec, ch 1, turn (3)

Round 19 :

sc 3, ch 1, turn (3)

Round 20 :

sc 2, inc, ch 1, turn (4)

Round 21 :

sc 4, ch 1, turn (4)

Round 22 :

inc, sc 2, inc, ch 1, turn (6)

Round 23 :

sc 6, ch 1, turn (6)

Round 24 :

sc 5, inc, ch 1, turn (7)

Round 25 :

sc 7, ch 1, turn (7)

Info :

Break the yarn, hold the piece as pic 24, join the yarn on the rnd 11, repeat rnd 12-25 (pic 25), do not break the yarn, continue to crochet the following rounds:

Round 26 :

inc, sc 5, inc, ch 12, inc, sc 5, inc, ch 1, turn (30)

Round 27-28 :

sc 30 (2 rnds), ch 1, turn (30)

Round 29 :

inc, sc 28, inc, ch 1, turn (32)

Round 30 :

sc 32 (32)

Info :

Do not break the yarn, continue to crochet sc across the edge, (sc 3) on the 3 pivots (pic 29): sc 28 + (sc 3) + sc 28 + (sc 3) + sc 30 + (sc 3)=95 (sts). We will have total 95 sts, break yarn D, change to yarn E, continue to crochet the following rounds:

Round 31 :

(blo) sc 95 (95)

Round 32-36 :

sc 95 (5 rnds) (95)

Info :

Break yarn E (pic 31&32). Place the cheese as pic 33, join yarn D as pic 34, crochet sc across the inner ring (sc 12+14+10+14=50 sts) (pic 35), do not break the yarn, continue to crochet the inner part:

Inner Round 1 :

(blo) sc 50 (50)

Inner Round 2-6 :

sc 50 (5 rnds) (50)

Info :

Break the yarn with a long rest to sew later (pic 36&37).

Part 2 :

Make another cheese slide (repeat rnd 1-30), and sc cross the edges as well (total 95 sts) (pic 38). And join yarn D on any st of the inner ring, crochet sc 50 across the inner ring (total 50 sts) (pic 39), do not break the yarn, continue to crochet to join 2 pieces together. Slst across the edge of the 1st piece (pic 41-42-43), break the yarn. Cut a long piece of yarn D to sew 2 rings together (pic 44), stuff firmly as long as sewing (pic 45).

Info :

Break the yarn, leave a long rest to make the dents on both side of the cheese (pic 46). Use your hands to stretch the hole (it should be easier to put the mouse inside) (pic 47). Use tapestry needle to pull through both sides (pic 48-49-50-51) to create the dents (both sides). Put the mouse inside the cheese (pic 52&53). We have finished crocheting the Mochi-Mouse Loves Cheese!

Assembly Instructions

  • Attach the sewn eye-piece to the body: position the eyes as in the reference photos, sew the grouped eye pieces onto the body securely and weave in ends so they sit flush.
  • Sew the ears, teeth and nose onto the head: hold the ear pairs right-sides together, crochet sc across edges, fold and sc to shape then sew ears and teeth under the nose as pictured.
  • Sew the feet and tail to the underside and back of the body, spacing feet evenly for stability and securing firmly with matching yarn so they will withstand play.
  • Join the two cheese slides: align inner rings, slip stitch around the edge to join, stuff through the seam and sew edges firmly; use tapestry needle to create dents on both sides for the finished look.
  • Insert the completed mouse into the cheese slide through the hole and position as desired; optionally glue safety eyes in place before final placement and make final embroidery/surface stitches.

Important Notes

  • πŸ’‘Use stitch markers to mark the beginning of each round β€” this is crucial when working long rounds or when joining pieces together.
  • πŸ’‘Stuff small parts gradually and check shape often β€” overstuffing can distort shapes while under-stuffing makes pieces floppy.
  • πŸ’‘When changing yarn colors, carry or secure ends and weave them in immediately to avoid bulky joins that show on the finished piece.
  • πŸ’‘Work with consistent tension throughout to maintain stitch counts and ensure the cheese hole is the right size for the mouse to fit inside.

This cheerful mochi mouse and its snug cheese home make a delightfully quirky handmade gift that brightens any shelf or playroom. The interactive cheese slide adds a playful element β€” tuck the mouse inside for safe keeping or for a fun surprise reveal. Enjoy the process of shaping tiny parts and creating a character full of personality. πŸ§ΆπŸ§€

You ask,

we answer.

FAQs

What size will the finished piece be?

The finished amigurumi measures approximately 10-12 cm tall for the mouse and the cheese slide is sized to fit this mouse when using the recommended yarn and 2.5mm hook.

Can I use different yarn weights for this pattern?

Yes, you can change yarn weight but that will affect the final size β€” use a larger or smaller hook appropriate to the yarn and expect the mouse and cheese proportions to change.

Do I need prior crochet experience for this pattern?

This pattern is rated intermediate and uses shaping, small parts and color changes, so basic amigurumi experience and comfort with increases/decreases are recommended.

How long does this project typically take to complete?

Most crocheters finish this project in 5-7 hours, although time will vary depending on experience and pace.