🧢 Beautiful ✨ Detailed πŸ’ Adorable

Mini Flower Basket & Flowers Amigurumi Pattern

Mini Flower Basket & Flowers Amigurumi Pattern
4.4β˜… Rating
5-7 Hours Time Needed
2.6K Made This
βœ‚οΈ

Intermediate Level

Ideal for those with basic crochet experience, featuring slightly more advanced stitches and techniques to expand your skills.

⏱️

Weekend Treat

Takes 5-7 hours, making it an enjoyable project to finish over a couple of days.

🏑

Cozy Accent

A warm touch for your space that transforms ordinary corners into inviting nooks filled with handmade charm.

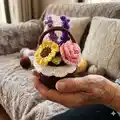
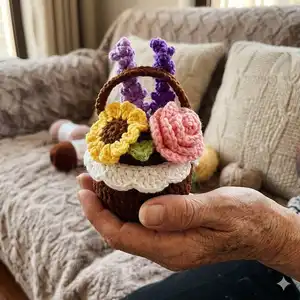
About This Mini Flower Basket & Flowers Amigurumi Pattern

This pattern shows you how to crochet a mini flower basket and a set of tiny flowers to fill it. You will work small rounds and rows to create the basket cover, body and lace, plus delicate flowers like lavender, sunflower, rose, tulip and more. Techniques include working in a magic loop, front/back loop stitches, and attaching wire for stems.

Mini Flower Basket & Flowers Amigurumi Pattern crochet pattern - detailed view of completed project

Detailed rounds and row-by-row instructions are provided for each piece, along with materials and abbreviations. Helpful tips and step notes guide you through assembly and finishing for a professional look.

Why You'll Love This Mini Flower Basket & Flowers Amigurumi Pattern

I absolutely love this pattern because it turns simple crochet shapes into a delightful miniature arrangement that fits in the palm of your hand. I enjoy how every tiny flower is made with small, repeatable stitches that feel relaxing but rewarding. The combination of basket weaving texture and delicate floral details makes it a charming home accent or gift. I also love that you can customize colors and sizes easily to create unique variations for different occasions.

Mini Flower Basket & Flowers Amigurumi Pattern step 1 - construction progress Mini Flower Basket & Flowers Amigurumi Pattern step 2 - assembly progress Mini Flower Basket & Flowers Amigurumi Pattern step 3 - details and accessories Mini Flower Basket & Flowers Amigurumi Pattern step 4 - final assembly and finishing

Switch Things Up

I love how easy it is to customize this mini flower basket with different color palettes; try pastels for a soft look or jewel tones for dramatic contrast.

I often swap the yarn weight and hook size to make larger or smaller versionsβ€”use bulky yarn and a larger hook for a chunky centerpiece.

I sometimes embroider tiny details on flower centers or add French knots for texture to make each bloom unique.

Try using metallic or variegated yarn for a special-effect petal or highlight one flower with a sparkly center for extra charm.

I also experiment with stem materialsβ€”thin florist wire wrapped with floral tape makes more realistic stems and helps arrange the bouquet easier.

To create a seasonal theme, adjust colors to match holidays: warm oranges and browns for autumn or bright pastels for spring.

I occasionally add small felt leaves or crocheted leaf pairs for fuller arrangements, stitching them to the wire stems before inserting into the basket.

If you want a keychain version, make a tiny basket without stuffing and attach a keyring to the handle for a portable miniature gift.

For gift packaging, place the finished mini bouquet in a small box with tissue or mount it on a tiny wooden disk as a decorative keepsake.

I recommend trying different flower combinations to get a balanced arrangementβ€”mix height, shape and color to make the display visually pleasing.

Common Mistakes & How to Fix Them

βœ— Skipping stitch markers during rounds can cause you to lose track of the start of each round; place a marker at the beginning of every round and move it as you go. βœ— Not checking stitch counts after increases or decreases will create uneven shaping; count your stitches at the end of each round and correct mistakes immediately. βœ— Overstuffing the basket body makes it lose its shape and become lumpy; stuff gradually and only halfway through sewing for a neat finish. βœ— Crocheting wire into the round without securing it properly can make stems loose; put the wire on the hook as instructed and bend or secure extra wire out of the way while you work. βœ— Forgetting to sew the lace on before continuing can result in misalignment; sew the basket lace on the edge of Round 8 before starting Round 9 as instructed.

Mini Flower Basket & Flowers Amigurumi Pattern

Create a charming mini flower basket filled with tiny crocheted blooms using this detailed pattern. You will make a woven-style basket with lace and handle, plus a collection of mini flowers like lavender, sunflower, rose, tulip and more. The pattern includes stitch-by-stitch rounds, materials, abbreviations and assembly tips so you can finish a delightful decorative piece.

Intermediate 5-7 Hours

Materials Needed for Mini Flower Basket & Flowers Amigurumi Pattern

β€” Main Fabric

  • 01
    Basket: #3 light 5ply yarn (pick colors you like)
  • 02
    Flowers: #2 fine 4ply yarn (pick colors you like)
  • 03
    Small amounts of brown, green, white and accent colors as desired

β€” Tools Required

  • 01
    Crochet hook size 3.0mm (for basket)
  • 02
    Crochet hook size 3.5mm (optional for basket variations)
  • 03
    Crochet hook size 2.0mm (for flowers)
  • 04
    Crochet hook size 2.5mm (optional for flowers)
  • 05
    Stitch markers
  • 06
    Tapestry needle
  • 07
    Scissors
  • 08
    Wire (0.3-0.5mm diameter; to be used as flower stems)
  • 09
    Polyester stuffing

Progress Tracker

0% Complete

β€” Crochet Pattern :

β€” Basket Cover :

Info :

3.0mm hook | #3 yarn

Round 1 :

14 dc in magic loop (14)

Round 2 :

14 dc inc (28)

Round 3 :

14[dc, dc inc] (42)

β€” Basket Lace :

Info :

3.0mm hook | #3 yarn

Row 1 :

45 ch, 44 sc, turn (44)

Row 2 :

11[ch, dc, dc inc, dc, ch, ss] (66)

β€” Basket Body :

Info :

3.0mm hook | #3 yarn

Round 1 :

14 dc in magic loop (14)

Round 2 :

14 dc inc (28)

Round 3 :

14[dc, dc inc] (42)

Round 4 :

42 dc blo (42)

Round 5-8 :

21[dc, dc flo] (42)

Info :

Sew the basket lace on the edge of Round 8 before starting Round 9.

Round 9 :

42 sc (42)

Info :

Crochet the basket cover and the body together while crocheting Round 9, or sew them together after you finish Round 9. Stuff the basket body halfway through sewing.

β€” Basket Handle :

Info :

3.0mm hook | #3 yarn

Row 1 :

32 ch, (put wire on) 31 sc (31)

β€” Mini Leaf :

Info :

2.0mm hook | #2 Green yarn

Round 1 :

7 ch, (put wire on) sc, hdc, 2 dc, hdc, (3 sc), hdc, 2 dc, hdc, sc (13)

β€” Mini Lavender :

Info :

2.0mm hook | #2 yarn

Row 1 :

26 ch, 10[sc, 3 ch, ss-in the 3rd ch], 10[sc, 4 ch, ss-in the 4th ch], 5[sc, 5 ch, ss-in the 5th ch]

Info :

Wrap the fabric around a wire with the right side facing out.

β€” Mini Forget-Me-Not :

Info :

2.0mm hook | #2 yarn

Round 1 :

5[3 ch, dc, 3 ch, ss] in magic loop

Infos :

Make a stamen. 1. Wrap yarn around a wire about 1cm. 2. Bend it into a circle. 3. Insert the wire into the center of the flower. Adjust the position of the stamen as needed.

β€” Mini Sunflower :

Info :

2.0mm hook | #2 yarn

Round 1 :

6 sc in magic loop (6)

Round 2 :

6 inc (12)

Info :

Make one each with brown and green yarn (center and backing).

Round 3 :

11[(3 ch, dc, 3 ch), ss]

Infos :

Make the 2 round pieces' wrong sides facing each other, work into any 2 parallel stitches of them, and crochet Round 3 with yellow yarn. Insert a wire in the center of the flower.

β€” Mini Rose :

Info :

2.0mm hook | #2 yarn

Row 1 :

28 ch, work into the 4th chain-12[(3 dc), ch, sk], (3 dc), turn (51)

Row 2 :

13[ch, dc, dc inc, dc, ch, ss] (78)

Infos :

Roll the fabric into the shape of a rose, and keep it in shape by sewing. Insert a wire in the center of the flower.

β€” Mini Tulip :

Info :

2.0mm hook | #2 yarn

Round 1 :

6 sc in magic loop (6)

Round 2 :

6 inc (12)

Round 3 :

6[sc, inc] (18)

Round 4-8 :

18 sc (18)

Infos :

Leave some yarn and sew a cross on the last round. Insert a wire in the center of the flower.

Assembly Instructions

  • Sew the basket lace on the edge of Round 8 of the basket body before starting Round 9 to secure the decorative edge.
  • Crochet the basket cover and the body together while crocheting Round 9, or sew the cover to the body after finishing Round 9 for a neat seam.
  • Insert wire stems into the centers of flowers (sunflower, rose, tulip, lavender, forget-me-not) and bend or secure excess wire so it won't bother your hands.
  • Stuff the basket body halfway through sewing the cover and body together to maintain shape without overfilling.
  • Arrange and insert the finished flowers into the basket, adjusting stems and positioning to create a balanced arrangement.

Important Notes

  • πŸ’‘Use stitch markers to keep track of the start of rounds, especially when working continuous rounds and small motifs.
  • πŸ’‘When working with wire, put the wire on at the beginning of the round and crochet with the wire for that round, temporarily bending extra wire down to avoid interference.
  • πŸ’‘Stuff gently and gradually; overstuffing can distort the basket shape and make assembly difficult.

This Mini Flower Basket pattern helps you create a tiny, delightful floral arrangement perfect for gifts or decor. The pattern includes individual flower tutorials and a little woven basket with lace and handle for a polished finish. Have fun choosing colors and arranging your bouquet β€” tiny details make a big impact! 🧢🌸

You ask,

we answer.

FAQs

What size will the finished piece be?

The finished basket measures approximately a few inches across (palm-sized) when using the recommended #3 and #2 yarns and the specified hook sizes; exact size will vary with yarn and tension.

Can I use different yarn weights for this pattern?

Yes, you can use different yarn weights, but this will affect the final size; use appropriate hook sizes for your chosen yarn and expect the finished bouquet to be larger or smaller.

Do I need prior crochet experience for this pattern?

This pattern is rated intermediate and assumes you know basic stitches like sc, dc, hdc, working in magic loop, increases and decreases, and how to sew pieces together.

How long does this project typically take to complete?

Most crocheters finish this project in 5-7 hours depending on experience and how many flowers you make; small motifs like lavender and sunflower are quick once you get the rhythm.