🧢 Beautiful ✨ Detailed πŸ’ Adorable

Mini Sunflower Turtle Amigurumi Pattern

Mini Sunflower Turtle Amigurumi Pattern
4.2β˜… Rating
2-3 Hours Time Needed
2.3K Made This
βœ‚οΈ

Intermediate Level

Ideal for those with basic crochet experience, featuring slightly more advanced stitches and techniques to expand your skills.

⏱️

Bite-Sized Project

Finishes in 2-4 hoursβ€”perfect for an afternoon of creative relaxation.

🧸

Cute Companion

An adorable friend to cherish, handcrafted with love to bring comfort and joy for years to come.

About This Mini Sunflower Turtle Amigurumi Pattern

This pattern creates a small sunflower-shelled turtle amigurumi using bulky chenille yarn for a plush texture. You will crochet separate legs, tail, head, and a sunflower-style shell, then assemble the pieces for a finished toy about 6 inches across. The pattern uses US terms and includes photos to guide placement and shaping.

Mini Sunflower Turtle Amigurumi Pattern crochet pattern - detailed view of completed project

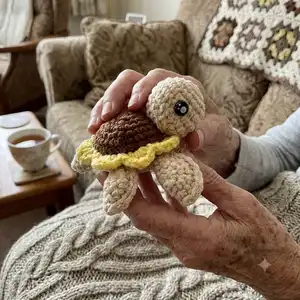
Techniques used include working in magic rings, increases and decreases, folding circles to form half-circle legs, and joining pieces directly into the body. Safety eyes and stuffing are added to finish the character.

Why You'll Love This Mini Sunflower Turtle Amigurumi Pattern

I absolutely love this pattern because the sunflower shell makes a classic turtle shape feel fresh and playful. I enjoy how the bulky chenille yarn gives the turtle a soft, plush look that is irresistible to touch. I also love that the pieces are quick to crochet and can be made in an afternoon, yet the finished toy looks detailed and professional. It is so satisfying to sew the parts together and watch the little turtle come to life.

Mini Sunflower Turtle Amigurumi Pattern step 1 - construction progress Mini Sunflower Turtle Amigurumi Pattern step 2 - assembly progress Mini Sunflower Turtle Amigurumi Pattern step 3 - details and accessories Mini Sunflower Turtle Amigurumi Pattern step 4 - final assembly and finishing

Switch Things Up

I love customizing this pattern with different color combinations; try a pastel sunflower for a softer look or bold orange and brown for a more autumnal turtle.

Want a smaller version? Use a lighter weight yarn and a smaller hook to make a mini keychain version you can carry everywhere.

For a larger, cuddlier turtle, use a bulkier yarn and a larger hook and increase stuffing for a plump finish.

I often add embroidered facial details or a tiny crocheted bow or scarf to give each turtle unique personality.

Swap the safety eyes for embroidered eyes if you need a child-safe toy without hard parts.

Try alternating yarn textures for the shell center and petals to add contrast and tactile interest.

I sometimes add a loop on the shell to turn the turtle into an ornament or bag charm for gifting.

Consider using variegated yarn for the shell center for a mottled effect without changing colors regularly.

If you enjoy sewing, add felt applique shapes to the shell for extra decoration and detail.

I recommend experimenting with eye placement and spacing to change the turtle's expression and character before securing eyes permanently.

Common Mistakes & How to Fix Them

βœ— Not using stitch markers when working with fluffy or chunky yarn can make rounds hard to find; place a stitch marker at the start of every round and after decreases to keep track. βœ— Overstuffing the head or body will distort shaping and make seams hard to close; stuff gradually and check the shape frequently to keep it even and soft. βœ— Forgetting to leave a long tail for sewing on the head can make attachment difficult; leave about a foot of yarn on the head after finishing and use it to sew the head in place securely. βœ— Skipping the instruction to fold the leg circles before crocheting the half circle will produce incorrect leg shape; always SlSt, fold the circle in half, then SC around both layers through both stitches to form the half leg.

Mini Sunflower Turtle Amigurumi Pattern

Make a charming Mini Sunflower Turtle for gifts or home decor with this friendly crochet pattern. You'll enjoy the soft chenille textures and simple assembly while learning a few shaping techniques. The finished turtle is small, cuddly, and full of personality β€” perfect for gifting or displaying on a shelf. Follow the step-by-step rounds and photos to make your own sunflower-shelled turtle.

Intermediate 2-3 Hours

Materials Needed for Mini Sunflower Turtle Amigurumi Pattern

β€” Main Fabric

  • 01
    Size 5 Bulky yarn - Yarn Bee Velvety Smooth - Ivory (used for head, legs, tail and shell trim)
  • 02
    Size 6 Bulky yarn - Premier Just Chenille - Yellow (for sunflower petals)
  • 03
    Size 6 Bulky yarn - Premier Just Chenille - Cocoa (for body/shell center)
  • 04
    General: Size 5 and/or 6 bulky chenille yarn, assorted colors as listed

β€” Tools Required

  • 01
    Crochet hook size 3.5mm (E-5)
  • 02
    Tapestry needle
  • 03
    Scissors
  • 04
    Safety eyes 12mm (2 pieces)
  • 05
    Poly-Fil stuffing
  • 06
    Stitch markers
  • 07
    Pins for assembly (optional)

Progress Tracker

0% Complete

β€” Front Legs :

Info :

Using Ivory Yarn. (Make 2)

Round 1 :

6SC in MR (6)

Round 2 :

Inc (12)

Round 3 :

SC, Inc (18)

Round 4 :

2SC, Inc (24)

Info :

SlSt into next St. Fold your circle in half to make a half circle, SC around the half circle through both stitches.

Info :

SlSt into the last stitch, BO, weave in the yarn tail. You do not need to leave a tail for sewing, it will be single crocheted into the body later.

β€” Back Legs :

Info :

Using Ivory Yarn. (Make 2)

Round 1 :

6SC in MR (6)

Round 2 :

Inc (12)

Round 3 :

SC, Inc (18)

Info :

SlSt into next St. Fold your circle in half to make a half circle, SC around the half circle through both stitches.

Info :

SlSt into the last stitch, BO, weave in the yarn tail. You do not need to leave a tail for sewing, it will be single crocheted into the body later.

β€” Tail :

Info :

Using Ivory Yarn.

Round 1 :

3SC in MR (3)

Round 2 :

Inc (6)

Round 3-4 :

SC (6)

Info :

SlSt into the last stitch, BO, weave in the yarn tail. You do not need to leave a tail for sewing, it will be single crocheted into the body later.

β€” Head :

Info :

Using Ivory Yarn.

Round 1 :

8SC in MR (8)

Round 2 :

Inc (16)

Round 3 :

SC, Inc (24)

Round 4 :

3SC, Inc (30)

Round 5-6 :

SC (30)

Round 7 :

3SC, Dec (24)

Round 8 :

SC, Dec (16)

Round 9 :

SC (16)

Info :

SlSt and leave a pretty long tail for sewing (I leave about a foot of yarn).

Info :

Add Safety Eyes and stuffing. I added my safety eyes between row 4 and 5, about 8 stitches apart.

β€” Body :

Info :

Using Brown Yarn.

Round 1 :

8SC into MR (8)

Round 2 :

Inc (16)

Round 3 :

SC, Inc (24)

Round 4 :

3SC, Inc (30)

Round 5 :

4SC, Inc (36)

Round 6 :

3SC, Inc (45)

Info :

Color change to Yellow yarn using your preferred method.

Round 7 :

Working in FLO (You may want to put stitch markers in the back loops so you can find them in the next round) 5SC, [(SC, TC, TC2*, TC, SC) x 7], 5SC (52) *Triple crochet two times in one stitch.

Info :

Color change to Ivory yarn using your preferred method.

Round 8 :

SC into BLO of R6 where you placed your stitch markers (45)

Round 9 :

This is the row you will crochet the legs and tail into. When attaching, push your hook through the stitch(s) of the leg or tail first, then through the stitch of the body and complete your single crochet.

Round 9 :

5SC

Round 9 :

Grab the first big leg, attach using 3SC (refer to photo for placement, the curve of the leg should be on your right)

Round 9 :

5SC

Round 9 :

Grab the first small leg, attach using 2SC (refer to photo above for placement, the curve of the leg should be on your right)

Round 9 :

6SC

Round 9 :

Grab your tail and attach using 3SC (see photo for placement)

Round 9 :

6SC

Round 9 :

Grab the second small leg, attach using 2SC (refer to photo below for placement, the curve of the leg should be on your left)

Round 9 :

5SC

Round 9 :

Grab the second big leg, attach using 3SC (refer to photo below for placement, the curve of the leg should be on your left)

Round 9 :

5SC (45)

Info :

You are working clockwise in the direction of the red arrow in the left photo above.

Round 10 :

3SC, Dec (36)

Round 11 :

2SC, Dec (27)

Info :

Stuff the body to your desired firmness.

Round 12 :

SC, Dec (18)

Round 13 :

Dec (9)

Info :

Add stuffing again if necessary.

Info :

SlSt, cut yarn leaving a short tail to sew the hole closed. Weave the yarn tail back and forth into the stitches around then pull tight to close. Tie to secure and weave the rest of the yarn tail into the body.

β€” Assembly :

Info :

Sew on the head, placing it between the two front legs. I like to place the head over 3-4 rows of the shell and 1-2 rows of the bottom body. To make it easier and keep placement even, I use long sewing pins to pin it to the body in place.

Assembly Instructions

  • Sew the head onto the body between the two front legs, placing the head over 3-4 rows of the shell and 1-2 rows of the bottom body; use long sewing pins to hold placement even while stitching.
  • Attach each leg and the tail into Round 9 of the body by inserting your hook through the leg or tail stitch first, then through the body stitch and completing a single crochet to secure.
  • Close the body opening after stuffing by SlSting and leaving a short tail, then weave the tail back and forth through surrounding stitches, pull tight to close, tie to secure and weave remaining tail into the body.
  • Place safety eyes between head rows 4 and 5, approximately 8 stitches apart, before stuffing the head and closing; ensure they are securely fastened.

Important Notes

  • πŸ’‘Use stitch markers when working with fluffy or chenille yarn to help you find the start of rounds and marked loops, especially when working FLO or BLO.
  • πŸ’‘Stuff gradually while shaping the head and body to achieve an even firmness and avoid overstuffing which can distort the toy.
  • πŸ’‘Weave in ends and secure yarn tails well after closing to prevent unraveling and ensure a tidy, long-lasting finish.

This adorable Mini Sunflower Turtle is a delightful, pocket-sized amigurumi that brightens any shelf or gift bag. The plush chenille yarn creates a soft, huggable texture and the sunflower shell adds a playful, sunny touch. Perfect for makers who love quick, satisfying projects and sweet, handmade gifts. 🧢🌻😊

You ask,

we answer.

FAQs

What size will the finished piece be?

The finished turtle measures approximately 6 inches long, 6 inches wide, and 2 inches tall when made with the recommended bulky chenille yarn and a 3.5mm (E-5) hook.

Can I use different yarn weights for this pattern?

Yes, you can use different yarn weights, but the final size and texture will change; use an appropriate hook for your chosen yarn and expect differences in finished dimensions and stitch definition.

Do I need prior crochet experience for this pattern?

This pattern is rated intermediate and uses stitches like triple crochet in repeats, folding circles to form legs, and working in FLO/BLO, so basic crochet experience and familiarity with increases and decreases are recommended.

How long does this project typically take to complete?

Most crocheters complete this project in 2-3 hours, though actual time may vary depending on experience, yarn choice, and how much time you spend on assembly and finishing.