🧶 Beautiful ✨ Detailed 💝 Adorable

Mini Pumpkin Man Amigurumi Pattern

Mini Pumpkin Man Amigurumi Pattern
4.8★ Rating
2-4 Hours Time Needed
3.8K Made This
✂️

Intermediate Level

Ideal for those with basic crochet experience, featuring slightly more advanced stitches and techniques to expand your skills.

⏱️

Bite-Sized Project

Finishes in 2-4 hours—perfect for an afternoon of creative relaxation.

🧸

Cute Companion

An adorable friend to cherish, handcrafted with love to bring comfort and joy for years to come.

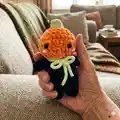
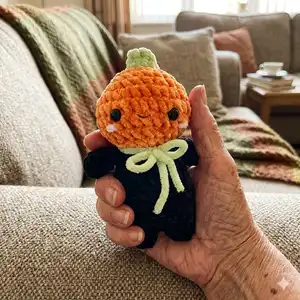
About This Mini Pumpkin Man Amigurumi Pattern

This pattern creates a sweet Mini Pumpkin Man amigurumi using velvet and sport weight yarn for soft texture. You will crochet a pumpkin head with carved dents, a simple body with legs and arms, and a tiny sprout stem. The instructions are worked in continuous rounds and include finishing details for facial features and a bow.

Mini Pumpkin Man Amigurumi Pattern crochet pattern - detailed view of completed project

The pattern uses basic stitches (sc, inc, dec) and clear round-by-round instructions to guide you. Assembly directions explain how to create the pumpkin dents and attach parts for a polished amigurumi finish.

Why You'll Love This Mini Pumpkin Man Amigurumi Pattern

I absolutely love this pattern because it turns simple stitches into a charming seasonal character that is both squishy and expressive. I enjoy how the pumpkin dents technique gives the head real personality with just a bit of yarn manipulation. The project is compact and quick to finish, so I can make multiple versions in different colors for gifts. Sewing the little sprout and adding the tiny bow always feels like the perfect finishing touch that brings the doll to life.

Mini Pumpkin Man Amigurumi Pattern step 1 - construction progress Mini Pumpkin Man Amigurumi Pattern step 2 - assembly progress Mini Pumpkin Man Amigurumi Pattern step 3 - details and accessories Mini Pumpkin Man Amigurumi Pattern step 4 - final assembly and finishing

Switch Things Up

I love how easy it is to customize this pumpkin man by swapping yarn colors; try pastel orange and mint green for a softer look or deep orange and bronze for a rustic vibe.

You can change the size by altering yarn weight and hook size — bulky velvet with a larger hook makes a chunky cuddly friend while thinner yarn with a smaller hook yields a tiny keychain version.

I often switch the safety eye size to change the character’s expression; smaller eyes make a cuter face while larger eyes create more presence.

To make the pumpkin more realistic, I add extra dent lines using sport weight brown yarn and a tapestry needle to emphasize ribs on the pumpkin head.

I sometimes embroider different mouths — a small V, a smile or no mouth — to vary personality across dolls.

For wearable or decorative options I attach a small loop to the top of the stem to hang the pumpkin as an ornament or bag charm.

I like to add a tiny crocheted scarf or bow in contrasting colors to make the pumpkin seasonal or themed for gifts.

If I want posable limbs I thread thin wire inside the arms before folding and sewing, which lets me slightly pose the doll’s arms.

Try mixing yarn textures: a fuzzy mohair for the body with a velvet head gives a playful mixed-fiber effect that photographs beautifully.

I advise experimenting with eye and blush placement before securing; pin parts in place and try different positions until the face appeals to you.

Common Mistakes & How to Fix Them

✗ Skipping the correct starting chain for the head makes shaping incorrect; follow R1 exactly (6ch, begin in 2nd chain from hook, 4sc, inc, 4sc, inc) to ensure the oval head shape. ✗ Placing safety eyes too high or too low will throw off facial balance; insert eyes between R7-R8, five stitches apart on the long side of the R1 oval as instructed. ✗ Not stuffing gradually leads to lumps and collapsing shapes; begin stuffing at the head after placing eyes and stuff legs and body gradually for even filling. ✗ Forgetting to join the second leg properly will leave a gap between legs; when making the second leg do not fasten off and attach it by doing 1 sc on any stitch of leg 1, then sc around both legs. ✗ Pulling the dent threads too tight can distort head shape; when creating dents pull gently and check shape before finishing. ✗ Using a different gauge yarn without adjusting hook will change final size drastically; adjust hook size to match recommended 4.5mm gauge or measure gauge swatch and adapt.

Mini Pumpkin Man Amigurumi Pattern

Make a charming little pumpkin man using soft velvet yarn and simple crochet techniques. This pattern guides you through head shaping, body and limb assembly, and decorative pumpkin dents for a delightful finished toy. Perfect as a seasonal gift or a cute desk companion, with clear rounds and helpful assembly notes to follow.

Intermediate 2-4 Hours

Materials Needed for Mini Pumpkin Man Amigurumi Pattern

— Main Fabric

  • 01
    Velvet yarn in orange (head) - amount as needed for head
  • 02
    Velvet yarn in black (body, arms, legs) - amount as needed for body and limbs
  • 03
    Velvet yarn in light green (stem and neck bow) - small amount
  • 04
    Velvet yarn in light pink (cheeks) - small amount for blush
  • 05
    Recommended: sport weight yarn in black and light brown for dent lines and mouth detailing
  • 06
    Fiber filling for stuffing (polyester stuffing)
  • 07
    8mm safety eyes (2 pieces)

— Tools Required

  • 01
    4.5mm crochet hook or hook matching your yarn’s weight
  • 02
    8mm safety eyes (2 pieces)
  • 03
    Fiber filling (stuffing)
  • 04
    Scissors
  • 05
    Yarn needle for sewing and embroidery
  • 06
    Sport weight yarn for facial details (black, brown)

Progress Tracker

0% Complete

Info :

The size of the hook you should use when crocheting the pumpkin man is 4.5 mm. You will need to use 8 mm safety eyes for the eyes of the toy. Important: the pattern is worked in continuous rounds.

Infos :

Abbreviations - R = row. dec = decrease. ch = chain. MR = magic ring. Sc= single crochet. (x) = number of stitches. sl st = slip stitch. inc = increase.

Infos :

Materials - Velvet yarn in orange, black, light green, light pink (cheeks). 4.5mm crochet hook/hook matching your yarn’s weight. 8mm safety eyes. Recommended: sport weight yarn in black and light brown. Fiber Filling, scissors, yarn needle.

— Head (in orange) :

Round R1 :

6ch, begin in 2nd chain from hook 4sc, inc in last chain, 4sc on the other side of the chain, inc (12)

Round R2 :

(sc, inc) x6 (18)

Round R3 :

(sc, inc, sc) x6 (24)

Round R4 :

sc around (24)

Round R5 :

(2sc, inc, sc) x6 (30)

Round R6 :

(2sc, inc, 2sc) x6 (36)

Round R7 :

sc around (36)

Round R8 :

(2sc, dec, 2sc) x6 (30)

Round R9 :

(2sc, dec, sc) x6 (24)

Info :

Insert eyes between R7-R8, 5 stitches apart, while looking from the top, place them on the long side of the R1 oval. Begin stuffing

Round R10 :

(sc, dec, sc) x6 (18)

Round R11 :

(sc, dec) x6 (12)

Info :

Finish stuffing the head, sl st and fasten off, leave a long tail for sewing.

— Legs- make 2 (in black) + Body :

Round R1 :

6sc in MR (6)

Round R2 :

sc around (6)

Round R3 :

(sc, inc) x3 (9)

Info :

After finishing the first leg, cut off the yarn. When making the second leg, do not fasten off and attach it to the first leg by doing 1 sc on any of the stitches of leg 1.

Round R4 :

counting the previous sc, sc around both legs (18)

Round R5 :

(sc, inc, sc) x6 (24)

Round R6-R7 :

sc around (24 x2)

Round R8 :

(4sc, dec) x4 (20)

Round R9 :

(8sc, dec) x2 (18)

Info :

Stuff the legs and body

Round R10-R11 :

sc around (18 x2)

Round R12 :

(sc, dec) x6 (12)

Info :

Finish stuffing, sl st and fasten off.

— Arms- make 2 (in black) :

Round R1 :

6sc in MR (6)

Round R2-R4 :

sc around (6 x3)

Info :

Do not stuff the arms

Round R5 :

fold the arms in half and 3sc through both sides of the stitches (3)

Info :

Sl st and fasten off. Leave a long tail for sewing.

— Little stem (in light green) :

Round R1 :

6sc in MR (6)

Round R2-R3 :

sc around (6x2)

Info :

Sl st and fasten off. Leave a long tail for sewing.

— Assembly :

Info :

Before sewing the head to the body, make sure to create the dents of the pumpkin as so: first look at your pumpkin man’s head from the top, you should have an oval at the top where R1 is. The face should be located on one of the long sides of the pumpkin. Drag a long piece of orange velvet yarn through the head, and begin making the dents. There should be 5 dents as shown in the diagram. To create the dents in the head, drag the orange velvet yarn from the top to the bottom of the head, alternating between sewing under and above the Rows. When reaching the bottom of the head, make sure to pull on the yarn to form the dent before moving on to the next dent.

Info :

Start sewing the dents from the coloured dots shown in the diagram. The front part should be wider than the rest, about 2 stitches from the eyes to each side.

Info :

After you have finished sewing the head dents, drag brown sporting weight yarn through the head and over each of the dents to create lines. Next, place the head onto the body, make sure to align the eyes to the legs properly, and sew them together with the yarn tail from the head.

Info :

Next, position the arms right under the head and sew the to the last row of the body, on both sides of the body.

Info :

Sew the little sprout right on top of the head, on R1.

Info :

Add a little V shaped mouth to the pumpkin using black sporting weight yarn. Also add two little lines for blush one row under and one stitch to the side of each eye. If you want, you may also give your pumpkin a little bow.

Assembly Instructions

  • Create the pumpkin dents before attaching the head: drag orange velvet yarn from the top to the bottom of the head to make 5 dents, alternating sewing under and above the rows and pulling to form each dent.
  • After denting, drag brown sport weight yarn over each dent to create pumpkin lines, then place the head onto the body and sew using the long tail from the head, aligning the eyes with the legs.
  • Position the arms directly under the head and sew them to the last row of the body on both sides, making sure they are symmetrical.
  • Sew the little green sprout onto R1 at the top center of the head and embroider a small V-shaped mouth with black sport weight yarn; add blush lines below and to the side of each eye.
  • When attaching the second leg, do not fasten off the first: join the second leg by crocheting 1 sc into a stitch of leg 1, then continue around both legs to form the body.
  • Use the remaining tail ends to securely sew parts together and weave in all ends with a yarn needle for a clean finish.

Important Notes

  • 💡The pattern is worked in continuous rounds—do not join unless explicitly instructed to do so.
  • 💡Use 8mm safety eyes and place them between R7-R8 with approximately 5 stitches between them for correct facial placement.
  • 💡Stuff the head, legs and body gradually and evenly to avoid lumps and to maintain shape while you work.
  • 💡Leave long yarn tails when fastening off the head, arms and stem for easier sewing and secure attachment.

This Mini Pumpkin Man is a tiny, heartwarming amigurumi perfect for Halloween or autumn decor. It uses velvet yarn for a cozy, plush feel and simple shaping techniques that yield a lot of personality. Make one as a small gift or a collection of seasonal pals to brighten any shelf. 🎃🧶

You ask,

we answer.

FAQs

What size will the finished piece be?

The finished amigurumi measures approximately 10-15 cm tall depending on yarn thickness and your tension; using the recommended velvet yarn and 4.5 mm hook gives a small palm-sized doll.

Can I use different yarn weights for this pattern?

Yes, you can use different yarn weights but the final size and stitch counts will change; adjust your hook size accordingly and expect a larger or smaller finished doll.

Do I need prior crochet experience for this pattern?

This pattern is rated intermediate because it uses increases, decreases, magic rings and shaping via sewn dents; basic amigurumi experience is recommended for best results.

How long does this project typically take to complete?

Most crocheters complete this project in 2-4 hours, though time may vary based on experience level and the amount of detailing and sewing you choose to do.

Where should I place the safety eyes?

Place the safety eyes between rounds R7 and R8 on the long side of the R1 oval, spaced about 5 stitches apart when viewing the head from the top.