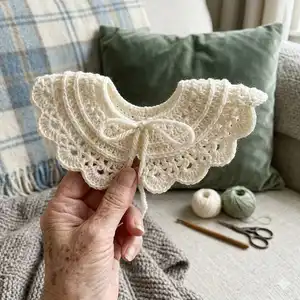
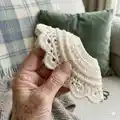
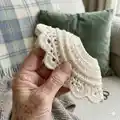
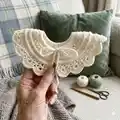
Create a delicate, handcrafted collar to add instant charm to any outfit. This pattern guides you through a beautiful textured collar with V-stitches, crossed double crochets and scalloped clusters. You will get clear step-by-step instructions, size options (S, M, L), and helpful technique photos to support your stitching. Perfect for gifting or adding a vintage-inspired touch to garments.
Progress Tracker
0% Complete
— Materials :
Info :
Yarn, super fine/fingering - For this pattern I have used Rainbow Cotton 8/4 from Hobbii 50g=170m approx. (186 yds) and a 2,5mm hook. Weight: 16g for small, 17g for medium and 18g for large. Hook: EU: 2,5-3,5mm / US C-E/2-4 or whichever one you find suitable for your preferred yarn. Tapestry needle. Scissors.
— Abbreviations :
Info :
S - Stitch. SLST - Slip stitch. CH - Chain. SC - Single crochet. DC - Double crochet. HDC - Half double crochet. SCinc - Increase with 2 sc in the same stitch. HDCinc - Increase with 2 hdc in the same stitch. SK - Skip. Yarn over - Wrap the yarn over your crochet hook. CL - Cluster (8DC in the same stitch). CDC - Crossed double crochet. FPsc - Front post single crochet. Vs - V-stitch. X - Repeat the instructions in parentheses following the single x as directed. () - Work instructions within parentheses as many times as directed.
— Techniques :
Info :
FPsc - Front Post single crochet: insert your hook from front to back to front through the loops of the corresponding stitch below, yarn over and pull through loop, yarn over and pull through the remaining two loops on your hook. CDC - Crossed double crochet: make 1 DC, skip 1 stitch and make 1 DC, then place the second DC in the same stitch as the first DC in the beginning of the round to create the crossed effect. Vs - V-stitch: Skip 2 stitches and make 1 DC, chain 2 and make 1 DC in the same stitch as your first DC in the Vs.
— Collar :
Round S-1 :
CH 55 - Turn. Start by making a long chain. CH55, when done turn. (55)
Round M-1 :
CH 61 - Turn. (61)
Round L-1 :
CH 67 - Turn. (67)
Round S-2 :
Sk ch1, 2SC, (1 SCinc, 3sc) x 6, 2 SC, (3SC, 1 SCinc) x 6, 2SC, 3 ch - Turn. Skip the first stitch on the chain and start with 2 single crochet. Repeat 6 times: 1 single crochet increase, 3 single crochet. Make 2 single crochet and repeat 6 times: 3 single crochet, 1 single crochet increase. Finish this round by making 2 single crochet and chain 3 - Turn. (66)
Round M-2 :
Sk ch1, 4 SC (1 SCinc, 3sc) x 6, 4 SC, (3 SC, 1 SCinc)x6, 4 SC, 3 ch - Turn. (72)
Round L-2 :
Sk ch1, (4 sc, 1 SCinc) x 6, 6 SC (1 SCinc, 4SC) x 6, 3 ch - Turn. (78)
Round S-3 :
1 DC, 32 CDC, 1 DC, 2 CH - Turn. Start with 1 double crochet in the next stitch, skip 1 and make a double crochet. Skip the same stitch again and make a new double crochet in the same stitch as your first double crochet. That's your first crossed double crochet. Make 31 more so you have 32 in total. Finish with 1 double crochet in the last stitch on the row. Chain 2 - Turn. (66)
Round M-3 :
1 DC, 35 CDC, 1 DC, 2 CH - Turn. (72)
Round L-3 :
1 DC, 38 CDC, 1 DC, 2 CH - Turn. (78)
Round S-4 :
(3 HDC, 1 HDCinc) x 8, 2 HDC (1 HDCinc, 3 HDC) x 8, 1 ch - Turn. Repeat 8 times: 3 half double crochet, 1 half double crochet increase. Make two more half double crochet and repeat 8 times: 1 half double crochet increase, 3 half double crochet. Chain 1 - Turn. (82)
Round M-4 :
(3 HDC, 1 HDCinc) x 8, 8 HDC (1 HDCinc, 3 HDC) x 8, 1 ch - Turn. (88)
Round L-4 :
4 HDC (3 HDC, 1 HDCinc) x 8, 6 HDC (1 HDCinc, 3 HDC) x 8, 4 HDC, 1 ch, Turn. (94)
Round S-5 :
81 FPsc, 2 ch - Turn. Insert your hook in the first stitch on the row, go around the post and to the front side again, yarn over and pull through the post, yarn over and pull through the two loops on your hook. This is your first front post single crochet. Make 80 more so you have 81 in total. Chain 2 - Turn. (81)
Round M-5 :
87 FPsc, 2 ch - Turn. (87)
Round L-5 :
93 FPsc, 2 ch - Turn. (93)
Round S-6 :
3 HDC (2 HDC, 1 HDCinc) x 11, 6 HDC, (1 HDCinc, 2 HDC) x 12, 3 HDC, ch 1 - Turn. Start with 3 half double crochet. Repeat 11 times: 2 half double crochet and 1 half double crochet increase. Make 6 double crochet. Repeat 12 times: 1 half double crochet increase 2 half double crochet. Make 3 half double crochet, chain 1 - Turn. (104)
Round M-6 :
4 HDC, (2 HDC, 1 HDCinc) x 11, 10 HDC, (1 HDCinc, 2 HDC) x 12, 4 HDC, ch 1 - Turn. (110)
Round L-6 :
2 HDC, 1 HDCinc, (3 HDC, 1 HDCinc) x 22, 2 HDC, ch 1 - Turn. (116)
Round S-7 :
103 FPsc, ch 3 - Turn. Insert your hook in the first stitch on the row, go around the post and to the front side again, yarn over and pull through the post, yarn over and pull through the two loops on your hook. This is your first front post single crochet. Make 102 more so you have 103 in total. Chain 3 - Turn. (103)
Round M-7 :
109 FPsc, ch 3 - Turn. (109)
Round L-7 :
115 FPsc, ch 3 - Turn. (115)
Round S-8 :
1 DC, sk2, 33 VS, sk1, 2 DC, ch 3 - turn. Start by making a double crochet in the first stitch. Skip 2 stitches and make a double crochet, chain 2 and make another double crochet in the same stitch. You have now made your first V-stitch. Skip 2 and continue with 32 more V-stitches, 33 in total. Finish this round by skipping 1 stitch and make 2 double crochet. Chain 3 - Turn. (69)
Round M-8 :
1 DC, sk2, 35 VS, sk1, 2 DC, ch 3 - turn. (73)
Round L-8 :
1 DC, sk2, 37 VS, sk1, 2 DC, ch 3 - turn. (77)
Round S-9 :
2 DC, sk 1 VS, 33 VS, 2 DC, ch 1 - turn. Start with 2 double crochet. Skip 1 V-stitch from the previous round and crochet a new V-stitch in the space between the two V stitches from the previous round. Continue to crochet V-stitches in all "Upside down Vs" You should make 33 in total. When done with your last V-stitch, make 1 double crochet in the last stitch on the round and one more in the turning chain from previous round. Chain 1 and turn. (33VS+4DC)
Round M-9 :
2 DC, sk 1 VS, 35 VS, 2 DC, ch 1 - turn. (35VS+4DC)
Round L-9 :
2 DC, sk 1 VS, 37 VS, 2 DC, ch 1 - turn. (37VS+4DC)
Round S-10 :
Sk3 (1 CL with 8 DC in VS, 1 SC in VS) x16. 1 CL in next VS, sk 2, 1 SC in last ST, 1 CH - don't turn. Skip your first 3 stitches and make a cluster with 8 double crochet in the next V-stitch on the row. Attach the cluster with 1 single crochet in the next V-stitch on the row. Continue crocheting like this. Make 16 clusters. When making your last one, attach the cluster in the last stitch on the row. You should have 17 clusters in total. Chain 1 - do not turn, do not cut the yarn. (17CL+17SC)
Round M-10 :
Sk3 (1 CL with 8 DC in VS, 1 SC in VS) x17. 1 CL in next VS, sk2, 1 SC in last ST, 1 CH - Don't turn, don't cut yarn. (18CL+18SC)
Round L-10 :
Sk3 (1 CL with 8 DC in VS, 1 SC in VS) x18. 1 CL in next VS, sk2, 1 SC in last ST, 1 CH - Don't turn, don't cut yarn. (19CL+19SC)
Round 11 :
All sizes: Continue crocheting along the side of the collar. Make 13 single crochets. Continue crocheting along the side of the collar making 13 SC to form the side edge.
Round 12 :
All sizes: When reaching the beginning of the neck opening, chain 61, turn and skip 1 st, make 60 slip stitches along the chain. Create the chain for the neck opening: ch 61, turn, skip first chain and work 60 slip stitches back along the chain to form the inner neck edge.
Round S-13 :
Continue with 54 SC around the neck opening. (1 SC for each chain st)
Round M-13 :
Continue with 60 SC around the neck opening. (1 SC for each chain st)
Round L-13 :
Continue with 66 SC around the neck opening. (1 SC for each chain st)
Round 14 :
All sizes: When reaching the end of the neck opening, chain 61, turn and skip ch 1, make 60 Slip stitches along the chain. (This joins the inner neck edge on the other side.)
Round 15 :
All sizes: Continue crocheting along the side of the collar. Make 13 single crochets and 1 slip stitch in the first DC on the cluster. Cut the yarn but leave approx. 15 cm for sewing. Secure edge by working 13 SC along the side and close with a slip stitch into the first DC of the cluster; leave a tail for sewing.
Round 16 :
All sizes: Weave in all the loose ends in the back of the collars front stitches. Finish by weaving in ends neatly in the back of the front stitches and block lightly if desired.
Info :
Measurements: Size S - up to 12 months, Neck circumference 24 cm. Finished widths and inner diameters vary by size: S overall width approx 19 cm, inner opening 6 cm, outer height 13 cm. Size M neck circumference 27 cm, outer height 14 cm. Size L neck circumference 30 cm, outer height 15 cm. Good to know: The size of the collar may vary depending on the yarn you use. Each "turn CH" and chains made in the actual pattern is not counted in the stitch count. No stitches are made in the first CH (turning chain) of every row. Make sure you have the correct number of stitches once you finish every row. The number within () after every row shows how many stitches each row is supposed to have excluded the turning CH and chains made in the actual pattern.
You are now done with your Lovely Collar — a sweet handcrafted finish that adds a touch of vintage charm to any outfit. Thank you for making something special with this pattern, I hope it brings joy and many compliments. Happy stitching and enjoy styling your new collar! 🧶✨