🧢 Beautiful ✨ Detailed πŸ’ Adorable

Lily Bunny Amigurumi Pattern

Lily Bunny Amigurumi Pattern
4.8β˜… Rating
5-7 Hours Time Needed
2.1K Made This
βœ‚οΈ

Intermediate Level

Ideal for those with basic crochet experience, featuring slightly more advanced stitches and techniques to expand your skills.

⏱️

Weekend Treat

Takes 5-7 hours, making it an enjoyable project to finish over a couple of days.

🧸

Cute Companion

An adorable friend to cherish, handcrafted with love to bring comfort and joy for years to come.

About This Lily Bunny Amigurumi Pattern

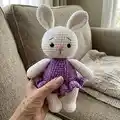
This pattern guides you through making Lily Bunny, a charming amigurumi bunny with a ruffled skirt and embroidered face. The design uses chenille sport yarn for a plush, velvety finish and includes step-by-step rounds for each body part. You will learn how to shape limbs, assemble parts, and add finishing touches like head sculpting and embroidery.

Lily Bunny Amigurumi Pattern crochet pattern - detailed view of completed project

Clear US-terminology instructions are provided and the finished toy measures around 35 cm using the recommended materials. The pattern is rated easy-to-medium and great for crocheters looking to expand their amigurumi skills.

Why You'll Love This Lily Bunny Amigurumi Pattern

I absolutely love this pattern because the plush chenille yarn gives Lily Bunny the softest, most huggable finish. I enjoy how the simple shaping creates a charming, expressive face that feels unique with minimal embroidery. The dress and ruffle add a playful detail that makes every bunny feel special and gift-ready. I also appreciate that the pattern is modular β€” you can easily adapt yarn colors and embellishments to personalize each bunny.

Lily Bunny Amigurumi Pattern step 1 - construction progress Lily Bunny Amigurumi Pattern step 2 - assembly progress Lily Bunny Amigurumi Pattern step 3 - details and accessories Lily Bunny Amigurumi Pattern step 4 - final assembly and finishing

Switch Things Up

I love how easily you can customize Lily Bunny by swapping yarn colors; try pastel shades for a nursery-friendly version or bold jewel tones for a playful look.

You can change yarn weight and hook size to make different sizes β€” use thicker chenille and a larger hook for an extra cuddly oversized bunny.

I often experiment with textured yarns or add a second-color dress to give the bunny a wardrobe of looks that delight kids and adults alike.

Try embroidering different facial expressions: move the eyes slightly closer for a sleepy look or change the mouth embroidery for a smiling personality.

For a more durable toy, consider using embroidery for eyes instead of safety eyes or insert felt pieces for appliqued details.

I like adding tiny accessories like a crocheted bow, scarf, or mini bag to personalize each bunny for gifts and occasions.

If you want a poseable bunny, add a light gauge wire inside the arms or legs before stuffing to allow gentle posing.

Make a themed set by creating bunnies in coordinated outfits β€” matching scarves, hats, or seasonal costumes are quick add-ons.

Swap the ruffled skirt for a simple pullover dress or tiny pants if you prefer less frill and a cleaner silhouette.

Use contrasting yarn for ear linings or inner limbs to add subtle detail; I sometimes crochet the inner ear in a soft pink to accent the face.

Common Mistakes & How to Fix Them

βœ— Skipping stitch markers when joining legs to the body can cause misalignment; place and check your marker when joining the legs to keep round counts accurate. βœ— Not stuffing as you go leads to lumps or overstuffed sections; stuff gradually and evenly, especially the neck and head areas for smooth shaping. βœ— Forgetting to change to front or back loops only will alter the skirt attachment; follow the 'back loops only' instruction on round 8 to attach the skirt correctly. βœ— Cutting yarn too early on the right leg will prevent joining to the body; keep the right leg yarn uncut when instructed to continue with the body join. βœ— Missing placement of safety eyes will give the face wrong proportions; insert safety eyes between rounds 8 and 9 with 8 stitches between them as described.

Lily Bunny Amigurumi Pattern

Create a sweet Lily Bunny amigurumi with this complete crochet pattern. You will find detailed step-by-step rounds, materials, and assembly tips so you can make a plush bunny about 35 cm tall. The pattern uses soft chenille yarn and simple shaping to produce a cuddly toy you will love to gift or display. Follow the instructions closely for best results and enjoy the process of crafting your new handmade friend.

Intermediate 5-7 Hours

Materials Needed for Lily Bunny Amigurumi Pattern

β€” Main Fabric

  • 01
    Sport yarn - White (Chenille 01) - approximately enough for body and details (about 150-200g)
  • 02
    Sport yarn - Purple (Chenille 13) - approximately 50-100g for dress and ruffle
  • 03
    Brown thread - for embroidering eyebrows and muzzle - small amount
  • 04
    Pink thread - for embroidering the nose - small amount
  • 05
    White thread - for head sculpting - small length
  • 06
    Safety eyes 14 mm (2 pieces)
  • 07
    Polyester stuffing (polyester fiber fill) - enough to stuff head, body, arms, and legs

β€” Tools Required

  • 01
    Crochet hook 5 mm
  • 02
    Safety eyes 14 mm (2 pieces)
  • 03
    Stuffing (Polyester fiber fill)
  • 04
    Scissors
  • 05
    Yarn needle for sewing and weaving ends
  • 06
    Stitch markers
  • 07
    Embroidery thread (brown, pink, white) for facial details
  • 08
    Pins for assembly (optional)

Progress Tracker

0% Complete

β€” Arms :

Info :

CCrochet with white yarn. Stuff only 2/3 of the arm.

Round 1 :

6 sc into a magic ring (6)

Round 2 :

6 inc (12)

Round 3 :

(3 sc, inc) * 3 (15)

Round 4-5 :

15 sc (2 rounds)

Round 6 :

(3 sc , dec ) * 3 ( 12 )

Round 7-14 :

8 sc ( 8 rounds )

Round 15 :

( 4 sc , dec ) * 2 ( 10 )

Round 16 :

10 sc

Info :

Fold the arm in half and crochet 5 sc through both sides. Fasten off and cut the yarn, leaving a tail for sewing. Sew the arms two rounds under the beginning of the head.

β€” Legs :

Info :

Crochet with white yarn. Stuff as you go.

Round 1 :

7 sc into a magic ring (7)

Round 2 :

7 inc (14)

Round 3 :

(sc, inc) * 7 (21)

Round 4-5 :

21 sc (2 rounds)

Round 6 :

7 sc, 4 dec, 6 sc (17)

Round 7 :

7 sc, 2 dec, 6 sc (15)

Round 8-10 :

15 sc (3 rounds)

Round 11 :

(4 sc, inc) * 3 (18)

Round 12 :

18 sc

Round 13 :

For the left leg: crochet only 14 sc Fasten off, cut the yarn.

Round 13 :

For the right leg: 18 sc Don't cut the yarn, we will continue with the body:

β€” Body :

Round 1 :

Crochet 7 sc on the right leg; make 3 chains; 18 sc on the left leg; 3 sc on the chain; 18 sc on the right leg ; 3 sc on the chain; put the marker here ( 42 )

Round 2 :

(6 sc, inc ) * 6 ( 48 )

Round 3-6 :

48 sc (4 rounds). Change the yarn to pink color:

Round 7 :

48 sc

Round 8 :

back loops only: 48 sc

Round 9 :

( 6 sc, dec ) * 6 ( 42 )

Round 10-11 :

42 sc ( 2 rounds )

Round 12 :

( 5 sc, dec ) * 6 ( 36 ).

Round 13-14 :

36 sc ( 2 rounds )

Round 15 :

( 4 sc, dec ) * 6 ( 30 )

Round 16-17 :

30 sc ( 2 rounds )

Round 18 :

( 3 sc, dec ) * 6 ( 24 ).

Round 19 :

24 sc

Round 20 :

( 6 sc, dec ) * 3 ( 21 )

Info :

Stuff the body firmly, especially in the neck. Cut the pink yarn, we will continue with the head, but first, we need to make the dress.

β€” Skirt :

Info :

Attach the pink yarn to the back of the body in the front loops of round 8. Crochet with the body turned upside down:

Round 1 :

( 2 dc in one stitch ) * 48 ( 96 )

Round 2 :

96 dc Fasten off, and cut the yarn. Hide the thread inside the body.

β€” Head :

Info :

Change the yarn to white color. Stuff as you go.

Round 1 :

21 sc

Round 2 :

21 inc ( 42 )

Round 3 :

( 6 sc, inc ) * 6 ( 48 )

Round 4 :

( 7 sc, inc ) * 6 ( 54 )

Round 5-9 :

54 sc ( 5 rounds ) Insert the safety eyes between rounds 8 and 9 with 8 st between them.

Round 10 :

( 7 sc, dec ) * 6 ( 48 )

Round 11-13 :

48 sc ( 3 rounds )

Round 14 :

( 6 sc, dec ) * 6 ( 42 )

Round 15 :

42 Sc

Round 16 :

( 5 sc, dec ) * 6 ( 36 ) ( 30 )

Round 17 :

( 4 sc, dec ) * 6

Round 18 :

( 3 sc, dec ) * 6 ( 24 )

Round 19 :

24 sc

Round 20 :

( 2 sc, dec ) * 6 ( 18 )

Round 21 :

6 Dec ( 6 ) Make sure that the head is stuffed firmly. Close the opening and hide the yarn inside. Head sculpting

β€” Ears :

Info :

Crochet with white yarn .

Round 1 :

6 sc into a magic ring ( 6 )

Round 2 :

6 inc ( 12 )

Round 3 :

( sc , inc ) * 6 ( 18 )

Round 4 :

( 2 sc , inc ) * 6 ( 24 )

Round 5-6 :

24 sc ( 2 rounds )

Round 7 :

( 6 sc , dec ) * 3 ( 21 )

Round 8 :

( 5 sc , dec ) * 3 ( 18 )

Round 9 :

( 4 sc , dec ) * 3 ( 15 )

Round 10-12 :

15 sc ( 3 rounds ) Fasten off and cut the yarn , leaving a tail for sewing. Fold the ear in half and sew the ends together. Sew the ears on the top of the head with 4 stitches between them.

Assembly Instructions

  • Sew the arms two rounds under the beginning of the head, matching the placement on both sides for symmetry.
  • Attach the left and right legs to the body when joining rounds as instructed; keep the right leg yarn uncut to continue joining to the body, and fasten off the left leg as directed.
  • Insert safety eyes between rounds 8 and 9 of the head with 8 stitches between them before stuffing further.
  • Fold each ear in half and sew the ends together; sew the ears on top of the head with 4 stitches between them.
  • Attach skirt by securing yarn into the front loops of body round 8, work ruffle rounds with the body turned upside down, then hide thread inside the body.

Important Notes

  • πŸ’‘Use stitch markers to mark the beginning of rounds and the join between legs and body to avoid miscounting.
  • πŸ’‘Stuff firmly but evenly, especially in the neck and head; under-stuffed necks will distort the head placement.
  • πŸ’‘Insert safety eyes before final stuffing and closing the head to ensure correct placement and secure fastening.
  • πŸ’‘Keep the right leg yarn uncut when instructed so you can join it seamlessly to the body when forming the torso.

This Lily Bunny pattern is a delightful mix of plush chenille texture and sweet details that make a perfect handmade gift. The completed bunny measures around 35 cm with the recommended yarn and hook, and the ruffled skirt adds a playful flourish to her look. Enjoy creating a cozy companion to treasure or give away β€” happy crocheting! 🧢🧸

You ask,

we answer.

FAQs

What size will the finished piece be?

The finished amigurumi measures approximately 35 cm tall when using the recommended sport chenille yarn and a 5 mm hook.

Can I use different yarn weights for this pattern?

Yes, you can use different yarn weights but it will change the final size; choose an appropriate hook for your yarn and expect the toy to be larger or smaller.

Do I need prior crochet experience for this pattern?

This pattern is rated intermediate (easy-to-medium); you should be comfortable with single crochet, increases, decreases, and basic assembly.

How long does this project typically take to complete?

Most crocheters complete this project in 5-7 hours, though time will vary based on experience and how much detail you add.