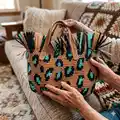
🧢 Beautiful ✨ Detailed πŸ’ Adorable

Leopard tote Pattern

Leopard tote Pattern
4.4β˜… Rating
8-10 Hours Time Needed
2.0K Made This
βœ‚οΈ

Intermediate Level

Ideal for those with basic crochet experience, featuring slightly more advanced stitches and techniques to expand your skills.

⏱️

All-Day Adventure

Requires 8-10 hours, ideal for a full day of immersive crocheting.

✨

Stylish Touch

An elegant detail to elevate any look, combining traditional techniques with contemporary design sensibilities.

About This Leopard tote Pattern

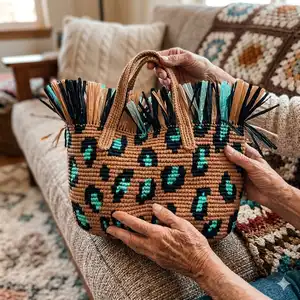
This pattern teaches you how to crochet a leopard-print raffia tote with a leather bottom and felt lining. It uses raffia yarn worked in jacquard to create a bold print, then finishes with a stitched-on fringe and handles. Clear step-by-step instructions and photos guide you through base attachment, crocheting the canvas, fringe, handles and lining.

Leopard tote Pattern crochet pattern - detailed view of completed project

Includes materials list, recommended tools and tips for working with raffia yarn. Suitable for crafters who already know single crochet and basic color changes.

Why You'll Love This Leopard tote Pattern

I absolutely love this pattern because it combines texture, colorwork and practical construction into a statement accessory I use every day. The jacquard leopard print is so striking and fun to crochet, and adding the fringe gives the bag a playful, designer look. I enjoy working with raffia for its sculptural quality β€” it holds shape beautifully after steaming. Sewing on the leather bottom and lining transforms a crochet piece into a durable, everyday tote that looks professionally finished.

Leopard tote Pattern step 1 - construction progress Leopard tote Pattern step 2 - assembly progress Leopard tote Pattern step 3 - details and accessories Leopard tote Pattern step 4 - final assembly and finishing

Switch Things Up

I love how easily you can customize this tote by changing colors: swap the leopard colors for monochrome tones or bright neons to create different looks.

You can make the bag larger or smaller by adjusting the number of rows; add more rows to the body for a deeper tote or remove rows for a compact clutch.

If you want a more structured bag, use thicker felt for the lining or add a leather or plastic insert inside the base for extra rigidity.

Experiment with different fringe lengths and color arrangements β€” longer fringe gives boho drama while short fringe is more subtle and modern.

Try using flat cotton ribbon instead of raffia for a softer, washable version of the bag; choose a slightly larger hook to keep a looser fabric.

I often add decorative hardware like studs or a zipper at the top for extra security and style; mark positions carefully before attaching.

For a polished professional finish, stitch the lining by machine before inserting, or have the lining sewn at an atelier if you prefer.

You can also change handles: use wooden or metal handles for a different vibe or make a long crossbody strap from the same raffia for versatility.

Try alternating jacquard patterns: create stripes, geometric shapes or floral motifs instead of leopard spots for a completely new design.

Finally, personalize with embroidery or a small sewn-on patch to create a signature look β€” I like to add a small interior pocket for keys or phone.

Common Mistakes & How to Fix Them

βœ— Not straightening raffia before use causes uneven stitches and tangles; straighten or steam your raffia skeins before crocheting to create a smooth, consistent strand. βœ— Pulling jacquard floats too tight will distort the canvas and shrink the pattern; leave gentle slack for floats and avoid tugging threads tightly inside the work. βœ— Forgetting to count loops around the leather bottom leads to mismatched edges; follow the base trim instructions carefully and confirm you have 160 loops before continuing. βœ— Skipping steam shaping will let the bag sag and lose definition; steam the base after 10-12 rows and steam the fringe, shaping it by hand as instructed. βœ— Not securing joined raffia ends properly causes unraveling later; join new skeins with a 5 mm overlap, glue with PVA and wrap after drying to make the join secure.

Leopard tote Pattern

Create a stylish leopard-print raffia tote with this detailed crochet pattern. You will build a sturdy base, crochet the canvas with jacquard leopard spots, add a fringe and sew on a leather bottom and lining. The pattern includes step-by-step photos and clear instructions so you can finish a beautiful handmade bag you'll be proud to carry.

Intermediate 8-10 Hours

Materials Needed for Leopard tote Pattern

β€” Main Fabric

  • 01
    Raffia yarn in 3 colors, 225 yards (200 m) each (example: Ispie raffia) - Colors used: Autumn (main), Black, Salt Lake (green)
  • 02
    Leather bottom 12 x 4 inches (30 x 10 cm) with 60 holes
  • 03
    Sewing handles 75 x 1.5 cm (pair)
  • 04
    Felt for the lining, 2 mm thick (cut to bottom shape and a strip 9 inches x 36 inches (23 x 90 cm))
  • 05
    Fringe: cut approximately 160 pieces 8 inches (20 cm) long (approx. 80 main / 60 green / 20 black)

β€” Tools Required

  • 01
    Crochet hook size 3 mm
  • 02
    Optional crochet hook 4-4.5 mm for edging
  • 03
    Plastic needle with large eyelet
  • 04
    Sewing needle and sewing thread
  • 05
    Pins
  • 06
    Stitch markers (2 or more)
  • 07
    Scissors
  • 08
    PVA glue
  • 09
    Iron for steaming and shaping
  • 10
    Measuring tape or ruler

Progress Tracker

0% Complete

β€” Recommendations for working with raffia yarn :

Info :

1.Before crocheting with raffia, it must be straightened. If you have Fibranatura, then you need to Β«fluffΒ» the yarn with your hands. If you have Ispie, you can steam yarn with an iron.

Info :

2.When the thread runs out, you need to take a new skein and straighten the end of the thread. Put on the end of the working thread and the thread from a new skein with a clearance of 5 mm. Glue together with PVA glue. After drying, lightly wrap the thread.

Info :

3.If you had to rip out your work, steam thread with an iron. The yarn will return to its original shape.

β€” Base Trim of the Bottom :

Info :

Leave the end about 8 inches (20 cm) long to close the rows of the base trim.

Info :

Crochet around the bottom edge as shown in the picture.

Row 1 :

Insert the hook in the side hole in the middle, pull the loop.

Row 2 :

Make CH, crochet 2 SC in the same hole.

Row 3 :

Next crochet 3 SC in each hole along the side part.

Row 4 :

Crochet 3 SC in 1 in the corner.

Row 5 :

Crochet 3 SC in 1, 2 SC in 1 along the long side of the bottom, repeat to the corner.

Row 6 :

Crochet 3 SC in 1 in the 2nd corner.

Row 7 :

Crochet 3 SC in each hole along the 2nd side part.

Row 8 :

Crochet 3 SC in 1 in the 3rd corner.

Row 9 :

Crochet 3 SC in 1, 2 SC in 1 along the 2nd long side of the bottom, repeat to the corner.

Row 10 :

Crochet 3 SC in 1 in the 4th corner.

Row 11 :

Crochet 3 SC in 1 in the hole, which are left on the 1st side part.

Row 12 :

Crochet the last SC with the end. Pull out the end. Pull the end under the 1st loop of the row. Pull back to the wrong side.

Info :

There are 160 loops now.

Row 13 :

Pull the working loop, crochet SlSt in each hole.

Row 14 :

Crochet the last SlSt with the end. Pull out the end. Pull the end under the 1st loop of the row. Pull back to the wrong side.

Row 15 :

Cut the thread, tie the knot. Hide the ends.

β€” Crochet the Base Part :

Row 1 :

1 row. Take 3 skeins of the raffia yarn. Place it so that the thread unwinds counterclockwise.

Row 2 :

Take the thread of the base color. Insert the hook in the middle loop on the side part of the bottom on the back loop and the jumper only.

Row 3 :

Pull the loop. Take 2 more thread of 2 different colors, put on along the row, crochet CH.

Row 4 :

Crochet row with SC on the back loop and the jumper only. Crochet the leopard print following to the pattern provided in the attachment.

Info :

Pattern consists of 80 loops, that is, we crochet 2 halves with the same pattern (=160).

Info :

Place the markers in the 1st loops of the halves of the row.

Info :

Always pull the working loop to the level of the hook by 15-17 mm to make the canvas even and tight. After crocheting, pull the loop back.

Row 5 :

Crochet the last SC in the 1st loop of the row.

Info :

Next crochet a spiral.

Row 6 :

2 row. Crochet 80+80 SC following to the pattern (=160).

Row 7 :

3 row. Crochet 80+80 SC following to the pattern (=160).

Row 8 :

4 row. Crochet 80+80 SC following to the pattern (=160).

Info :

Now hide the ends at the beginning of crocheting, and cut off the excess.

Row 9 :

5 row. Crochet 80+80 SC following to the pattern (=160).

Rows 10-34 :

6-30 rows. Crochet 80+80 SC following to the pattern (=160).

Info :

Steam the base of the bag with an iron after crocheting 10-12 rows.

Info :

You can crochet more rows in height following to the pattern as desired.

Row 35 :

In the last row, before 2 SC to the marker, cut off additional threads, leaving only the main thread. Crochet 2 SC with a gradual decrease in the height of the SC.

Info :

Remove the markers.

β€” Base Trim :

Row 1 :

Crochet SlSt in each SC of the last row. Pull the loop by 4-5 mm, so as not to tighten the edge. You can take a 4-4.5 mm hook.

Row 2 :

Cut the thread, pull out the end. Pull the end under the 1st SlSt of the row. Pull back to the wrong side. Strengthen and hide the end on the wrong side. Steam the base of the bag with an iron.

β€” Fringe :

Info :

Cut 160 pieces of fringe 8 inches (20 cm) long, of the main, green and black colors (approximately 80/ 60/ 20, respectively).

Row 1 :

Insert the hook from the wrong side under the braid and the loop of the base trim, grab the middle of the fringe, pull it out and pull the ends in the loop. Tighten the loop.

Row 2 :

Make the fringe in each loop of the edge (160 pieces). Choose the color of the fringe, which is the color of the braid of the last row.

Row 3 :

Steam the fringe with an iron, shape with hands. Cut off the excess.

β€” Sew on the Handles :

Step 1 :

Count 6 holes from the corners of the bottom. Put markers on the edge of the bag opposite the sixth holes.

Step 2 :

Put the handles near the markers.

Step 3 :

Sew on the handles with the plastic needle. Make a few stitches.

Step 4 :

Tie the knot and hide the ends. You can fix it with PVA glue.

β€” Lining :

Step 1 :

Take felt 2 mm thick for the lining. Cut the bottom according to the shape and size of the leather bottom without seam allowances. Make 4 notches on the bottom.

Step 2 :

Measure the perimeter of the edge of the bag (in my example, 36 inches (90 cm)).

Step 3 :

Measure the height of the bag (in my example, 9 inches (23 cm)).

Step 4 :

Cut a stripe from felt 9 inches (23 cm) high and 36 inches (90 cm) long.

Step 5 :

Sweep the stripe in a circle along the side seam.

Step 6 :

Make 4 notches.

Step 7 :

Match the notches of the bottom and the stripe, pin with a pins.

Step 8 :

Sweep both parts.

Step 9 :

Make 10 mm tucks at the corners.

Step 10 :

Sew the lining.

Info :

At this stage, you can give it to the atelier.

β€” Sew in the Lining :

Step 1 :

Put in the lining in the bag. Pin with a pins.

Step 2 :

Sew neat stitches through one SC. Make a several fixing stitches along the seam. Strengthen and hide the end of the thread.

β€” Final :

Info :

Congratulations! Your cute tote with trends print is ready.

Info :

I hope you enjoy this pattern, and if you have questions about it, please convo me. I am always glad to help!!!

Assembly Instructions

  • Attach the leather bottom to the crochet base by inserting the hook through the center side hole, crochet around the bottom following the base trim instructions until you have 160 loops and secure the end as described.
  • Crochet the body in the round using 3 strands of raffia (base color + two accents), follow the 80+80 loop pattern for jacquard leopard spots and place markers at the first loop of each half for alignment.
  • Add the fringe by inserting the hook from the wrong side under the braid and base trim loop, pull the middle of each 8-inch fringe piece through and tighten; repeat in every edge loop (160 pieces) and steam to shape.
  • Position and sew the leather handles: count six holes from each corner, mark opposite edges, place handles at markers and sew through the crochet canvas with the plastic needle, secure with a few stitches and hide ends.
  • Cut and sew the felt lining: cut the bottom to the leather shape, cut a felt strip for the side (e.g. 9 x 36 inches), match notches, sew, tuck corners and then pin and stitch the lining neatly inside the bag through one SC.

Important Notes

  • πŸ’‘Use stitch markers to mark the first loop of each half and key points so your jacquard pattern aligns correctly.
  • πŸ’‘Always pull the working loop to the level of the hook by 15-17 mm while crocheting raffia to keep the canvas even and tight, then pull back after each stitch.
  • πŸ’‘When joining a new raffia skein, leave a 5 mm overlap, glue with PVA, and wrap after drying to create a durable join.
  • πŸ’‘Steam-shape the bag base and fringe with an iron to give the raffia structure and a professional finish.
  • πŸ’‘Do not pull jacquard floats tightly inside the work to avoid tightening and warping the canvas.

This leopard tote pattern brings bold print and texture together in a stylish handmade bag you'll love to carry. The raffia canvas, leather bottom and shaped fringe make a unique, eye-catching accessory that stands out. Finish with a felt lining for durability and a polished interior. πŸ§Άβœ¨πŸ‘œ

You ask,

we answer.

FAQs

What size will the finished bag be?

The finished bag measures approximately 18 inches (45 cm) length and about 9 1/2 inches (24 cm) height without the fringe using the specified materials.

Can I use a different yarn or hook size?

You can substitute a similar raffia or flat ribbon yarn but the final size will change; the pattern uses a 3 mm hook for the raffia canvas and an optional 4-4.5 mm hook for the edging.

How do I secure joins when changing raffia skeins?

Straighten both ends, overlap by about 5 mm, glue together with PVA, let dry, then lightly wrap for a secure, low-bulk join that will be hidden in the canvas.

How long does this project take to complete?

Most crafters finish this tote in about 8-10 hours, depending on experience with jacquard work and the time spent on finishing (fringe, lining and sewing handles).