🧢 Beautiful ✨ Detailed πŸ’ Adorable

Desert Crochet Cactus Amigurumi Pattern

Desert Crochet Cactus Amigurumi Pattern
4.0β˜… Rating
2-3 Hours Time Needed
3.2K Made This
βœ‚οΈ

Beginner Friendly Level

Perfect for those just starting their crochet journey, with clear instructions and simple techniques

⏱️

Bite-Sized Project

Finishes in 2-4 hoursβ€”perfect for an afternoon of creative relaxation.

🧸

Cute Companion

An adorable friend to cherish, handcrafted with love to bring comfort and joy for years to come.

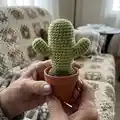
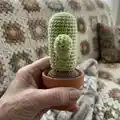
About This Desert Crochet Cactus Amigurumi Pattern

This pattern teaches you how to crochet a small stuffed cactus with a terracotta pot 'soil' base. You will make the soil, the cactus body and optional arms or flowers using DK weight yarn and a 3.5mm hook. The techniques are simple single crochets, increases and decreases, with a flat piece option for a tall cactus variant.

Desert Crochet Cactus Amigurumi Pattern crochet pattern - detailed view of completed project

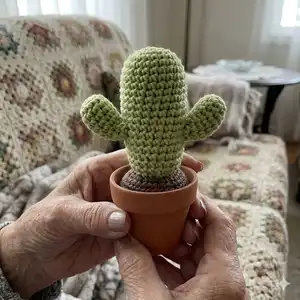
Ideal for beginners, it uses a magic ring, invisible decreases and simple assembly steps. The finished cactus fits neatly inside a small terracotta pot and makes a charming handmade gift.

Why You'll Love This Desert Crochet Cactus Amigurumi Pattern

I absolutely love this pattern because it turns basic crochet stitches into a delightful miniature plant that brightens any space. I enjoy how quickly it works up β€” you can finish one in an afternoon and still have time to make a friend for it. The design is forgiving and beginner friendly, yet still allows little custom touches like bent arms or tiny flowers. Sewing the pieces together is satisfying and gives a professional, finished look. I also love gifting these β€” they are small, handmade and always well received.

Desert Crochet Cactus Amigurumi Pattern step 1 - construction progress Desert Crochet Cactus Amigurumi Pattern step 2 - assembly progress Desert Crochet Cactus Amigurumi Pattern step 3 - details and accessories Desert Crochet Cactus Amigurumi Pattern step 4 - final assembly and finishing

Switch Things Up

I love how easy it is to customise this cactus β€” you can change the yarn color to make a whole desert scene in different greens and pastels.

I often make a set of three using varying yarn weights: a bulky yarn with a larger hook creates a chunky statement cactus, while a finer yarn and smaller hook makes tiny keychain-sized cactuses.

I sometimes add a short piece of pipe cleaner inside the arms so I can pose them; place it inside before finishing the stuffing and bend it to the desired shape after sewing.

If you prefer a more textured cactus, try working every few rounds in front loops only to create ridges or use a half double crochet row for larger ribbing effects.

For flowers, switch to bright contrast colours and experiment with multiple layers of petals or tiny French knots using embroidery thread for delicate blooms.

I also change the pot: a painted terracotta pot, a tiny teacup or a shallow bowl will change the display and feel of the finished piece.

To make a family of plants, vary the height and width by adding or subtracting rounds in the body or by changing the number of rows for the tall panel piece.

I sometimes embroider tiny spines or use contrasting yarn to stitch vertical lines for a realistic ribbed cactus look.

If you want a hanging decoration, leave a longer tail and make a small loop to hang it, or attach a keyring to create a cactus keychain.

Finally, I recommend experimenting with mixed fibres for different textures β€” cotton gives a crisp stitch while acrylic gives a softer, squishier toy for a different tactile finish.

Common Mistakes & How to Fix Them

βœ— Skipping stitch markers at the beginning of rounds can cause you to lose the start point; mark the first stitch of each round to keep your rounds even and countable. βœ— Stuffing too early or too much at once will distort shaping; stuff gradually and firmly as directed, especially before closing decreases to maintain the cactus shape. βœ— Not counting stitches after increases and decreases can throw off the pattern; count regularly after each round to ensure you have the correct stitch count. βœ— Forgetting to leave a long tail when fastening off prevents easy sewing; always leave a generous tail at the end of the body and soil pieces for secure assembly. βœ— Working tightly or loosely compared to the recommended gauge changes the finished size; maintain consistent, moderate tension and use the recommended hook for best results.

Desert Crochet Cactus Amigurumi Pattern

Make a charming handmade cactus to brighten any shelf or desk with this easy crochet amigurumi pattern. You'll work simple single crochet rounds to create the soil, body and optional arms or flowers. The pattern is small, gift-ready and uses minimal yarn, perfect for quick makes and thoughtful handmade gifts. Clear step-by-step rounds and assembly notes guide you through finishing and styling your cactus.

Beginner Friendly 2-3 Hours

Materials Needed for Desert Crochet Cactus Amigurumi Pattern

β€” Main Fabric

  • 01
    Yarn A: Brown DK weight yarn - approximately 20g (for soil)
  • 02
    Yarn B: Green DK weight yarn - approximately 20g (for cactus body and arms)
  • 03
    Yarn C: Small quantity of pink or white DK weight yarn - small amount for flowers (optional)
  • 04
    Small Terracotta Plant Pot - recommended size 6cm x 6.8cm x 4cm (not yarn, used for display)

β€” Tools Required

  • 01
    Crochet hook size US 4 (3.5mm)
  • 02
    Stitch marker
  • 03
    Sewing needle / yarn needle for sewing pieces
  • 04
    Acrylic toy stuffing
  • 05
    Small terracotta plant pot – 6cm x 6.8cm x 4cm
  • 06
    Scissors
  • 07
    Pipe cleaner (optional for bendable arms)

Progress Tracker

0% Complete

β€” Soil :

Info :

Using yarn A

Round 1 :

MR 6

Round 2 :

*Inc (12)

Round 3 :

*1 SC, Inc (18)

Round 4 :

1 SC, *Inc, 2 SC until last stitch, 1 SC (24)

Round 5 :

*3 SC, Inc (30)

Round 6 :

2 SC, *Inc, 4 SC until last 2 stitches, 2 SC (36)

Info :

Note: If your pot is larger continue increasing in this way until the circumference of the soil fits just inside the pot as pictured below.

Round 7-15 :

SC around (36)

Info :

Begin stuffing soil, continue stuffing as you go.

Round 16 :

2 SC, *Dec, 4 SC until last 2 stitches, 2 SC (30)

Round 17 :

*3 SC, Dec (24)

Round 18 :

1 SC, *Dec, 2 SC until last stitch, 1 SC (18)

Round 19 :

*1 SC, Dec (12)

Round 20 :

*Dec (6)

Info :

FO.

β€” Cactus :

Info :

Using Yarn B

Round 1 :

MR 6 (6)

Round 2 :

*Inc (12)

Round 3 :

*1 SC, Inc (18)

Round 4 :

1 SC, *Inc, 2 SC until last stitch, 1 SC (24)

Round 5-19 :

SC around (24)

Round 20 :

1 SC *Dec, 2 SC until last stitch, 1 SC (18)

Info :

FO – leave tail for sewing.

Info :

Stuff firmly.

β€” Arms (Make 2) :

Info :

Using Yarn B

Round 1 :

MR 6 (6)

Round 2 :

*Inc (12)

Round 3-8 :

SC around (12)

Round 9 :

(for this last row stop working in rounds) turn and do not CH, SC 8.

Info :

FO – leave tail for sewing

Info :

Lightly stuff.

Info :

If you want the arms to have more of a bend, fold a short piece of pipe cleaner so it is the length of the arm. Place inside with the stuffing.

β€” Assembly :

Info :

Sew the body of the cactus to the soil at approximately round three of the soil pattern.

Info :

To sew the arms to the cactus. Place the arms with pins to the body approximately 6 rounds up from the bottom of the body of the cactus and on opposite sides.

Info :

Place the arms facing upwards, so row 9 is facing downwards.

Info :

Sew the arm of the cactus to the body of the cactus. If you have used pipe cleaner, once sewn in place bend the pipe cleaner to create an upwards curve.

Info :

Sew to the soil.

β€” Flowers (Optional) :

Info :

Using Yarn C

Round 1 :

MR 6

Info :

Change to Yarn D:

Round 2 :

SS to the first stitch, in the same stitch: 2 CH, 2 TR, 1 DC. For the remaining 5 stitches: SS to the next stitch, 2 CH 2 TR, 1 DC. SS to the first stitch.

Info :

FO.

β€” Cactus (Tall) :

Info :

Using yarn B

Info :

CH 24

Row 1 :

In 2nd Loop from the hoop, SC, repeat for remaining 22 stitches, CH1 turn

Row 2 :

In 2nd loop from the hook, SC in the back loops only for all 23 stitches, CH 1 turn

Info :

Repeat row 2 until piece measures 11cm.

Info :

Weave through one side of the cactus, drawstring close as pictured.

Info :

Sew up the side of the cactus by crocheting through the stem of the first row and the back loop of the last row.

Info :

Stuff firmly.

Info :

Weave the other side of the cactus as above and drawstring to close.

Info :

Sew to the soil.

Assembly Instructions

  • Sew the body of the cactus to the soil at approximately round three of the soil pattern to secure it inside the pot.
  • Position and pin the arms on opposite sides of the body approximately 6 rounds up from the bottom, then sew them in place so they face upwards (row 9 facing downwards).
  • If you used pipe cleaner inside the arms, sew the arms firmly and then bend the pipe cleaner to create a natural upwards curve.
  • Weave and drawstring the tall cactus panels closed, then sew the seam by crocheting through the stem of the first row and the back loop of the last row, stuff firmly and attach to the soil.
  • Attach optional flowers to the top of your cactus by sewing the flower pieces to the cactus crown using a yarn needle and matching yarn.

Important Notes

  • πŸ’‘This pattern uses American crochet terminologyβ€”check abbreviations before you start.
  • πŸ’‘Use stitch markers to keep track of your rounds, especially during increases and decreases to maintain accurate stitch counts.
  • πŸ’‘Stuff the pieces gradually and firmly; overstuffing can distort shaping while under-stuffing will give a floppy result.
  • πŸ’‘Leave long tails when fastening off for secure sewing and neat finishing.

This Desert Crochet Cactus is a sweet, low-maintenance project that fits perfectly in small homes or office desks. It uses minimal yarn and simple stitches to create a charming, handmade accent that you can gift or keep. Make a set of cacti in different sizes and colours for a playful display. 🧢🌡

You ask,

we answer.

FAQs

What size will the finished piece be?

The finished cactus measures approximately the height of the small terracotta pot shown (about 6-8 cm tall for the small version) when using the recommended DK yarn and 3.5mm hook; sizes vary with yarn/hook choice.

Can I use different yarn weights for this pattern?

Yes, you can substitute yarn weights, but the finished size and stitch definition will change; choose a suitable hook for the yarn weight and expect a larger or smaller cactus accordingly.

Do I need prior crochet experience for this pattern?

This pattern is beginner friendly and uses basic stitches like single crochet, increases and decreases; familiarity with the magic ring and invisible decrease is helpful but an alternative CH start is provided.

How long does this project typically take to complete?

Most crocheters complete a single small cactus in about 2-3 hours, though time may vary depending on experience and whether you include optional arms or flowers.