🧢 Beautiful ✨ Detailed πŸ’ Adorable

Lemon Granny Square Pattern

Lemon Granny Square Pattern
4.4β˜… Rating
2-4 Hours Time Needed
3.2K Made This
βœ‚οΈ

Intermediate Level

Ideal for those with basic crochet experience, featuring slightly more advanced stitches and techniques to expand your skills.

⏱️

Bite-Sized Project

Finishes in 2-4 hoursβ€”perfect for an afternoon of creative relaxation.

🏑

Cozy Accent

A warm touch for your space that transforms ordinary corners into inviting nooks filled with handmade charm.

About This Lemon Granny Square Pattern

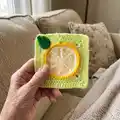
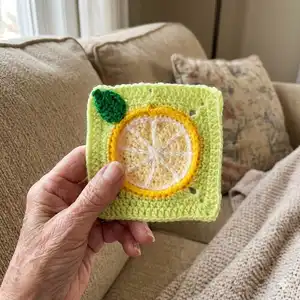
This pattern creates a lemon-themed granny square featuring a circular lemon motif, a sunny yellow rind, and a leafy applique. It uses DK weight yarns and simple shaping to make a 13cm square that is perfect for blankets, cushions or seasonal decor. You will also learn basic surface crochet to add the lemon segments for a polished finish.

Lemon Granny Square Pattern crochet pattern - detailed view of completed project

The pattern includes detailed round-by-round instructions, abbreviations and tips for assembly so you can follow along with confidence. Ideal as a single motif or combined into larger projects for a fresh summer look.

Why You'll Love This Lemon Granny Square Pattern

I absolutely love this pattern because it brings a little burst of sunshine into everyday crochet through a playful lemon motif. I enjoyed designing the textured rind and adding the small leaf applique β€” these little details really lift the finished square. The pattern blends simple stitches with a touch of surface crochet, which makes it satisfying to work and easy to personalise. It is versatile too β€” make one as a coaster or a whole collection for a cushion or blanket.

Lemon Granny Square Pattern step 1 - construction progress Lemon Granny Square Pattern step 2 - assembly progress Lemon Granny Square Pattern step 3 - details and accessories Lemon Granny Square Pattern step 4 - final assembly and finishing

Switch Things Up

I love changing up the colours to create different moods for this square β€” swap the lemon yellows for pinks and peaches for a sherbet theme.

You can make the square larger by adding extra rounds in the pistachio colour, repeating the increase pattern to keep the corners square.

If you prefer a chunkier look, use aran or bulky yarn and a larger hook to create oversized decorative squares for cushions or rugs.

For a dainty look, use a 3.5mm hook and lighter DK or sport weight yarn to make smaller motifs ideal for garlands or bunting.

I often add embroidered seeds or French knots to the lemon centre for extra texture and personality.

Try different placement for the leaf β€” top-left, top-right or even two small leaves β€” to vary the finished layout across multiple squares.

Make a set in graduated shades of green for the background to create an ombre blanket effect using the same pattern repeated.

Combine this lemon square with plain granny squares or other fruit motifs to design a playful, themed throw or scarf collection.

For a festive twist, change the surface crochet thread to metallic or contrasting colours to make more decorative segments that catch the light.

I also recommend experimenting with surface crochet thickness β€” using two strands held together gives bolder segment lines while a single strand keeps them subtle.

Common Mistakes & How to Fix Them

βœ— Starting the circle too loosely will make the centre gap visible; use a firm magic ring and pull it closed tightly to avoid a hole. βœ— Skipping the front or back loop instructions will change the texture and fit of rounds; work exactly into FLO or BLO where specified for correct shaping. βœ— Not counting stitches after each round leads to incorrect increases; count your stitches at the end of each round and correct immediately if they do not match. βœ— Attaching the leaf without pinning can result in uneven placement; pin the leaf in place and check the photo reference before sewing securely.

Lemon Granny Square Pattern

Make a bright, summery Lemon Granny Square to brighten blankets, cushions or scarves. This pattern walks you through a small circular lemon motif, a textured square border and a cute leaf applique so you can create a cheerful summer motif. Clear step-by-step instructions and surface crochet guidance make this a fun project to personalise and gift.

Intermediate 2-4 Hours

Materials Needed for Lemon Granny Square Pattern

β€” Main Fabric

  • 01
    1 ball Paintbox Yarns Simply DK - Buttercup Yellow
  • 02
    1 ball Budget Yarns DK - Lemon (for lemon body)
  • 03
    1 ball Budget Yarns DK - Pistachio (for square)
  • 04
    Small amount Stylecraft Special DK - Kelly Green or dark green alternative (for leaf and detail)

β€” Tools Required

  • 01
    4mm (G-6) crochet hook
  • 02
    Scissors
  • 03
    Tapestry needle
  • 04
    Stitch marker (optional for counting rounds)
  • 05
    Yarn for surface crochet (white) for lemon segments

Progress Tracker

0% Complete

β€” Instructions :

Info :

Pattern begins in lemon yarn

Round 1 :

In MR Ch 2 (counts as a stitch), 8Htr into the ring. Pull the ring closed and join to the top of the Ch 2 with a sl st. (9)

Round 2 :

Ch 2 (counts as a st), 1Htr in the base of the Ch 2, 2Htr in each st around, join to the top of the Ch 2 with a sl st. (18)

Round 3 :

Ch 2 (counts as a st), 1Htr in the st at the base of the Ch 2, 1Htr in next st. *2Htr in next st, 1Htr* repeat from * to * around, join with sl st to the top of the beginning Ch 2. (27)

Round 4 :

Ch 2 (counts as a st), 1Htr in st at the base of the Ch 2, 1Htr in next 2 stitches. *2Htr,1Htr,1Htr* repeat from * to * around. Join with a sl st to the top of the beginning Ch 2. (36)

Round 5 :

Ch 2 (counts as a st), 1Htr in st at the base of the Ch 2, 1Htr in next 3 stitches. *2Htr in next st, 1Htr, 1Htr, 1Htr* repeat from * to * around, join with sl st into the top of the beginning Ch 2. FO (45)

Round 6 :

Join bright yellow into any stitch on the circle. Ch 1 (does not count as a st) Dc in the same st and Dc in each st around, sl st to Ch1. (45)

Round 7 :

Ch 1 (does not count as a st) 1Dc in each stitch around in FLO. Join to Ch 1, FO. (45)

Round 8 :

Join pistachio to BL of any stitch on the Lemon circle from round 6 (not the last round worked but the round prior to this you will have back loops exposed. Ch 1 (does not count as a st), 1Dc in same space as Ch 1, 1Dc, *1Htr, 2Tr, Ch 2, 2Tr, 1Htr, 5Dc*. Repeat from * to * twice more. 1Htr, 2Tr, Ch2, 2Tr, 1Htr, 3Dc, sk last st, join to the first Dc. (4 ch 2 spaces and 44 stitches made).

Round 9 :

Ch 2 (counts as a st), 1Htr in each st to the corner Ch2 space [2Tr, Ch2, 2Tr] in corner space, repeat around the square, 1Htr in each stitch and [2Tr, Ch2, 2Tr] in corner space. Join to top of beginning Ch2 with a sl st. (4 Ch2 spaces and 60 stitches)

Round 10 :

Ch 3 (counts as a st), 1Tr in each st to the corner Ch 2 space, [2Tr, Ch2, 2Tr] in corner space. Repeat around, 1Tr in each stitch and [2Tr, Ch2, 2Tr] in each corner, join to top of beginning Ch3 with sl st, FO and weave in ends. (4 Ch2 spaces and 76 stitches).

β€” To make the leaf :

Item Name (P1) :

Ch 7, 1Htr in second Ch from hook, 4Tr, [1Tr, 1Dc, 3Ch picot, 1Dc] into the last Ch stitch. Working down the other side of the chain, 5Tr, 1Htr into the last ch, sl st into the first Htr. FO. Sew leaf into place on the square

β€” Surface Crochet :

Info :

Surface crochet a circle on top of the lemon circle with white using the pictures for reference. Surface crochet across the circle horizontally, vertically and twice diagonally to create the segments.

Infos :

For surface crochet tutorials see below; https://moaracrochet.com/how-to-surface-crochet/ https://www.mooglyblog.com/surface-crochet-tutorial/ Weave in your ends and your square is complete! Use it in a blanket, to make up a cushion, as part of a funky summer scarf or even to decorate a summer table. The possibilities are endless!

Assembly Instructions

  • Sew the leaf applique into place on the top edge of the square using a tapestry needle and matching yarn, positioning it as shown in the photo for best balance.
  • Weave in all ends securely after fastening off each section, trimming excess and burying tails with a tapestry needle.
  • Surface crochet the white segments on top of the lemon circle by stitching a circle and then stitching across horizontally, vertically and twice diagonally to create the lemon slices.
  • When joining rounds and changing colours (lemon to bright yellow to pistachio), weave ends into the wrong side and make neat joins to avoid bulk and keep the square flat.

Important Notes

  • πŸ’‘This pattern is written in standard UK crochet terms; check abbreviations before starting to avoid stitch confusion.
  • πŸ’‘Gauge is not essential but for consistent sizing maintain the same hook and yarn when making multiple squares.
  • πŸ’‘Pin pieces in place before sewing to ensure correct placement and symmetry while assembling the leaf and surface crochet details.
  • πŸ’‘Work with consistent tension and avoid over-stuffing or pulling stitches too tight when closing rounds to maintain a flat motif.

This Lemon Granny Square pattern brings a splash of sunshine to your crochet projects and is perfect for summer embellishments. Use it to make cushions, a bright blanket or whimsical table decor that pops. Happy crocheting and enjoy making something cheerful and hand made! πŸŒžπŸ‹πŸ§Ά

You ask,

we answer.

FAQs

What size will the finished piece be?

The finished granny square measures approximately 13cm x 13cm when using DK yarn and a 4mm hook as recommended.

Can I use different yarn weights for this pattern?

Yes, you can use different yarn weights but the finished size will change; use a larger hook with bulkier yarn for a bigger square or a smaller hook with lighter yarn for a smaller motif.

Do I need prior crochet experience for this pattern?

This pattern is rated intermediate and includes half treble, treble stitches and surface crochet, so basic crochet experience is recommended for best results.

How long does this project typically take to complete?

Most crocheters finish a single Lemon Granny Square in about 2-4 hours, depending on experience and how much time is spent on surface crochet details.