🧢 Beautiful ✨ Detailed πŸ’ Adorable

Cute Bunny Amigurumi Pattern

Cute Bunny Amigurumi Pattern
4.5β˜… Rating
5-7 Hours Time Needed
3.2K Made This
βœ‚οΈ

Intermediate Level

Ideal for those with basic crochet experience, featuring slightly more advanced stitches and techniques to expand your skills.

⏱️

Weekend Treat

Takes 5-7 hours, making it an enjoyable project to finish over a couple of days.

🧸

Cute Companion

An adorable friend to cherish, handcrafted with love to bring comfort and joy for years to come.

About This Cute Bunny Amigurumi Pattern

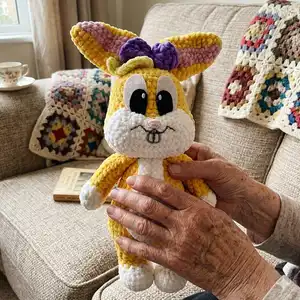
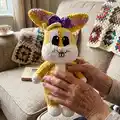
This pattern teaches you how to crochet a plush chenille bunny amigurumi with full round-by-round instructions. It includes pieces for arms, legs, body, head, ears, muzzle, belly, tail, bow and hair. The pattern uses chenille yarn for a soft, plush finish and felt for the eyes to keep the toy kid-friendly.

Cute Bunny Amigurumi Pattern crochet pattern - detailed view of completed project

Detailed abbreviations, materials and step-by-step rounds are included so you can follow along easily. Assembly notes and photos guide you through placement and finishing for a professional result.

Why You'll Love This Cute Bunny Amigurumi Pattern

I absolutely love this pattern because it transforms simple chenille yarn into an irresistibly soft and huggable bunny. I enjoy how the shaping gives the character and personality to the piece, especially the expressive muzzle and long ears. The step-by-step rounds make it easy for me to keep track of progress while stuffing and shaping as I go. Sewing the felt eyes and tiny bow always feels like bringing the little friend to life β€” it is such a rewarding finish every time.

Cute Bunny Amigurumi Pattern step 1 - construction progress Cute Bunny Amigurumi Pattern step 2 - assembly progress Cute Bunny Amigurumi Pattern step 3 - details and accessories Cute Bunny Amigurumi Pattern step 4 - final assembly and finishing

Switch Things Up

I love how easy it is to customize this bunny by changing colors; try pastel shades for a nursery-friendly version or bold colors for a playful look.

You can make a mini version by using thinner yarn and a smaller hook to create keychain-sized pals.

For an extra cuddly toy, choose a super bulky chenille and a larger hook to create a large, plush bunny.

I often add embroidered eyelashes or a small scarf to change the character and personality of each bunny I make.

Try switching the bow color and adding tiny buttons or beads for seasonal decoration, like a tiny Easter bow or a winter scarf.

If you want posable ears, lightly insert a thin craft wire inside the ear seam before closing and shaping it.

Experiment with different stuffing levels β€” slightly under-stuffed heads give a softer look while firmer stuffing helps pieces sit upright.

I sometimes replace felt eyes with safety eyes (for non-child toys) to give a glossy finished look.

Make a family set by crocheting the same pattern in three sizes β€” baby, medium, and large β€” and display them as a collection.

Swap the bow for a crocheted flower or little hat to create seasonal variations and gifts for friends and family.

Use embroidery floss to add freckles, whiskers or smile lines to personalize each face and add expression.

I like to keep notes of any changes I make to gauge finished size differences when trying new yarns or hooks.

Common Mistakes & How to Fix Them

βœ— Skipping stitch markers when joining legs to start the body causes misaligned joins; place a marker at the joining point and count stitches carefully to ensure even joins. βœ— Overstuffing limbs and head will distort the shape and make sewing difficult; stuff gradually and check shape frequently, using small amounts until you reach the desired firmness. βœ— Not changing colors tidily at the cuff and belly edges can leave messy joins; fasten off and weave in ends or carry yarn neatly and secure color changes at the back. βœ— Forgetting to count increases and decreases leads to incorrect stitch counts later; after each shaping round count stitches and mark the start of round with a stitch marker to stay consistent.

Cute Bunny Amigurumi Pattern

Make a cuddly chenille yarn bunny with this complete step-by-step pattern. You will create a 35 cm tall amigurumi with ears, belly, muzzle, tail, bow and felt eyes. The instructions include full round-by-round stitch counts, assembly guidance and small detail pieces so you can finish an adorable handmade companion.

Intermediate 5-7 Hours

Materials Needed for Cute Bunny Amigurumi Pattern

β€” Main Fabric

  • 01
    Chenille yarn (main color yellow) - specified in pattern (use chenille for plush finish)
  • 02
    Chenille yarn (white) - for muzzle, belly, paws and tail
  • 03
    Chenille yarn (pink) - small amounts for inner ear and nose detail
  • 04
    Chenille yarn (purple) - small amount for bow
  • 05
    Cotton yarn in pink - for nose (use 2.5mm hook as noted)
  • 06
    Black and white felt - for eyes (cut shapes from felt)
  • 07
    Fiberfill (polyester stuffing) - for stuffing body, head and limbs

β€” Tools Required

  • 01
    Crochet hook size 6 mm
  • 02
    Crochet hook size 2.5 mm (for nose with cotton yarn)
  • 03
    Sewing needle
  • 04
    Scissors
  • 05
    Fabric glue or hot glue gun
  • 06
    Stitch markers
  • 07
    Yarn needle for sewing pieces
  • 08
    Polyester stuffing (fiberfill)
  • 09
    Black and white felt for eyes
  • 10
    Pins for assembly (optional)

Progress Tracker

0% Complete

β€” Arms :

Round 1 :

Start with white yarn 6 sc (6)

Round 2 :

6 inc (12)

Round 3 :

12 sc (12)

Round 4 :

5 sc, 1 bobble, 6 sc. Change to yellow color yarn (12)

Round 5 :

(sc, dec) * 4 times (8)

Round 6-7 :

8 sc (8)

Round 8 :

3 sc, inc, 4 sc (9)

Round 9-11 :

9 sc (9)

Round 12 :

4 sc, inc, 4 sc (10)

Round 13-15 :

10 sc (10)

Info :

Stuff firmly, cut the yarn and leave a long tail for sewing

β€” Legs (make 2) and Body :

Round 1 :

Start with white yarn Chain 5: start to crochet on the 2nd chain from the hook: 3 sc, 4 sc in the same stitch, continue to work on the other side of foundation chain: 2 sc, inc inc, 2 sc, 4 inc, 2 sc, 2 inc 18 sc 4 sc, 5 (stitches shown in pattern: 11)

Round 2 :

dec, 4 sc Change to yellow color 6 sc, dec, 5 sc 12 sc (18)

Round 3-5 :

18 sc (18)

Round 6 :

13 sc (13)

Round 7 :

12 sc (12)

Round 8-11 :

12 sc (12)

Info :

Stuff firmly, cut the yarn. Do the 2nd leg the same way, do not cut the yarn, chain 2 and join 2 legs together in the next round and crochet the body

Round 12 :

12 sc on the 1st leg, 2 sc on the chain 2, 12 sc on the 2nd leg, 2 sc on the chain 2 (3 sc, inc) * 7 times (28)

Round 13 :

(3 sc, inc) * 7 times (35)

Round 14 :

(4 sc, inc) * 7 times (42)

Round 16 :

(inc, 2 sc) * 3 times, 24 sc, (inc, 2 sc) * 3 times (48)

Round 16-18 :

48 sc (48)

Round 19 :

(6 sc, dec) * 6 times (42)

Round 20 :

42 sc (42)

Round 21 :

(5 sc, dec) * 6 times (36)

Round 22 :

36 sc (36)

Round 23 :

(4 sc, dec) * 6 times (30)

Round 24-26 :

30 sc (30)

Round 27 :

(3 sc, dec) * 6 times (24)

Round 28-30 :

24 sc (24)

Round 31 :

(2 sc, dec) * 6 times (18)

Round 32 :

4 sc on the body, 5 sc through body and arm 1, 4 sc on the body, 5 sc through body and arm 2 (sc, dec) * 6 times (18)

Round 33 :

12 sc (12)

Info :

Stuffed firmly, do not cut the yarn, we will continue to crochet the head

β€” Head :

Round 34 :

12 inc (24)

Round 35 :

(sc, inc) * 12 times (2 sc, inc) * 12 times (3 sc, inc) * 12 times 60 sc,

Round 36 :

continue to crochet to the middle of the head back (9 sc, you may need to add or omit one sc to reach the midpoint), place marker. This will be the new starting point of the round 5 (48)

Round 37 :

(pattern text shows continuation and stitch placement) (60)

Round 38-40 :

sc, 10 dec, 10 sc, 10 dec, 5 sc. (3 sc, dec) * 8 times 32 sc. Stuff as you go (2 sc, dec) * 8 times (sc, dec) * 8 times (60)

Round 41 :

8 dec (40)

Round 42 :

32 (32)

Round 43-49 :

32 (32)

Round 50 :

24 (24)

Round 51 :

16 (16)

Round 52 :

8 (8)

Info :

Stuffed firmly, cut the yarn and weave the end

β€” Tail :

Round 1 :

6 sc in the MR (6)

Round 2 :

6 inc (12)

Round 3 :

(sc, inc) * 6 times (18)

Round 4 :

18 sc (18)

Round 5 :

(sc, dec) * 6 times (12)

Info :

Fasten off and leave a long tail for sewing

β€” Ears :

Info :

YELLOW COLOR is written in BLACK, PINK color is written in RED (pattern color coding)

Round 1 :

5 sc in the MR (5)

Round 2 :

2 inc, inc, 2 inc (10)

Round 3 :

4 sc, 2 sc, 4 sc (10)

Round 4 :

(sc, inc) * 2 times, sc, inc, (sc, inc) * 2 times (15)

Round 5-9 :

6 sc, 3 sc, 6 sc (15)

Round 10 :

(2 sc, inc) * 2 times, 2 sc, inc, (2 sc, inc) * 2 times (20)

Round 11-17 :

8 sc, 4 sc, 8 sc (20)

Round 18 :

20 sc (20)

Info :

Fold in half, cut the yarn and leave a long tail for sewing

β€” Belly :

Round 1 :

Chain 14, start to crochet on the 2nd chain from the hook: 12 sc, 5 sc in the same stitch, 12 sc on the other side of the foundation chain. Chain 1 and turn (27)

Round 2 :

6 sc, 5 hdc, dc, 5 dc inc, dc, 5 hdc, 6 sc (34)

Info :

Cut the yarn and leave a long tail for sewing

β€” Mouth :

Round 1 :

Chain 11, start to crochet on the 2nd chain from the hook: inc, 8 sc, 4 sc in the same stitch, 8 sc on the other side of the foundation chain, inc, slst (24)

Round 2 :

Chain 1, 2 inc, 8 sc, 4 inc, 8 sc, 2 inc, slst (32)

Round 3 :

Chain 1, (sc, inc) * 2 times, 8 sc, (sc, inc) * 4 times, 8 sc, (sc, inc) * 2 times, slst (40)

Round 4 :

Chain 2, 5 dc, 2 hdc, 2 sc, 2 slst, 2 sc, 2 hdc, 7 dc, 2 hdc, 12 slst, 2 hdc, 2 dc (40)

Info :

Cut the yarn and leave a long tail for sewing

β€” Nose :

Info :

Use cotton yarn in pink and 2.5mm hook (pattern note)

β€” Woolymagics :

Info :

MR: 4 sc in the MR, close the hole and cut the yarn (do not slst). Leave a long tail for sewing

β€” Eyes :

Info :

Use black and white felt to cut the eyes

β€” Hair :

Info :

Use yellow color yarn Chain 10: start to crochet on the 2nd chain from the hook: 2 slst, 2 sc, 2 hdc, 3 dc, slst and fasten off. Leave a long tail for sewing

β€” Bow :

Info :

Use purple color yarn Chain 5: 4 treble crochet on the 1st chain, chain 4 and slst into the 1st chain, chain 4 + 4 treble crochet on the 1st chain, chain 4 and slst. Cut the yarn and leave a long tail to wrap around the middle of the bow.

β€” Additional Pieces (Muzzle, Tail, Bow, Nose, Hair photos) :

Info :

Muzzle, tail, bow, nose and hair pieces are crocheted and left with long tails for sewing and placement. Follow photos for shape and placement guidance.

Assembly Instructions

  • Sew the belly on the body over round 16-33.
  • Sew the ears to the head on round 47-51 and fold the ear seams as shown, securing with a few hidden stitches.
  • Sew the bow next to the ears and sew the hair close to the bow, using the long tails to position and secure.
  • Sew the mouth to the head over round 35-42 and sew the muzzle in place, then embroider or attach felt details for the nose and teeth.
  • Sew the tail to the back of the body over round 15-18 and secure firmly with several passes of the needle.
  • Use hot glue to attach the felt eyes on the face or sew felt shapes in place for a more secure finish.

Important Notes

  • πŸ’‘This pattern uses US crochet terminology and is worked in spiral rounds; do not slip stitch unless stated.
  • πŸ’‘Work with chenille yarn carefully β€” avoid over-tight tension to prevent difficulty inserting your hook in stitches.
  • πŸ’‘Stuff firmly but not too tightly; overstuffing can distort shaping and make seams hard to close.
  • πŸ’‘Weave in ends as you go and leave long tails on small pieces for easier placement and sewing.

This adorable chenille bunny amigurumi makes a lovely handmade gift and measures approximately 35 cm tall when using the recommended yarn and hook. The plush chenille gives a soft, cuddly texture while the felt eyes and tiny bow add character and charm. Enjoy the process and treasure the finished friend β€” happy crocheting! 🧢🐰

You ask,

we answer.

FAQs

What size will the finished piece be?

The finished amigurumi measures approximately 35 cm tall when using chenille yarn and a 6 mm hook as recommended.

Can I use different yarn weights for this pattern?

Yes, you can use different yarn weights but the final size will vary; choose an appropriate hook for your yarn and expect a change in finished dimensions.

Do I need prior crochet experience for this pattern?

This pattern is rated intermediate and requires familiarity with basic stitches, increases, decreases and working in spiral rounds for best results.

How long does this project typically take to complete?

Most crocheters complete this project in about 5-7 hours depending on experience and speed, excluding assembly and finishing time.