About This Ladybug Keychains Amigurumi Pattern
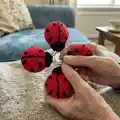
This pattern creates small, stuffed ladybug keychains using DK weight yarn and a 3mm hook. It includes both UK and US term instructions so you can follow your preferred stitch names. You will make a back, tummy, join the halves, embroider a stripe and spots, then attach a keychain for a finished accessory.

The design is compact and uses very small amounts of yarn, perfect for scrap-busting and quick makes. Ideal as charming small gifts or bundles for craft fairs.
Why You'll Love This Ladybug Keychains Amigurumi Pattern
I absolutely love this pattern because it turns tiny scraps of yarn into a joyful, practical accessory that people actually use. I enjoy the quick rounds and the instant satisfaction of a finished little toy in a single afternoon. The embroidered stripe and spots let me add personality and small handmade details that delight recipients. I also appreciate that it includes both UK and US terminology so I can share it with friends who crochet using different stitch names.
Switch Things Up
I love to change up the colors to make a whole set of different beetles—try pink and purple for a playful look or cream and brown for a vintage feel.
I often switch yarn weight and hook size to make mini or jumbo versions; use fingering yarn with a 2.5mm hook for tiny charms, or bulky yarn with a 5mm hook for a chunky key fob.
I like to add a small loop of ribbon at the head join before sewing the keychain for an extra decorative hanger option.
Instead of embroidered spots, you can sew tiny felt circles or use small beads for textured spots—just secure them firmly to withstand handling.
Try adding a tiny bell inside the stuffing for a jingly keychain that’s great for kids or pet collars.
I sometimes make a magnet version by embedding a small disc magnet in the stuffing near the back and sealing it securely.
For a gift set, I make four in complementary colors and attach them to a ring with a handmade card—perfect for craft fair stalls.
If you want a poseable version, add a short length of wire in the body before closing and cover with stuffing for mild posability.
I recommend experimenting with different embroidery thread colors for the stripe and spots to add contrast—metallic or neon gives a modern twist.
When I teach this pattern I encourage learners to try both UK and US terms to become comfortable converting between dc/sc and htr/hdc.
Common Mistakes & How to Fix Them
✗ Skipping the stitch marker when working continuous rounds can cause you to lose track of the start; place a stitch marker at the last stitch of each round to stay aligned.
✗ Overstuffing the tummy or back will make the seams bulge and show stuffing; stuff lightly and test by pinching firmly to ensure it can still be squeezed easily.
✗ Not leaving the specified yarn tails for joining will make attaching the head and keychain awkward; leave the lengths indicated and weave them through as instructed before cutting.
✗ Rushing the embroidery of the stripe and spots can result in asymmetrical markings; use small running stitches and mark positions before sewing to keep spots balanced.