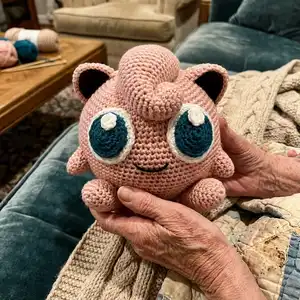
Make your own adorable Jigglypuff amigurumi with this friendly, intermediate-level crochet pattern. The pattern walks you through the full body, eyes, ears, feet, arms, and the distinctive poof so you can create a polished finished toy. Clear step-by-step rounds and helpful photos guide you to a cuddly finished piece that measures about six inches tall with the recommended materials. Perfect for gifting or keeping as a cute collectible.
Progress Tracker
0% Complete
— Introduction :
Info :
This pattern will show you how to create the Pok�mon Jigglypuff in amigurumi form. Jigglypuff measures six inches tall, however, the final size of your amigurumi may vary depending on the crochet hook size, weight yarn, and how tight your stitch work is. The materials used are listed in the Materials section. Do not sell or redistribute the pattern, but you are free to sell items you make using this pattern.
Infos :
Materials: 5.5 mm Crochet Hook. Vanna's Choice Yarn��Pink (~1 skein). Vanna's Choice Yarn�Black (<1 skein). Vanna's Choice Yarn�White (<1 skein). Red Heart Super Saver Economy Yarn�Real Teal (<1 skein). Poly-fil. Yarn Needle. Scissors.
Info :
Terminology: Magic ring�Method for starting amigurumi in the round. sc�single crochet. ch�chain. inc�increase (add one stitch). dec�decrease (remove one stitch). (A) x B�Repeat A, B times. [X]�Total number of stitches for the round/row. pr x�partial row starting at stitch x. pr x is the author's own terminology and will be better explained where used.
— Body :
Round 1 :
Magic ring 6 [6]
Round 3 :
(inc, sc 1) x 5, inc [18]
Round 4 :
(inc, sc 2) x 6, sc 1 [25]
Round 5 :
sc 1, (inc, sc 3) x 6 [31]
Round 6 :
sc 3, (inc, sc 4) x 5, inc, sc 2 [37]
Round 7 :
sc 6, (inc, sc 7, inc) x 2, sc ? [42]
Round 8 :
sc 3, (inc, sc 6, inc, sc 5) x 2, inc [48]
Round 9 :
sc 5, inc, (sc 8, inc, sc 9) x 2, sc 4 [53]
Round 10 :
sc 8, inc, (sc 9, inc, sc 10, inc) x 2, sc 2 [58]
Round 11 :
sc 3, (inc, sc 10, inc, sc 11, inc) x 2, sc 8 [63]
Round 12 :
sc 12, inc, sc 11, inc, sc 2, inc [68]
Round 13 :
sc 6, inc, (sc 16, inc) x 3, sc 10 [72]
Round 14 :
sc 11, inc, (sc 17, inc) x 3, sc 6 [76]
Round 15 :
sc 3, inc, (sc 24, inc) x 2, sc 22 [79]
Round 16 :
sc 18, inc, (sc 25, inc) x 2, sc 8 [82]
Round 17 :
sc 6, inc, (sc 26, inc) x 2, sc 21 [85]
Round 18 :
sc 14, inc, (sc 27, inc) x 2, sc 14 [88]
Round 19 :
(sc 43, inc) x 2 [90]
Round 20 :
sc 20, inc, sc 69 [91]
Round 21 :
sc 3, inc, sc 44, inc, sc 42 [93]
Round 22 :
sc 92, inc [94]
Round 26 :
dec, sc 92 [93]
Round 27 :
sc 42, dec, sc 44, dec, sc 3 [91]
Round 28 :
sc 69, dec, sc 20 [90]
Round 29 :
(dec, sc 43) x 2 [88]
Round 30 :
sc 14, (dec, sc 27) x 2, dec, sc 14 [85]
Round 31 :
sc 21, (dec, sc 26) x 2, dec, sc 6 [82]
Round 32 :
sc 8, (dec, sc 25) x 2, dec, sc 18 [79]
Round 33 :
sc 22, (dec, sc 24) x 2, dec, sc 3 [76]
Round 34 :
sc 6, (dec, sc 17) x 3, dec, sc 11 [72]
— Body Continued :
Round 35 :
sc 10, (dec, sc 16) x 3, dec, sc 6 [68]
Round 36 :
dec, sc 12, (dec, sc 11, dec, sc 12) x 2 [63]
Round 37 :
sc 8, (dec, sc 11, dec, sc 10) x 2, dec, sc 3 [58]
Round 38 :
sc 2, (dec, sc 10, dec, sc 9) x 2, dec, sc 8 [53]
Round 39 :
sc 4, (dec, sc 9, dec, sc 8) x 2, dec, sc 5 [48]
Round 40 :
sc 3, (dec, sc 6) x 5, dec, sc 3 [42]
Round 41 :
dec, (sc 6, dec, sc 7, dec) x 2, sc 6 [37]
Round 42 :
sc 2, dec, (sc 4, dec) x 5, sc 3 [31]
Round 43 :
(sc 3, dec) x 6, sc 1 [25]
Round 44 :
sc 1, (sc 2, dec) x 6 [19]
Round 45 :
dec, dec, (sc 1, dec) x 5 [12]
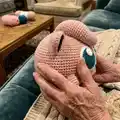
Info :
Once you finish crocheting the body, stuff it full of Poly-fil and close it up. The finished body should look similar to Image 2 in the tutorial.
— Eyes :
Info :
Each eye is made up of three circles: the sclera (large white circle), the iris (teal circle), and the highlight (small white circle). The circles are stacked on each other and stitched to the body. Make 2 eyes total (six circles total).
Round 1 :
Magic ring 6 [6]
Round 3 :
(inc, sc 1) x 6 [18]
Round 4 :
(sc 1, inc, sc 1) x 6 [24]
Round 5 :
(sc 3, inc) x 6 [30]
Round 1 :
Magic ring 6 [6]
Round 3 :
(inc, sc 1) x 6 [18]
Round 4 :
(sc 1, inc, sc 1) x 6 [24]
Round 1 :
Magic ring 6 [6]
— Ears :
Info :
Each ear is made of two triangles: outer ear (pink) and inner ear (black). Pieces are not crocheted in the round but turned at the end of each row. Once both triangles are finished, crochet them together along the two side edges by inserting the hook through an edge hole of the inner ear and corresponding hole of the outer ear, pulling yarn through both and continuing along the two edges. Do not crochet the two triangles together along the initial chained edge; keep it open for shape. If black shows through the pink, thread pink yarn between stitches to hide it. Stuff with Poly-fil if desired.
Round 2 :
sc in second ch, sc 5, ch 1, turn [6]
Round 3 :
dec, sc 4, ch 1, turn [5]
Round 4 :
dec, sc 3, ch 1, turn [4]
Round 2 :
sc in second ch, sc 11, ch 1, turn [12]
Round 3 :
dec, sc 3, dec, sc 3, dec, ch 1, turn [9]
Round 4 :
dec, sc 1, dec, sc 2, dec, ch 1, turn [6]
Info :
Once both triangles are joined along the side edges, hide any black showing through using pink yarn threaded between stitches. Attach ears to the top of the body as pictured and stuff lightly if desired.
— Feet :
Info :
Each foot is made in the round. Stuff with Poly-fil and close up once complete. There should be a flatter spot on the foot that is the bottom. Reference Image 1 for foot placement if you want a sitting position.
Round 1 :
Magic ring 7 [7]
Round 2 :
inc, (inc, sc 1) x 3 [11]
Round 3 :
inc, sc 1, inc, sc 4, inc, sc 3 [14]
Round 5 :
sc 8, inc, sc 3, inc, sc 2 [17]
Round 7 :
sc 5, inc, sc 4, dec, sc 5 [17]
Round 9 :
dec, sc 9, inc, sc 5 [17]
Round 10 :
sc 9, dec, sc 6 [16]
Round 11 :
sc 12, dec, sc 2 [15]
Round 12 :
sc 4, dec, sc 3, dec, sc 4 [13]
Round 13 :
dec, sc 6, dec, sc 3 [11]
Round 14 :
(dec) x 4, sc 1, dec [6]
— Arms :
Info :
Each arm is made in the round and will consist of a few partial rows. After completing the third round, tie off your current strand and start a new one as described below. The new strand will be started in the second stitch of the previous row and will be worked into 6 of the 9 stitches existing in the work before being tied off. Then a new strand will be started in the second stitch of the 7 new stitches and be worked into only 5 of the stitches before being tied off. Give the arm a clean edge by crocheting once around the outer edge so the arm has 10 stitches total, stuff with Poly-fil, and attach to the body.
Round 1 :
Magic ring 5 [5]
Round 2 :
(inc, sc 1) x 2, inc [8]
Round 3 :
sc 3, inc, sc 4 [9]
Round 4 :
pr 2: sc 2, inc, sc 3 [7]
Round 7 :
Add clean edge (crochet around outer edge to create 10 stitches for finishing)
— Poof :
Info :
The poof is constructed using a combination of full rounds and many partial rows and color changes to achieve curvature. You will start crocheting in the round. When you reach the end of row 7, do not cut the strand or tie off; leave it for the time being. Crochet row 8 (first teal partial row) and then cut the strand and tie it off; go back to the stitch left alone at the end of row 7 and start crocheting row 9. Essentially you are making 4 stitches in row 7 taller (adding 2 more stitches) to help with curvature. This technique is used for all 4 teal partial rows (rows 8, 10, 14, and 16).
Round 1 :
Magic ring 6 [6]
Round 2 :
(inc) x 5, sc 1 [11]
Round 3 :
(sc 2, inc) x 3, sc 1, inc [15]
Round 4 :
sc 3, inc, sc 7, inc, sc 3 [17]
Round 5 :
sc 8, dec, sc 7 [16]
Round 6 :
dec, sc 3, dec, sc 4, dec, sc 3 [13]
Round 7 :
dec, sc 1, dec, dec, sc 1, dec [8]
Round 8 :
pr 3: inc, sc 2, inc [6]
Round 12 :
sc 4, inc, sc 5 [11]
Round 13 :
inc, sc 10 [12]
Round 15 :
sc 3, inc, sc 5, inc [14]
Round 17 :
sc 1, inc, sc 6, inc, sc 5 [16]
Round 18 :
sc 6, inc, sc 6, inc, sc 1 [18]
Round 19 :
sc 3, inc, sc 8, inc, sc 5 [20]
Round 20 :
pr 3: sc 18 [18]
Round 21 :
pr 1: sc 8, inc, sc 9 [19]
Round 22 :
pr 1: sc 4, inc, sc 14 [20]
Round 23 :
pr 1: sc 20 [20]
Round 24 :
pr 1: sc 20 [20]
Round 25 :
pr 1: sc 20 [20]
Round 26 :
pr 1: sc 8, dec, sc 10 [19]
Round 27 :
pr 1: sc 12, dec, sc 5 [18]
Round 28 :
pr 1: sc 5, dec, sc 11 [17]
Round 29 :
pr 1: sc 4, dec, sc 5, dec, sc 4 [15]
Round 30 :
pr 1: sc 6, dec, sc 7 [14]
Round 31 :
pr 1: sc 8, dec, sc 4 [13]
Round 32 :
pr 1: sc 3, dec, sc 3, dec, sc 3 [11]
Round 33 :
pr 1: sc 5, dec, sc 4 [10]
Round 34 :
pr 1: sc 2, dec, sc 2, dec, sc 2 [8]
Info :
Once row 20 is reached (first yellow row), you will no longer be fully crocheting in the round; instead work partial rows as described. For rows 20 to 34 start a new strand for every row to maintain stitch texture. After completing row 34 add a clean edge to the entire unfinished edge, pinch the poof together with a yarn segment to achieve the front and back shape, stuff with Poly-fil and attach the poof to the body with the edge tucked under for a rounder shape.
— Finishing & Assembly :
Item Name (P1) :
Position and stitch the three-layer eyes onto the body; stack sclera, iris, and highlight and sew centered on the face as shown in images.
Item Name (P2) :
Attach ears to the top of the head using whipstitch along the base, keeping the interior chained edge hidden and shaped as modeled in the photos.
Item Name (P3) :
Sew the feet to the bottom of the body spaced evenly for stability; if you prefer a sitting pose, place them slightly forward as in the reference image.
Item Name (P4) :
Sew the arms to both sides between the indicated rounds and angle slightly forward for a natural pose, then weave ends and tidy edges.
Info :
Weave in all ends, trim excess, and tuck any joining yarn under so seams are neat. Block gently if desired to shape pieces before attaching.
This charming Jigglypuff amigurumi pattern walks you through every element from the spherical body to the signature poof and layered eyes. The pattern is full of helpful photos and notes to guide you to a polished final toy you can cherish or gift. Happy crocheting and may your new little friend bring lots of smiles! 🧶✨