🧢 Beautiful ✨ Detailed πŸ’ Adorable

Jack Skellington & Sally Amigurumi Pattern

Jack Skellington & Sally Amigurumi Pattern
4.5β˜… Rating
5-7 Hours Time Needed
2.2K Made This
βœ‚οΈ

Intermediate Level

Ideal for those with basic crochet experience, featuring slightly more advanced stitches and techniques to expand your skills.

⏱️

Weekend Treat

Takes 5-7 hours, making it an enjoyable project to finish over a couple of days.

🧸

Cute Companion

An adorable friend to cherish, handcrafted with love to bring comfort and joy for years to come.

About This Jack Skellington & Sally Amigurumi Pattern

This PDF contains complete step-by-step crochet instructions to make Jack Skellington and Sally amigurumi dolls. You will find round-by-round stitch counts for the head, body, arms, legs, eyes, hair and dress. Photo references and assembly tips are included to help you match shaping and placement.

Jack Skellington & Sally Amigurumi Pattern crochet pattern - detailed view of completed project

The patterns use Alize Cotton Gold yarn and a small hook for tight stitches and neat shaping. Techniques include working in the round, color changes, back loop-only rows and simple surface embroidery.

Why You'll Love This Jack Skellington & Sally Amigurumi Pattern

I absolutely love this pattern because it brings two iconic characters to life using simple amigurumi techniques. I enjoy how the colorwork and tiny details let me personalize each doll while keeping the construction straightforward. The patterns are designed so I can finish a character in a few focused sessions and still achieve a polished, durable toy. Sewing the hair and embroidering the faces is my favorite part because it adds personality and makes each piece feel unique.

Jack Skellington & Sally Amigurumi Pattern step 1 - construction progress Jack Skellington & Sally Amigurumi Pattern step 2 - assembly progress Jack Skellington & Sally Amigurumi Pattern step 3 - details and accessories Jack Skellington & Sally Amigurumi Pattern step 4 - final assembly and finishing

Switch Things Up

I love how easy it is to customize these patterns to create new versions of the characters. You can change yarn colors to make alternative outfits or seasonal versionsβ€”try pastel shades for a softer look.

If you want a larger doll, use a bulkier yarn with a larger hook and follow the same stitch counts; the proportions will increase nicely and give you a cuddlier toy.

I often add embroidered scars or tiny accessories like hats, mini pumpkins, or scarves to personalize each doll and create a themed set for display or gifting.

To change expression, adjust eye placement and embroidery slightly: moving eyes closer together or higher up will alter the character's look dramatically.

For more texture in the hair, use different yarn types or braid multiple strands before sewing to the head, or make fewer longer loops for flowing hair instead of many short curls.

If you want posable limbs, add thin wire inside the arms or legs before stuffing, making sure to secure wire ends and cover them thoroughly for safety.

I recommend experimenting with surface crochet to add stitched patch lines or decorative borders to the dress for a more detailed finish.

Try adding tiny accessories like a removable bow, mini buttons, or felt details to the dress for variety and to practice small finishing techniques.

For gift-making, I sometimes make a set of accessories ahead of time (extra bow-ties, hats, or scarves) so recipients can swap looks and you can reuse the base doll pattern.

I love mixing yarn textures and weights for accentsβ€”use a fuzzy yarn for a collar or a cotton thread for tiny embroidered details to make the dolls stand out.

Common Mistakes & How to Fix Them

βœ— Skipping stitch counts or rounds leads to uneven shaping; always count your stitches at the end of each round to stay accurate. βœ— Overstuffing the head or body can distort shaping and make sewing pieces together difficult; stuff gradually and firmly but not excessively. βœ— Not securing color changes will cause loose loops and gaps; weave in ends neatly and hide join tails while changing colors. βœ— Failing to pin parts before sewing creates misaligned features; pin pieces in place and check symmetry before stitching them down.

Jack Skellington & Sally Amigurumi Pattern

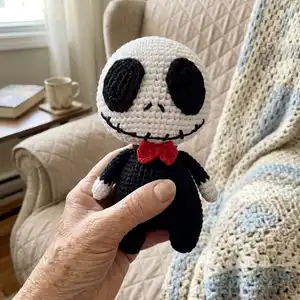
Create charming Jack Skellington and Sally amigurumi toys with complete, photo-supported instructions. This pattern walks you through each round, piece, and assembly step so you can crochet both characters with confidence. Perfect for gifting or adding to your handmade collection, these designs capture the spooky-cute essence of two beloved characters.

Intermediate 5-7 Hours

Materials Needed for Jack Skellington & Sally Amigurumi Pattern

β€” Main Fabric

  • 01
    Alize Cotton Gold 55 (white) for Jack head and details
  • 02
    Alize Cotton Gold 56 (black) for Jack body and eye patches
  • 03
    Alize Cotton Gold 60 (red) for Jack bow-tie (or accent colors)
  • 04
    Alize Cotton Gold 728 (Sally - primary blue)
  • 05
    Alize Cotton Gold 60 (Sally - red hair)
  • 06
    Alize Cotton Gold 16 (Sally - pink)
  • 07
    Alize Cotton Gold 56 (Sally - black)
  • 08
    Alize Cotton Gold 264 (Sally - yellow)
  • 09
    Alize Cotton Gold 110 (Sally - additional color)

β€” Tools Required

  • 01
    Crochet hook size 2.00 mm (or a hook that fits your yarn)
  • 02
    8 mm safety eyes (Sally)
  • 03
    Polyester Fiberfill
  • 04
    Yarn needle for sewing pieces and weaving ends
  • 05
    Scissors
  • 06
    Stitch markers (recommended)

Progress Tracker

0% Complete

β€” Jack Head :

Round 1 :

6 sc in magic ring (6)

Round 2 :

(inc) x6 (12)

Round 3 :

(sc, inc) x6 (18)

Round 4 :

(inc, 2 sc) x6 (24)

Round 5 :

(3 sc, inc) x6 (30)

Round 6 :

2 sc, inc, (4 sc, inc) x5, 2 sc (36)

Round 7 :

(5 sc, inc) x6 (42)

Round 8 :

3 sc, inc, (6 sc, inc) x5, 3 sc (48)

Round 9 :

(7 sc, inc) x6 (54)

Round 10 :

4 sc, inc, (8 sc, inc) x5, 4 sc (60)

Round 11-23 :

sc around (60) (13 rnds)

Round 24 :

(3 sc, dec) x12 (48)

Round 25 :

(2 sc, dec) x12 (36)

Round 26 :

2 sc, dec, (4 sc, dec) x5, 2 sc (30)

Round 27 :

(3 sc, dec) x6 (24)

Info :

Fasten off leaving a long tail for sewing. Stuff the head and set aside for assembly.

β€” Jack Eyes :

Info :

*Sc will be made on both sides of the chain.

Round 1 :

ch6; start in second chain from the hook, inc in this stitch, 3 sc, 3 sc in last st. Continue on the other side of the foundation chain, 3 sc, inc (13)

Round 2 :

sc, inc, 3 sc, (sc, inc) x2, 3 sc, inc (17)

Round 3 :

2 sc, inc, 3 sc, (2 sc, inc) x2, 4 sc, inc (21)

Info :

Make 2 eye patches in black for Jack and sew in position over the face. Embroider mouth and nose details with black yarn as shown in photos.

β€” Jack Leg :

Round 1 :

7 sc in magic ring (7)

Round 2 :

(inc) x7 (14)

Round 3-5 :

sc around (14) *make 2 pieces.

Info :

*After making the first leg, cut the thread. When making the second leg, do not cut the thread and continue to the body.

β€” Jack Body :

Round 6 :

ch4, join the first leg with the sc. Crochet on the first leg: 2 sc, (inc, 5 sc) x2, working on the chain: inc, 2 sc, inc, crochet on the second leg: (5 sc, inc) x2, 2 sc, working on the chain: 4 sc (42)

Round 7 :

(13 sc, inc) x3 (45)

Round 8-12 :

sc around (45) (5 rnds)

Round 13 :

(13 sc, dec) x3 (42)

Round 14-16 :

sc around (42) (3 rnds)

Round 17 :

(5 sc, dec) x6 (36)

Round 18-20 :

sc around (36) (3 rnds)

Round 21 :

(4 sc, dec) x6 (30)

Round 22-24 :

sc around (30)

Round 25 :

(3 sc, dec) x6, slst (24)

Info :

Fasten off and leaving a long tail for sewing. Stuff the body. Sew the Head with the Body.

β€” Jack Arm :

Info :

Use the white yarn for the hand portion then switch to black for the sleeve.

Round 1 :

6 sc in magic ring (6)

Round 2 :

(sc, inc) x3 (9)

Round 3-4 :

sc around (9) (2 rnds)

Info :

*switch to the black yarn for the sleeve.

Round 5-11 :

sc around (9) (7 rnds)

Info :

*I don't fill arms. Make 2 and sew to the body between rounds as shown in photos.

β€” Jack Bow-Tie :

Round 1 :

ch8; hdc in 3rd ch from hook, hdc in each space (6)

Round 2-3 :

ch2, turn, hdc in each stitch

Info :

Sew center and shape into a bow-tie. Attach to the neck after assembly.

β€” Jack Assembly :

Info :

Fasten off leaving long tails for sewing. Pin head to body, sew securely using a yarn needle. Sew legs and arms symmetrically and attach bow-tie. Embroider mouth and nose with black yarn following photo guides.

β€” Sally Head :

Round 1 :

6 sc in magic ring (6)

Round 2 :

(inc) x6 (12)

Round 3 :

(sc, inc) x6 (18)

Round 4 :

(inc, 2 sc) x6 (24)

Round 5 :

(3 sc, inc) x6 (30)

Round 6 :

2 sc, inc, (4 sc, inc) x5, 2 sc (36)

Round 7 :

(5 sc, inc) x6 (42)

Round 8 :

3 sc, inc, (6 sc, inc) x5, 3 sc (48)

Round 9 :

(7 sc, inc) x6 (54)

Round 10 :

4 sc, inc, (8 sc, inc) x5, 4 sc (60)

Round 11-23 :

sc around (60) (13 rnds)

Round 24 :

(3 sc, dec) x12 (48)

Round 25 :

(2 sc, dec) x12 (36)

Round 26 :

2 sc, dec, (4 sc, dec) x5, 2 sc (30)

Round 27 :

(3 sc, dec) x6 (24)

Round 28 :

sc around (24)

Info :

Place the 8mm safety eyes between rounds 18 and 19 leaving 10 sts between them.

β€” Sally Leg :

Round 1 :

7 sc in magic ring (7)

Round 2 :

(inc) x7 (14)

Round 3-5 :

sc around (14) *make 2 pieces.

Info :

*After making the first leg, cut the thread. When making the second leg, do not cut the thread and continue to the body.

β€” Sally Body :

Round 6 :

ch4, join the first leg with the sc. Crochet on the first leg: 2 sc, (inc, 5 sc) x2, working on the chain: inc, 2 sc, inc, crochet on the second leg: (5 sc, inc) x2, 2 sc, working on the chain: 4 sc (42)

Round 7 :

(13 sc, inc) x3 (45)

Round 8-12 :

sc around (45) (5 rnds)

Round 13 :

(13 sc, dec) x3 (42)

Round 14-16 :

sc around (42) (3 rnds)

Round 17 :

(5 sc, dec) x6 (36)

Round 18-20 :

sc around (36) (3 rnds)

Round 21 :

(4 sc, dec) x6 (30)

Round 22-24 :

sc around (30)

Round 25 :

(3 sc, dec) x6, slst (24)

Info :

*Fasten off and leaving a long tail for sewing. Stuff the body. Sew the Head with the Body.

β€” Sally Arm :

Round 1 :

6 sc in magic ring (6)

Round 2 :

(sc, inc) x3 (9)

Round 3-11 :

sc around (9) (9 rnds)

Info :

*I don't fill arms. Make 2 and attach to the body in the desired position.

β€” Sally Dress :

Info :

Start with the color pink; Ch14, add yellow color; ch15. Starting from the second chain, follow rounds below with color changes as indicated.

Round 1 :

yellow; (sc, inc) x7, pink; (sc, inc) x7 (42), turn

Round 2 :

ch1, pink; 21 sc, yellow; 21 sc (42), turn

Round 3 :

ch1, yellow; 7 sc, ch6, skip 6sc, 8 sc, pink; 8 sc, ch6, skip 6 sc, 7 sc, turn

Round 4 :

ch7, pink; 21 sc, yellow; 21 sc (42), turn

Round 5 :

ch1, yellow; 13 sc, blue; 8 sc, pink; 4 sc, black; 17 sc (42), turn

Round 6 :

ch1, black; 9 sc, (inc) x2, 10 sc, blue; 10 sc, (inc) x2, 9 sc (46), turn

Round 7 :

ch1, blue; 23 sc, black; 23 sc (46), turn

Round 8 :

ch1, black; 10 sc, (inc) x2, 11 sc, blue; 11 sc, (inc) x2, 10 sc (50), turn

Round 9 :

ch1, blue; 25 sc, black; 25 sc (50), turn

Round 10 :

ch1, black; 11 sc, (inc) x2, 12 sc, blue; 12 sc, (inc) x2, 11 sc (54), turn

Round 11 :

ch1, blue; 26 sc, black; 22 sc, yellow; 6 sc (54), turn

Round 12 :

ch1, yellow; 8 sc, black; 5 sc, (inc) x2, 15 sc, blue; 10 sc, (inc) x2, 12 sc (58), turn

Round 13 :

ch1, blue; 24 sc, black; 23 sc, yellow; 11 sc (58), turn

Round 14 :

ch7, yellow; 13 sc, black; 15 sc, (inc) x3, 5 sc, pink; 22 sc (61)

Round 15 :

ch1, pink; 20 sc, black; 23 sc, yellow; 18 sc (61), turn

Round 16 :

ch1, yellow; 21 sc, black; 16 sc, pink; 24 sc (61), turn

Round 17 :

ch1, pink; 27 sc, black; 9 sc, yellow; 25 sc (61), turn

Round 18 :

ch1, yellow; 30 sc, pink; 31 sc (61), turn

Round 19 :

ch1, pink; 31 sc, yellow; 30 sc (61)

Info :

Cut the yarn and hide ends. Sew dress onto body as shown in photos to achieve patchwork effect.

β€” Sally Hair :

Round 1 :

6 sc in magic ring (6)

Round 2 :

(inc) x6 (12)

Round 3 :

BLO (sc, inc) x6 (18)

Round 4 :

BLO (2 sc, inc) x6 (24)

Round 5 :

ch34, Starting from the third; 32 Hdc, 1sc skip, slst. Repeat this process 28 times. Hair in all loops with BLO in this way. If you want to do less, you can. If you want to make more, do it without skipping stitches. Then sew as in the photo.

Info :

*Fasten off and leaving a long tail for sewing.

Info :

Make curled hair pieces by crocheting narrow spirals (see photos), then pin and sew them to the head to match the reference images.

β€” Final Notes :

Info :

Your Jack Skellington and Sally are complete after assembly and final embroidery. Happy Crocheting!

Assembly Instructions

  • Fasten off and leaving a long tail for sewing; stuff the body and head, then position the head on the body and sew securely with a yarn needle using a whipstitch or ladder stitch.
  • When making the legs, cut the thread after the first leg; for the second leg do not cut the thread and continue to join the body (round 6) so the legs are attached seamlessly.
  • Position arms on either side of the body and sew them in place with a yarn needle, aligning them symmetrically and angling slightly for a natural pose; pin before sewing to check placement.
  • Sew eye patches (Jack) or attach safety eyes (Sally) in the positions indicated: Sally eyes between rounds 18 and 19 with 10 sts between; Jack eye patches should be sewn and secured before embroidering the mouth.
  • Attach hair and bow-tie last: pin curled hair pieces or stitched hair rows in place and sew securely; attach bow-tie at the neck and embroider final facial details with black yarn.

Important Notes

  • πŸ’‘Use a small hook (2.00 mm) and tight tension for neat, firm amigurumi fabric so stuffing does not show through.
  • πŸ’‘Use stitch markers to mark the beginning of each round and to keep track when working many rounds.
  • πŸ’‘Stuff gradually and evenly; overstuffing can distort shape while under-stuffing will flatten sections.
  • πŸ’‘Pin parts in place before sewing to ensure correct positioning and symmetry, especially eye patches and hair pieces.
  • πŸ’‘Weave and hide ends as you go to keep the finish tidy and avoid long tails to deal with at the end.

This pattern bundle includes Jack Skellington and Sally amigurumi designs with full round-by-round instructions and photo guidance. Whether you love spooky-cute decor or collectible handmade toys, these patterns are perfect for making memorable gifts. Happy stitching and enjoy bringing these characters to life! 🧢🧡

You ask,

we answer.

FAQs

What size will the finished piece be?

The finished amigurumi measures approximately 12-18 cm tall depending on yarn and hook size used; using the recommended Alize Cotton Gold and 2.00 mm hook yields a small collectible doll.

Can I use different yarn weights for this pattern?

Yes, you can use different yarn weights, but the final size will change. Use an appropriate hook for your chosen yarn and expect changes to stitch counts and proportions.

Do I need prior crochet experience for this pattern?

This pattern is rated intermediate because it uses working-in-the-round, color changes, BLO rows and assembly of many small pieces; basic amigurumi experience is recommended.

How long does this project typically take to complete?

Most crocheters complete one character in about 5-7 hours, depending on experience and how much time you spend on hair and embroidered details.

Where should I place the safety eyes for Sally?

Place the 8 mm safety eyes between rounds 18 and 19 leaving 10 stitches between them, as stated in the head section of Sally's pattern.