🧶 Beautiful ✨ Detailed 💝 Adorable

Jack Skellington Amigurumi Pattern

Jack Skellington Amigurumi Pattern
4.7★ Rating
5-7 Hours Time Needed
3.4K Made This
✂️

Intermediate Level

Ideal for those with basic crochet experience, featuring slightly more advanced stitches and techniques to expand your skills.

⏱️

Weekend Treat

Takes 5-7 hours, making it an enjoyable project to finish over a couple of days.

🧸

Cute Companion

An adorable friend to cherish, handcrafted with love to bring comfort and joy for years to come.

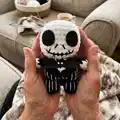
About This Jack Skellington Amigurumi Pattern

This pattern creates a small Jack Skellington amigurumi inspired by a beloved movie character. It uses chenille yarn for a plush texture and cotton/acrylic for suit details and stripes. You will crochet the head, body (legs combined), arms, and decorative jacket pieces with clear rounds and color changes. The pattern includes sewing and finishing notes to assemble the doll neatly.

Jack Skellington Amigurumi Pattern crochet pattern - detailed view of completed project

Ideal for an intermediate crocheter comfortable with color changes and shaping. Complete step-by-step rounds make it easy to follow and finish.

Why You'll Love This Jack Skellington Amigurumi Pattern

I absolutely love this pattern because it captures the character's iconic look with simple motifs and high-impact contrast. I enjoy working with chenille yarn for the soft, plush head that gives the doll a cuddly feel. The black-and-white striped suit details let me practice neat color changes and embroidery for a polished finish. I find the papillon bow a fun little finishing touch that brings the whole piece to life.

Jack Skellington Amigurumi Pattern step 1 - construction progress Jack Skellington Amigurumi Pattern step 2 - assembly progress Jack Skellington Amigurumi Pattern step 3 - details and accessories Jack Skellington Amigurumi Pattern step 4 - final assembly and finishing

Switch Things Up

I love customizing this pattern by changing yarn textures; try velvet yarn for a plush, luxe feel or standard acrylic for a firmer finish.

I often swap the chenille head for a sport-weight yarn with a smaller hook to create a mini keychain version.

I like to experiment with eye materials: cut felt for a flat look or safety eyes for more depth (if appropriate for the recipient).

Try colorful stripes instead of black-and-white for a whimsical twist that still follows the same stitch counts.

I sometimes embroider a smile or mouth differently to give each doll a unique personality—try different placements before committing.

Adding wire inside the arms can make them poseable; insert thin craft wire before final stuffing for a bendable finish.

Swap the papillon bow material to leather, felt, or crocheted fabric for varied textures and stronger detail.

Make a family set by adjusting yarn weight and hook size to produce small, medium, and large versions as gifts.

I recommend practicing the jacket spikes on scrap yarn first to perfect size and spacing, then sew them on for guaranteed alignment.

Finally, try adding tiny accessories like a miniature top hat or a stitched collar for seasonal variations or themed displays.

Common Mistakes & How to Fix Them

✗ Changing colors without securing ends properly can cause loose threads; weave in ends and carry yarn neatly to avoid bulk and visible joins. ✗ Forgetting to mark rounds during shaping leads to counting errors; place a stitch marker at the start of each round and move it as you crochet. ✗ Overstuffing or understuffing the head will distort the shape; stuff gradually and check the round profile often to achieve a nicely rounded head. ✗ Not keeping tension consistent between chenille and cotton yarns creates uneven stitches; practice maintaining the same tension and adjust hook size if needed.

Jack Skellington Amigurumi Pattern

Make your own spooky-cute Jack Skellington amigurumi with this complete crochet pattern. This project combines plush chenille yarn with cotton details for a striking black-and-white finish. Follow step-by-step rounds, clear materials, and finishing notes to crochet a rounded head, striped suit, and signature papillon bow. Perfect for fans of Nightmare Before Christmas who want a handmade collectible.

Intermediate 5-7 Hours

Materials Needed for Jack Skellington Amigurumi Pattern

— Main Fabric

  • 01
    Hook: 5mm (listed with materials)
  • 02
    Black chenille size 4 medium
  • 03
    White chenille size 4 medium
  • 04
    black cotton/acrylic yarn (for suit stripes and details)
  • 05
    white cotton/acrylic yarn (for suit stripes and details)
  • 06
    Black felt (for eyes and papillon)
  • 07
    white felt (for papillon accents)
  • 08
    Stuffing (polyester fiber fill)

— Tools Required

  • 01
    Crochet hook size 5mm
  • 02
    Tapestry needle
  • 03
    Stitch markers
  • 04
    Scissors
  • 05
    hot/super glue

Progress Tracker

0% Complete

— Head :

Info :

Use white yarn

Round 1 :

8sc in a mr (8)

Round 2 :

8inc (16)

Round 3 :

(sc, inc)x8 (24)

Round 4 :

(3sc, inc)x6 (30)

Round 5 :

(2sc, inc, 2sc)x6 (36)

Round 6-10 :

36sc (36) – 5 rounds

Round 11 :

(4sc, dec)x6 (30)

Round 12 :

(3sc, dec)x6 (24)

Round 13 :

(4sc, dec)x4 (20)

Info :

Cut yarn, FO with invisible join. Add fiber fill (stuff a lot to get rounded shape).

— Body :

Item Name (Body pt.1) :

Start with black yarn R1: 5sc in a mr (5) R2: 5inc (10) R3: BLO 10sc (10) R4-5: 10sc (10) – 2 rounds Cut yarn and FO with an invisible join. Make another leg but this time don’t cut yarn and ch2 (pic 1).

Round 6 :

Insert the hook in any of the first leg st (pic 2) and make 10sc, 2sc in the 2ch, 10sc, 2sc in the 2ch (24)

Item Name (Body pt.2) :

R7: (3sc, inc)x2, 6sc, inc, 3sc, inc, 5sc (28)

Round 8 :

BLO 28sc (28)

Round 9 :

28sc (28)

Round 10 :

13sc, cc to white 2sc, cc to black 13sc (28)

Round 11 :

12sc, cc to white 4sc, cc to black 12sc (28)

Round 12 :

(3sc, dec)x2, sc, cc to white 2sc, dec, 2sc, cc to black, sc, dec, 3sc, dec, 3sc (23)

Info :

Start stuffing as you go, when you stuff the feet remember to keep them flat

Round 13 :

4sc, dec, 3sc, cc to white sc, dec, 2sc, cc to black 2sc, dec, 5sc (20)

Info :

Finish stuffing. Cut yarn leaving a long tail for sewing (pic 3).

Info :

Don’t worry if the color change isn’t neat, you are going to cover that part by making the jacket’s front hem

— Arms :

Info :

Arms (x2) Start using white yarn

Round 1 :

4sc in a mr (4)

Round 2 :

4inc (8)

Round 3-5 :

cc to black 8sc (8) – 3 rounds

Round 6 :

fold the arm and close it making 4sc (4) Cut yarn leaving a long tail (pic 4).

— Jacket\'s front hem :

Round 1 :

Start using black yarn R1: slip knot, ch6, starting from the 2nd ch from the hook make: 1sc, 1hdc, ch 2, in the back of the 2nd ch from the hook make 1sc (pics 6-8), sc in the next 3sts. Cut yarn leaving a ling tail for sewing (pic 5).

— Jacket\'s back hem :

Info :

Count 8 BLO sts (made in R8) in the back of the body (you can mark the first and last sts with a stitch marker).

Round 1 :

Insert hook in the BLO st of R8 and ch5 (the first ch doesn’t count as a st), sl st in the 2nd ch from the hook and make 2sc in the next 2sts.

Round 2 :

sl st in the next st, ch5, sl st in the 2nd ch from the hook and make 3sc in the next 3sts

Round 3 :

sl st in the next st, ch4, sl st in the 2nd ch from the hook and make 2sc in the next 2sts

Info :

Repeat R2 and R3 until you have 7 spikes (you should end with a short one of R3). Cut yarn and FO (pic 9).

— Assembly :

Info :

Sewing • Sew the head to the body, add fiber fill while Sewing if needed • Sew the arms to the body at R12-13 • Cut 2 black felt circles using pic 10 as reference and glue them on R7-9

Info :

Note that the size may vary according to the yarn you are using

Info :

Body details • Sew the jacket’s front hem following the outline of the white Stitches • With white cotton/acrylic yarn sew the suit’s stripes: sew the legs’ part and the upper part separately • Cut black and white felt to make the papillon like pic

Info :

Congrats! You’ve finished your Jack Skellington

Assembly Instructions

  • Sew the head to the body, add fiber fill while sewing if needed to maintain the rounded head shape.
  • Sew the arms to the body at rounds R12-13, positioning them evenly on each side and securing with whipstitch.
  • Attach the jacket's front hem to the front outline of the white stitches to hide color changes and secure with small stitches.
  • Glue or sew two black felt circles (approx. 2.5cm) onto the head between R7-R9 for the eyes, using pic 10 as a size guide.
  • Sew the suit stripes using white cotton/acrylic yarn: sew the legs part and the upper part separately, then join cleanly.

Important Notes

  • 💡Use stitch markers to keep track of your rounds, especially marking the BLO stitches made in R8 for jacket attachment.
  • 💡Stuff firmly but not too tightly for the best shape and structure; stuff the head more to get a rounded shape and keep feet flat.
  • 💡Cut felt circles about 2.5cm diameter for the eyes as a visual reference and glue them securely, adjusting size to your yarn.

This Jack Skellington amigurumi pattern brings a spooky-fun character to your handmade collection with soft chenille texture and crisp black-and-white details. The project balances plush shape-making with playful suit decorations to create a memorable little doll you can proudly display. Happy crocheting and enjoy creating your own Nightmare Before Christmas keepsake! 🖤🎃

You ask,

we answer.

FAQs

What size will the finished piece be?

The finished amigurumi size will vary with your chosen yarn, but using medium chenille and a 5mm hook will produce a small handheld doll approximately 12-18 cm tall depending on stuffing and finishing.

Can I use different yarn weights for this pattern?

Yes, you can substitute yarn weights, but the final size and texture will change; adjust your hook accordingly and test gauge by making the head to check proportions.

Do I need prior crochet experience for this pattern?

This pattern is rated intermediate, so basic amigurumi skills like working in the round, increasing, decreasing, and simple color changes are recommended.

How long does this project typically take to complete?

Most crocheters complete this project in 5-7 hours, though time will vary based on experience, yarn handling, and the level of finishing detail you add.